# StarLine A90 # User manual # Safety Measures for Operating the Security System

Please read carefully!

Before operating the security system, carefully read this manual and pay special attention to sections marked with an exclamation point [![Screenshot 2023-11-28 163123.png](/uploads/images/gallery/2023-11/scaled-1680-/screenshot-2023-11-28-163123.png)](/uploads/images/gallery/2023-11/screenshot-2023-11-28-163123.png). To determine if this security system is suitable for your vehicle, refer to the vehicle manufacturer's requirements and operating instructions. If you are unsure whether this security system is suitable for installation in your vehicle, return it to the seller within 14 days of purchase. The security system is a complex technical device that requires connection to the vehicle's circuits associated with the engine operation. Installation of the security system should only be performed by specially trained qualified professionals. Mounting, programming, servicing, repairing, and disassembling/reassembling of the security system are prohibited for individuals who are not qualified specialists and have not undergone training and knowledge verification on safety procedures. When programming the security system parameters, the set parameters must not contradict the requirements of the vehicle's operating instructions. The user is fully responsible for any damage caused to individuals, animals, or property resulting from using the security system for purposes other than its intended use or in violation of the safety requirements outlined in this manual. The manufacturer is not liable for losses and accidents caused by failure to comply with the safety rules and requirements outlined in this manual. To avoid misunderstandings, keep the documents provided with the security system upon purchase. Verify the completion of the warranty card, including the sale date and seller's stamp. If there is no sale (purchase) date, the warranty period is calculated from the date of manufacture of the security system. The service life of the security system is 5 years provided that the product is installed and operated in accordance with the operating instructions, installation guidelines, and wiring diagram. If your security system includes a key fob or wireless tag: - Do not carry the key fob or tag on the same keychain with your car keys. - When handing over your vehicle for servicing or washing, always switch the security system to service mode. Do not pass the tags or key fobs to third parties to prevent unauthorized access to security functions. - Do not leave key fobs or tags in places accessible to children or animals. - Avoid exposing the key fobs to liquids. - If the key fob's display shows a low battery warning icon, take timely action to replace the battery. - Store a spare battery in the vehicle in its original packaging.

The full electronic version of the instruction manual is available on the website help.starline.ru.

### Mandatory Safety Measures When Using the Engine Start Function: It is important to remember that a vehicle is a potential hazard. Section 12.8 of the traffic rules states: "The driver may leave their place or leave the vehicle if necessary measures are taken to prevent the vehicle from moving spontaneously or being used in the absence of the driver." Before using the security system, carefully familiarize yourself with the safe use measures for remote or automatic engine start functions outlined below: - Always park the vehicle in an open, well-ventilated area. - Always engage the parking brake, which must be in good working condition and prevent the vehicle from moving. - When leaving the vehicle, be sure to set the automatic transmission lever to "PARK" and the manual transmission lever to neutral. - If your vehicle has a manual transmission, perform the engine start preparation procedure called "programmed neutral" before activating the remote or automatic engine start function. - Never hand over security system key fobs to children or others without prior knowledge of the operating instructions. Before activating the remote or automatic engine start function: - Ensure the vehicle is in good condition. - Ensure there is sufficient fuel, oil, coolant, etc. - Set the heater, air conditioner, defroster, and other accessories to the required levels. - Set the cabin air circulation to improve heating or cooling efficiency. ### Safety Measures When Charging Your Vehicle's Battery Keep in mind that any battery charging process involves supplying a voltage higher than the nominal 12V to the battery and, consequently, to the vehicle's electrical system. This can damage the vehicle's electronic equipment and any additional equipment installed on your vehicle. - Do not use battery chargers or jump-start devices to charge the battery directly on the vehicle without disconnecting the battery terminals from the vehicle's electrical system in the following modes: - High-current rapid charging modes ("boost" modes or similar). - Various START modes designed for engine starting. - 24V battery charging modes. - Do not use jump-start devices to start the engine without a connected battery or with a faulty battery (such as short circuits in cells, plate damage, etc.). - Avoid using faulty battery chargers, 24V chargers, or devices not intended for battery charging, such as welding inverters. All of the above devices and modes can lead to uncontrolled delivery of high voltage (up to 25V to 60V) to the vehicle's electrical system, potentially damaging the electronic components of the security system and the vehicle's equipment. Using jump-starting methods to charge the battery is not recommended. Even described "safe" jump-start methods are only safe for the donor vehicle. Connecting and disconnecting a fully discharged or faulty battery on your vehicle with the engine running can damage your vehicle's electronic devices and security system due to voltage spikes caused by connecting and disconnecting the battery. In the event of using the aforementioned devices and modes, the responsibility for damage to electronic equipment lies with the vehicle owner.

Follow safe battery charging procedures!

Before charging, the battery terminals must be disconnected from the vehicle's electrical system. Only then can you begin the battery charging process. After charging, reconnect the battery to the vehicle's electrical system. This necessity arises because without measuring devices, you cannot determine the condition, state, or reason for battery discharge (such as internal short circuits or breaks). Connecting a charging device to a faulty battery poses a risk of damaging the vehicle's electronic equipment and security system due to increased voltage. # General Description The **StarLine A90, Starline A60** security-telematics complexes (hereinafter referred to as the complex) are designed to protect motor vehicles from theft and armed attacks. The complex is controlled using a remote key. ### Key Features
- Built-in audible notifier for convenient owner notification. - "Slave" mode operation (arming or disarming the security mode with the vehicle's factory key fob). - Additional owner authorization via wireless tag, smartphone (availability depends on the complex configuration), or secret code entry using factory buttons. - StarLine control dialogue code with individual 128-bit encryption keys, ensuring reliable protection against all known code grabbers. - Remote and automatic engine control (A90). - Remote control of engine preheating devices. - Bypassing the factory immobilizer using a factory immobilizer disable module (analog connection). - Service button combined with an LED system status indicator. - Universal reassignable inputs/outputs. - Special [StarLine Master](/books/starline-master-Xh6) application allowing for individual complex customization based on owner preferences and vehicle features, and firmware updates.
### Pin Envelope [![pinEnvelope.jpg](/uploads/images/gallery/2023-11/scaled-1680-/pinenvelope.jpg)](/uploads/images/gallery/2023-11/pinenvelope.jpg) The supply kit includes a pin envelope with the following information: - Service Code: Used for configuring the complex using the [StarLine Master](/books/starline-master-Xh6) application. - Emergency Disarm Code: Intended for emergency deactivation of the security system.

Do not disclose the Emergency Disarm Code to anyone! Remember that knowing the Emergency Disarm Code, an intruder could deactivate the protective functions.

# Technical Specifications
ParameterValue
Remote Key Operating Frequency868.7–869.2 MHz
Remote Key Control RangeUp to 1500 meters
Notification Range on Remote KeyUp to 2000 meters
Interfaces- 1 Universal StarLine Bus - 1 USB - 23 Configurable Channels which can be used as: - 11 Outputs (0.2 A) - 1 Output (2 A) - 3 Positive Inputs - 3 Negative Inputs - 1 Universal Input - Temperature Sensor Connector - Service Button Connector - Microphone Connector
Input Voltage Range8–16 V
Power Consumption8.7 mA
Operating Temperature Range-40°C to +85°C
Main Unit Dimensions130 x 60 x 22 mm
Weight95 grams
# Light and sound indication The security complex provides various options for indicating modes such as "Disarmed", "Armed", and "Alarm": - **Hidden**: Light and sound indicators are disabled. - **Silent**: Only light indicators are enabled. - **Sound**: Only sound indicators are enabled. - **Full**: Both light and sound indicators are enabled.

The default setting includes sound notifications with sirens and emergency light signals. The indicator mode is configured by the installation specialist during complex setup.

### Indicator table The security complex informs about its status by means of sound (horn) and light signals (turn signals): - ![icon-short.png](/uploads/images/gallery/2023-11/icon-short.png ".indicationfull v2.20.3 > icon-short.png") — short signal; - ![icon-long.png](/uploads/images/gallery/2023-11/icon-long.png ".indicationfull v2.20.3 > icon-long.png") — long signal.
EventLight signalsHorn
Security activation
![icon-short.png](/uploads/images/gallery/2023-11/icon-short.png ".indicationfull v2.20.3 > icon-short.png")
Security activation with security zone breach
![icon-short.png](/uploads/images/gallery/2023-11/icon-short.png ".indicationfull v2.20.3 > icon-short.png") ![icon-short.png](/uploads/images/gallery/2023-11/icon-short.png ".indicationfull v2.20.3 > icon-short.png") ![icon-short.png](/uploads/images/gallery/2023-11/icon-short.png ".indicationfull v2.20.3 > icon-short.png") ![icon-short.png](/uploads/images/gallery/2023-11/icon-short.png ".indicationfull v2.20.3 > icon-short.png")
Security deactivation
![icon-short.png](/uploads/images/gallery/2023-11/icon-short.png ".indicationfull v2.20.3 > icon-short.png") ![icon-short.png](/uploads/images/gallery/2023-11/icon-short.png ".indicationfull v2.20.3 > icon-short.png")
Security deactivation (one of the zones was violated in the security cycle)
![icon-short.png](/uploads/images/gallery/2023-11/icon-short.png ".indicationfull v2.20.3 > icon-short.png") ![icon-short.png](/uploads/images/gallery/2023-11/icon-short.png ".indicationfull v2.20.3 > icon-short.png") ![icon-short.png](/uploads/images/gallery/2023-11/icon-short.png ".indicationfull v2.20.3 > icon-short.png")
[![icon-short.png](/uploads/images/gallery/2023-11/scaled-1680-/icon-short.png)](/uploads/images/gallery/2023-11/icon-short.png) [![icon-short.png](/uploads/images/gallery/2023-11/scaled-1680-/icon-short.png)](/uploads/images/gallery/2023-11/icon-short.png) [![icon-short.png](/uploads/images/gallery/2023-11/scaled-1680-/icon-short.png)](/uploads/images/gallery/2023-11/icon-short.png)
Alarm30 s 30 s
Warning level alarm
![icon-short.png](/uploads/images/gallery/2023-11/icon-short.png ".indicationfull v2.20.3 > icon-short.png") ![icon-short.png](/uploads/images/gallery/2023-11/icon-short.png ".indicationfull v2.20.3 > icon-short.png") ![icon-short.png](/uploads/images/gallery/2023-11/icon-short.png ".indicationfull v2.20.3 > icon-short.png") ![icon-short.png](/uploads/images/gallery/2023-11/icon-short.png ".indicationfull v2.20.3 > icon-short.png") ![icon-short.png](/uploads/images/gallery/2023-11/icon-short.png ".indicationfull v2.20.3 > icon-short.png") ![icon-short.png](/uploads/images/gallery/2023-11/icon-short.png ".indicationfull v2.20.3 > icon-short.png")
![icon-short.png](/uploads/images/gallery/2023-11/icon-short.png ".indicationfull v2.20.3 > icon-short.png") ![icon-short.png](/uploads/images/gallery/2023-11/icon-short.png ".indicationfull v2.20.3 > icon-short.png") ![icon-short.png](/uploads/images/gallery/2023-11/icon-short.png ".indicationfull v2.20.3 > icon-short.png")
Panic10 s10 s
Trunk opening[![icon-short.png](/uploads/images/gallery/2023-11/scaled-1680-/icon-short.png)](/uploads/images/gallery/2023-11/icon-short.png)[![icon-short.png](/uploads/images/gallery/2023-11/scaled-1680-/icon-short.png)](/uploads/images/gallery/2023-11/icon-short.png)
Exit from service mode
![icon-short.png](/uploads/images/gallery/2023-11/icon-short.png ".indicationfull v2.20.3 > icon-short.png") ![icon-short.png](/uploads/images/gallery/2023-11/icon-short.png ".indicationfull v2.20.3 > icon-short.png")
### LED Indicator
System StateLED Indicator
DisarmedNot lit
Disarmed with ignition and one zone violation (door, hood, trunk)Once every 5 seconds
ArmedOnce per second
Engine RunningConstantly lit
Service ModeNot lit
"Trip Prohibition" Function EnabledNot lit
Anti-hijacking Mode Enabled10 times per second
Incorrect Emergency Disarm Code EnteredFour times
Emergency Disarm Code Entry Blocked for 15 minutesFive times
Correct Emergency Disarm Code EnteredTwice
### Sound Indicator
EventSound Indicator
Waiting for Authorization10 seconds
Successful Owner Authorization Code Input[![icon-short.png](/uploads/images/gallery/2023-11/scaled-1680-/icon-short.png)](/uploads/images/gallery/2023-11/icon-short.png) [![icon-short.png](/uploads/images/gallery/2023-11/scaled-1680-/icon-short.png)](/uploads/images/gallery/2023-11/icon-short.png)
Incorrect Owner Authorization Code Input[![icon-short.png](/uploads/images/gallery/2023-11/scaled-1680-/icon-short.png)](/uploads/images/gallery/2023-11/icon-short.png) [![icon-short.png](/uploads/images/gallery/2023-11/scaled-1680-/icon-short.png)](/uploads/images/gallery/2023-11/icon-short.png) [![icon-short.png](/uploads/images/gallery/2023-11/scaled-1680-/icon-short.png)](/uploads/images/gallery/2023-11/icon-short.png) [![icon-short.png](/uploads/images/gallery/2023-11/scaled-1680-/icon-short.png)](/uploads/images/gallery/2023-11/icon-short.png)
# Controlling the system using a remote key ### Remote Keys The complex's memory can be programmed with two types of remote keys: 1. **Remote key with LCD (liquid crystal display). [![image.png](/uploads/images/gallery/2024-02/scaled-1680-/dmgimage.png) ](/uploads/images/gallery/2024-02/dmgimage.png) **[![image.png](/uploads/images/gallery/2024-02/scaled-1680-/xGqimage.png)](/uploads/images/gallery/2024-02/xGqimage.png)** The remote key with LCD uses a AAA 1.5 V battery. The battery life of the remote key with LCD is up to 6 months depending on operating conditions. 2. **Additional remote key.** ![a96-led-remote.jpg](/uploads/images/gallery/2023-11/a96-led-remote.jpg "Документация StarLine > _Управление_комплексом_с_помощью_брелока_E96_E96v2 > a96-led-remote.jpg") The additional remote key uses a CR2032 3 V battery. The battery life of the additional remote key is up to 1 year depending on operating conditions.

The presence of an additional remote key depends on the configuration of the security system.

The main and additional remote keys are equivalent in cryptographic resistance. Both remote keys use a dialogue algorithm for data exchange, excluding intelligent electronic hacking. Information about the current state of the security complex is transmitted to the main remote key and displayed on the screen. The additional remote key does not have notification functions; it is intended only for transmitting basic control commands. ### Meaning of icons on the remote key #### Engine Start
IconMeaning
![Двигатель запущен.jpg](/uploads/images/gallery/2023-11/dvigatel-zapushhen.jpg "Документация StarLine > _Управление_комплексом_с_помощью_брелока_E96_E96v2 > Двигатель запущен.jpg") Engine is running
![Включен автоматический запуск по будильнику.jpg](/uploads/images/gallery/2023-11/vkliucen-avtomaticeskii-zapusk-po-budilniku.jpg "Документация StarLine > _Управление_комплексом_с_помощью_брелока_E96_E96v2 > Включен автоматический запуск по будильнику.jpg") Automatic start by alarm is activated
![Включен автоматический периодический запуск.jpg](/uploads/images/gallery/2023-11/vkliucen-avtomaticeskii-periodiceskii-zapusk.jpg "Документация StarLine > _Управление_комплексом_с_помощью_брелока_E96_E96v2 > Включен автоматический периодический запуск.jpg") Automatic periodic start is activated
![Включен автоматический запуск по температуре.png](/uploads/images/gallery/2023-11/vkliucen-avtomaticeskii-zapusk-po-temperature.png "Документация StarLine > _Управление_комплексом_с_помощью_брелока_E96_E96v2 > Включен автоматический запуск по температуре.png") Automatic start by temperature is activated
![Включен автоматический запуск по падению напряжения АКБ.png](/uploads/images/gallery/2023-11/vkliucen-avtomaticeskii-zapusk-po-padeniiu-napriazeniia-akb.png "Документация StarLine > _Управление_комплексом_с_помощью_брелока_E96_E96v2 > Включен автоматический запуск по падению напряжения АКБ.png") Automatic start by battery voltage drop is activated
![Выполнена программная нейтраль.png](/uploads/images/gallery/2023-11/vypolnena-programmnaia-neitral.png "Документация StarLine > _Управление_комплексом_с_помощью_брелока_E96_E96v2 > Выполнена программная нейтраль.png") Programmed neutral is executed
![Включен подогрев двигателя (мигает).png](/uploads/images/gallery/2023-11/vkliucen-podogrev-dvigatelia-migaet.png "Документация StarLine > _Управление_комплексом_с_помощью_брелока_E96_E96v2 > Включен подогрев двигателя (мигает).png") Engine heating is activated (blinking)
#### Operating Modes
IconMeaning
![Автомобиль под охраной_2.png](/uploads/images/gallery/2023-11/avtomobil-pod-oxranoi-2.png "Документация StarLine > _Управление_комплексом_с_помощью_брелока_E96_E96v2 > Автомобиль под охраной_2.png") Security on
![Режим «Свободные руки».png](/uploads/images/gallery/2023-11/rezim-svobodnye-ruki.png "Документация StarLine > _Управление_комплексом_с_помощью_брелока_E96_E96v2 > Режим «Свободные руки».png") "Hands-Free" mode
![Сервисный режим.png](/uploads/images/gallery/2023-11/servisnyi-rezim.png "Документация StarLine > _Управление_комплексом_с_помощью_брелока_E96_E96v2 > Сервисный режим.png") Service mode
![Режим настроек и программирования.png](/uploads/images/gallery/2023-11/rezim-nastroek-i-programmirovaniia.png "Документация StarLine > _Управление_комплексом_с_помощью_брелока_E96_E96v2 > Режим настроек и программирования.png") Settings and programming mode
![Блокировка кнопок брелока.png](/uploads/images/gallery/2023-11/blokirovka-knopok-breloka.png "Документация StarLine > _Управление_комплексом_с_помощью_брелока_E96_E96v2 > Блокировка кнопок брелока.png") Remote key button lock
![Режим «Антиограбление».png](/uploads/images/gallery/2023-11/rezim-antiograblenie.png "Документация StarLine > _Управление_комплексом_с_помощью_брелока_E96_E96v2 > Режим «Антиограбление».png") "Anti hijack" mode
#### Security zones
IconMeaning
![Включено зажигание.png](/uploads/images/gallery/2023-11/vkliuceno-zaziganie.png "Документация StarLine > _Управление_комплексом_с_помощью_брелока_E96_E96v2 > Включено зажигание.png") Ignition is on
![Затянут стояночный тормоз.png](/uploads/images/gallery/2023-11/zatianut-stoianocnyi-tormoz.png "Документация StarLine > _Управление_комплексом_с_помощью_брелока_E96_E96v2 > Затянут стояночный тормоз.png") Parking brake is engaged
![открыт капот.png](/uploads/images/gallery/2023-11/otkryt-kapot.png "Документация StarLine > _Управление_комплексом_с_помощью_брелока_E96_E96v2 > открыт капот.png") Hood is open
![Открыта дверь.png](/uploads/images/gallery/2023-11/otkryta-dver.png "Документация StarLine > _Управление_комплексом_с_помощью_брелока_E96_E96v2 > Открыта дверь.png") Door is open
![Открыт багажник.png](/uploads/images/gallery/2023-11/otkryt-bagaznik.png "Документация StarLine > _Управление_комплексом_с_помощью_брелока_E96_E96v2 > Открыт багажник.png") Trunk is open
#### Sensors
IconMeaning
![Сработал датчик наклона или движения.png](/uploads/images/gallery/2023-11/srabotal-datcik-naklona-ili-dvizeniia.png "Документация StarLine > _Управление_комплексом_с_помощью_брелока_E96_E96v2 > Сработал датчик наклона или движения.png") Tilt or motion sensor activated
![Сработал дополнительный датчик 1.png](/uploads/images/gallery/2023-11/srabotal-dopolnitelnyi-datcik-1.png "Документация StarLine > _Управление_комплексом_с_помощью_брелока_E96_E96v2 > Сработал дополнительный датчик 1.png") Additional sensor 1 activated
![Сработал дополнительный датчик 2.png](/uploads/images/gallery/2023-11/srabotal-dopolnitelnyi-datcik-2.png "Документация StarLine > _Управление_комплексом_с_помощью_брелока_E96_E96v2 > Сработал дополнительный датчик 2.png") Additional sensor 2 activated
![Сработал датчик наклона.png](/uploads/images/gallery/2023-11/srabotal-datcik-naklona.png "Документация StarLine > _Управление_комплексом_с_помощью_брелока_E96_E96v2 > Сработал датчик наклона.png") Tilt sensor activated
![Сработал датчик движения.png](/uploads/images/gallery/2023-11/srabotal-datcik-dvizeniia.png "Документация StarLine > _Управление_комплексом_с_помощью_брелока_E96_E96v2 > Сработал датчик движения.png") Motion sensor activated
![Сработал предупредительный уровень датчика удара.png](/uploads/images/gallery/2023-11/srabotal-predupreditelnyi-uroven-datcika-udara.png "Документация StarLine > _Управление_комплексом_с_помощью_брелока_E96_E96v2 > Сработал предупредительный уровень датчика удара.png") Warning level of shock sensor activated
![Сработал тревожный уровень датчика удара.png](/uploads/images/gallery/2023-11/srabotal-trevoznyi-uroven-datcika-udara.png "Документация StarLine > _Управление_комплексом_с_помощью_брелока_E96_E96v2 > Сработал тревожный уровень датчика удара.png") Alarm level of shock sensor activated
![Датчик удара отключен.png](/uploads/images/gallery/2023-11/datcik-udara-otkliucen.png "Документация StarLine > _Управление_комплексом_с_помощью_брелока_E96_E96v2 > Датчик удара отключен.png") Shock sensor is deactivated
#### Additional Information
IconMeaning
![Передача данных_2.png](/uploads/images/gallery/2023-11/peredaca-dannyx-2.png "Документация StarLine > _Управление_комплексом_с_помощью_брелока_E96_E96v2 > Передача данных_2.png") Data Transmission
![Замените батарейку в брелоке_2.png](/uploads/images/gallery/2023-11/zamenite-batareiku-v-breloke-2.png "Документация StarLine > _Управление_комплексом_с_помощью_брелока_E96_E96v2 > Замените батарейку в брелоке_2.png") Replace battery in remote key
![Звук сирены включен_2.png](/uploads/images/gallery/2023-11/zvuk-sireny-vkliucen-2.png "Документация StarLine > _Управление_комплексом_с_помощью_брелока_E96_E96v2 > Звук сирены включен_2.png") Siren is on
![Сирена отключена_2.png](/uploads/images/gallery/2023-11/sirena-otkliucena-2.png "Документация StarLine > _Управление_комплексом_с_помощью_брелока_E96_E96v2 > Сирена отключена_2.png") Siren is off
### Main control commands from remote key Numbering of buttons on the main remote key: ![брелок E96.png](/uploads/images/gallery/2023-11/brelok-e96.png "Документация StarLine > _Управление_комплексом_с_помощью_брелока_E96_E96v2 > брелок E96.jpeg") Numbering of buttons on the additional remote key: ![dop-brelok.png](/uploads/images/gallery/2023-11/dop-brelok.png "Документация StarLine > _Управление_комплексом_с_помощью_брелока_E96_E96v2 > dop-brelok.png") The following terms of button press duration are used in this manual:
Short PressPressing a single button (or two buttons simultaneously) for less than 1.5 seconds. Example: ![icon-short-1.png](/uploads/images/gallery/2023-11/icon-short-1.png "Документация StarLine > _Управление_комплексом_с_помощью_брелока_E96_E96v2 > icon-short-1.png") — short press of the first button; ![icon-short-double-2-3.png](/uploads/images/gallery/2023-11/icon-short-double-2-3.png "Документация StarLine > _Управление_комплексом_с_помощью_брелока_E96_E96v2 > icon-short-double-2-3.png") — short press of buttons 2 and 3 simultaneously.
Long PressPressing and holding a button or two buttons until a melodic sound signal and vibration signal appear. Two levels of long press are provided:
- First-level long press — pressing a button until the first sound signal. Examples: ![icon-long-1.png](/uploads/images/gallery/2023-11/icon-long-1.png "Документация StarLine > _Управление_комплексом_с_помощью_брелока_E96_E96v2 > icon-long-1.png")![icon-note-1.png](/uploads/images/gallery/2023-11/icon-note-1.png "Документация StarLine > _Управление_комплексом_с_помощью_брелока_E96_E96v2 > icon-note-1.png") — first-level long press of the first button; ![icon-long-double-1-2.png](/uploads/images/gallery/2023-11/icon-long-double-1-2.png "Документация StarLine > _Управление_комплексом_с_помощью_брелока_E96_E96v2 > icon-logn-double-1-2.png")![icon-note-1.png](/uploads/images/gallery/2023-11/icon-note-1.png "Документация StarLine > _Управление_комплексом_с_помощью_брелока_E96_E96v2 > icon-note-1.png") — first-level long press of the first and second buttons; - Second-level long press — pressing a button until the second sound signal; Examples: ![icon-long-4.png](/uploads/images/gallery/2023-11/icon-long-4.png "Документация StarLine > _Управление_комплексом_с_помощью_брелока_E96_E96v2 > icon-long-4.png")![icon-note-2.png](/uploads/images/gallery/2023-11/icon-note-2.png "Документация StarLine > _Управление_комплексом_с_помощью_брелока_E96_E96v2 > icon-note-2.png") — second-level long press of the fourth button.
Double PressTwo presses of the same button within 1 second. Example: ![icon-short-1.png](/uploads/images/gallery/2023-11/icon-short-1.png "Документация StarLine > _Управление_комплексом_с_помощью_брелока_E96_E96v2 > icon-short-1.png")![icon-short-1.png](/uploads/images/gallery/2023-11/icon-short-1.png "Документация StarLine > _Управление_комплексом_с_помощью_брелока_E96_E96v2 > icon-short-1.png") — double press of the first button.
Triple PressThree presses of the same button within 1 second. Example: ![icon-short-1.png](/uploads/images/gallery/2023-11/icon-short-1.png "Документация StarLine > _Управление_комплексом_с_помощью_брелока_E96_E96v2 > icon-short-1.png")![icon-short-1.png](/uploads/images/gallery/2023-11/icon-short-1.png "Документация StarLine > _Управление_комплексом_с_помощью_брелока_E96_E96v2 > icon-short-1.png")![icon-short-1.png](/uploads/images/gallery/2023-11/icon-short-1.png "Документация StarLine > _Управление_комплексом_с_помощью_брелока_E96_E96v2 > icon-short-1.png") — triple press of the first button.
Sequential PressTwo presses of one or different buttons. The first press should be long (first or second level), the second press should be short. Release the first button before the second press. Example: ![icon-long-2.png](/uploads/images/gallery/2023-11/icon-long-2.png "Документация StarLine > _Управление_комплексом_с_помощью_брелока_E96_E96v2 > icon-long-2.png")![icon-note-1.png](/uploads/images/gallery/2023-11/icon-note-1.png "Документация StarLine > _Управление_комплексом_с_помощью_брелока_E96_E96v2 > icon-note-1.png")![icon-short-1.png](/uploads/images/gallery/2023-11/icon-short-1.png "Документация StarLine > _Управление_комплексом_с_помощью_брелока_E96_E96v2 > icon-short-1.png") — sequential press of buttons 2 and 1.
Main control commands from remote key:
CommandButton Combination
Arm
![icon-short-1.png](/uploads/images/gallery/2023-11/icon-short-1.png "Документация StarLine > _Управление_комплексом_с_помощью_брелока_E96_E96v2 > icon-short-1.png")
Arm without confirmation sound signals![icon-short-1.png](/uploads/images/gallery/2023-11/icon-short-1.png "Документация StarLine > _Управление_комплексом_с_помощью_брелока_E96_E96v2 > icon-short-1.png")![icon-short-1.png](/uploads/images/gallery/2023-11/icon-short-1.png "Документация StarLine > _Управление_комплексом_с_помощью_брелока_E96_E96v2 > icon-short-1.png")![icon-short-1.png](/uploads/images/gallery/2023-11/icon-short-1.png "Документация StarLine > _Управление_комплексом_с_помощью_брелока_E96_E96v2 > icon-short-1.png")
Disarm
![icon-short-2.png](/uploads/images/gallery/2023-11/icon-short-2.png "Документация StarLine > _Управление_комплексом_с_помощью_брелока_E96_E96v2 > icon-short-2.png")
Disarm without confirmation sound signals ![icon-short-2.png](/uploads/images/gallery/2023-11/icon-short-2.png "Документация StarLine > _Управление_комплексом_с_помощью_брелока_E96_E96v2 > icon-short-2.png")![icon-short-2.png](/uploads/images/gallery/2023-11/icon-short-2.png "Документация StarLine > _Управление_комплексом_с_помощью_брелока_E96_E96v2 > icon-short-2.png")![icon-short-2.png](/uploads/images/gallery/2023-11/icon-short-2.png "Документация StarLine > _Управление_комплексом_с_помощью_брелока_E96_E96v2 > icon-short-2.png")
Request engine temperature, cabin temperature, battery voltage, fuel level. During automatic engine start - remaining engine runtime.
![icon-short-3.png](/uploads/images/gallery/2023-11/icon-short-3.png "Документация StarLine > _Управление_комплексом_с_помощью_брелока_E96_E96v2 > icon-short-3.png")
Start engine
![icon-long-1.png](/uploads/images/gallery/2023-11/icon-long-1.png "Документация StarLine > _Управление_комплексом_с_помощью_брелока_E96_E96v2 > icon-long-1.png")![icon-note-1.png](/uploads/images/gallery/2023-11/icon-note-1.png "Документация StarLine > _Управление_комплексом_с_помощью_брелока_E96_E96v2 > icon-note-1.png")
Stop engine
![icon-long-2.png](/uploads/images/gallery/2023-11/icon-long-2.png "Документация StarLine > _Управление_комплексом_с_помощью_брелока_E96_E96v2 > icon-long-2.png")![icon-note-1.png](/uploads/images/gallery/2023-11/icon-note-1.png "Документация StarLine > _Управление_комплексом_с_помощью_брелока_E96_E96v2 > icon-note-1.png")
Activate engine pre-heater
![icon-long-2.png](/uploads/images/gallery/2023-11/icon-long-2.png "Документация StarLine > _Управление_комплексом_с_помощью_брелока_E96_E96v2 > icon-long-2.png")![icon-note-1.png](/uploads/images/gallery/2023-11/icon-note-1.png "Документация StarLine > _Управление_комплексом_с_помощью_брелока_E96_E96v2 > icon-note-1.png")![icon-short-1.png](/uploads/images/gallery/2023-11/icon-short-1.png "Документация StarLine > _Управление_комплексом_с_помощью_брелока_E96_E96v2 > icon-short-1.png")
Deactivate engine pre-heater
![icon-long-2.png](/uploads/images/gallery/2023-11/icon-long-2.png "Документация StarLine > _Управление_комплексом_с_помощью_брелока_E96_E96v2 > icon-long-2.png")![icon-note-1.png](/uploads/images/gallery/2023-11/icon-note-1.png "Документация StarLine > _Управление_комплексом_с_помощью_брелока_E96_E96v2 > icon-note-1.png")![icon-short-2.png](/uploads/images/gallery/2023-11/icon-short-2.png "Документация StarLine > _Управление_комплексом_с_помощью_брелока_E96_E96v2 > icon-short-2.png")
Search for vehicle in parking lot
![icon-long-3.png](/uploads/images/gallery/2023-11/icon-long-3.png "Документация StarLine > _Управление_комплексом_с_помощью_брелока_E96_E96v2 > icon-long-3.png")![icon-note-1.png](/uploads/images/gallery/2023-11/icon-note-1.png "Документация StarLine > _Управление_комплексом_с_помощью_брелока_E96_E96v2 > icon-note-1.png")
Activate/deactivate shock sensor
![icon-long-1.png](/uploads/images/gallery/2023-11/icon-long-1.png "Документация StarLine > _Управление_комплексом_с_помощью_брелока_E96_E96v2 > icon-long-1.png")![icon-note-1.png](/uploads/images/gallery/2023-11/icon-note-1.png "Документация StarLine > _Управление_комплексом_с_помощью_брелока_E96_E96v2 > icon-note-1.png")![icon-short-2.png](/uploads/images/gallery/2023-11/icon-short-2.png "Документация StarLine > _Управление_комплексом_с_помощью_брелока_E96_E96v2 > icon-short-2.png")
Activate/deactivate tilt and motion sensor
![icon-long-1.png](/uploads/images/gallery/2023-11/icon-long-1.png "Документация StarLine > _Управление_комплексом_с_помощью_брелока_E96_E96v2 > icon-long-1.png")![icon-note-1.png](/uploads/images/gallery/2023-11/icon-note-1.png "Документация StarLine > _Управление_комплексом_с_помощью_брелока_E96_E96v2 > icon-note-1.png")![icon-short-3.png](/uploads/images/gallery/2023-11/icon-short-3.png "Документация StarLine > _Управление_комплексом_с_помощью_брелока_E96_E96v2 > icon-short-3.png")
Activate "Panic" mode
![icon-short-1.png](/uploads/images/gallery/2023-11/icon-short-1.png "Документация StarLine > _Управление_комплексом_с_помощью_брелока_E96_E96v2 > icon-short-1.png")![icon-short-1.png](/uploads/images/gallery/2023-11/icon-short-1.png "Документация StarLine > _Управление_комплексом_с_помощью_брелока_E96_E96v2 > icon-short-1.png")
Unlock trunk
![icon-short-2.png](/uploads/images/gallery/2023-11/icon-short-2.png "Документация StarLine > _Управление_комплексом_с_помощью_брелока_E96_E96v2 > icon-short-2.png")![icon-short-2.png](/uploads/images/gallery/2023-11/icon-short-2.png "Документация StarLine > _Управление_комплексом_с_помощью_брелока_E96_E96v2 > icon-short-2.png")
Activate automatic startcursor menu
Activate/deactivate service mode
![icon-service-mode.png](/uploads/images/gallery/2023-11/icon-service-mode.png "Документация StarLine > _Управление_комплексом_с_помощью_брелока_E96_E96v2 > icon-service-mode.png") or cursor menu
Activate/deactivate "Hands-Free" modecursor menu
Activate/deactivate button lock
![icon-short-double-2-3.png](/uploads/images/gallery/2023-11/icon-short-double-2-3.png "Документация StarLine > _Управление_комплексом_с_помощью_брелока_E96_E96v2 > icon-short-double-2-3.png")
Activate/deactivate "Button Autolock" function
![icon-long-double-1-4.png](/uploads/images/gallery/2023-11/icon-long-double-1-4.png "Документация StarLine > _Управление_комплексом_с_помощью_брелока_E96_E96v2 > icon-logn-double-1-4.png")![icon-note-2.png](/uploads/images/gallery/2023-11/icon-note-2.png "Документация StarLine > _Управление_комплексом_с_помощью_брелока_E96_E96v2 > icon-note-2.png")
Activate only remote key vibration signal
![icon-long-3.png](/uploads/images/gallery/2023-11/icon-long-3.png "Документация StarLine > _Управление_комплексом_с_помощью_брелока_E96_E96v2 > icon-long-3.png")![icon-note-1.png](/uploads/images/gallery/2023-11/icon-note-1.png "Документация StarLine > _Управление_комплексом_с_помощью_брелока_E96_E96v2 > icon-note-1.png")![icon-short-3.png](/uploads/images/gallery/2023-11/icon-short-3.png "Документация StarLine > _Управление_комплексом_с_помощью_брелока_E96_E96v2 > icon-short-3.png")
Activate sound profile "SOUND 2"
![icon-long-3.png](/uploads/images/gallery/2023-11/icon-long-3.png "Документация StarLine > _Управление_комплексом_с_помощью_брелока_E96_E96v2 > icon-long-3.png")![icon-note-1.png](/uploads/images/gallery/2023-11/icon-note-1.png "Документация StarLine > _Управление_комплексом_с_помощью_брелока_E96_E96v2 > icon-note-1.png")![icon-short-1.png](/uploads/images/gallery/2023-11/icon-short-1.png "Документация StarLine > _Управление_комплексом_с_помощью_брелока_E96_E96v2 > icon-short-1.png")
Activate sound profile "SOUND 1"
![icon-long-3.png](/uploads/images/gallery/2023-11/icon-long-3.png "Документация StarLine > _Управление_комплексом_с_помощью_брелока_E96_E96v2 > icon-long-3.png")![icon-note-1.png](/uploads/images/gallery/2023-11/icon-note-1.png "Документация StarLine > _Управление_комплексом_с_помощью_брелока_E96_E96v2 > icon-note-1.png")![icon-short-2.png](/uploads/images/gallery/2023-11/icon-short-2.png "Документация StarLine > _Управление_комплексом_с_помощью_брелока_E96_E96v2 > icon-short-2.png")
Activate sound profile "SOUND 0"
![icon-long-3.png](/uploads/images/gallery/2023-11/icon-long-3.png "Документация StarLine > _Управление_комплексом_с_помощью_брелока_E96_E96v2 > icon-long-3.png")![icon-note-1.png](/uploads/images/gallery/2023-11/icon-note-1.png "Документация StarLine > _Управление_комплексом_с_помощью_брелока_E96_E96v2 > icon-note-1.png")![icon-short-3.png](/uploads/images/gallery/2023-11/icon-short-3.png "Документация StarLine > _Управление_комплексом_с_помощью_брелока_E96_E96v2 > icon-short-3.png")
Activate sound profile "SOUND --"
![icon-long-3.png](/uploads/images/gallery/2023-11/icon-long-3.png "Документация StarLine > _Управление_комплексом_с_помощью_брелока_E96_E96v2 > icon-long-3.png")![icon-note-1.png](/uploads/images/gallery/2023-11/icon-note-1.png "Документация StarLine > _Управление_комплексом_с_помощью_брелока_E96_E96v2 > icon-note-1.png")![icon-short-4.png](/uploads/images/gallery/2023-11/icon-short-4.png "Документация StarLine > _Управление_комплексом_с_помощью_брелока_E96_E96v2 > icon-short-4.png")
Launch flexible logic program
![icon-short-3.png](/uploads/images/gallery/2023-11/icon-short-3.png "Документация StarLine > _Управление_комплексом_с_помощью_брелока_E96_E96v2 > icon-short-3.png")![icon-short-3.png](/uploads/images/gallery/2023-11/icon-short-3.png "Документация StarLine > _Управление_комплексом_с_помощью_брелока_E96_E96v2 > icon-short-3.png")
### Cursor Menu Some functions of the security complex are controlled through a cursor menu: control of the "Hands-Free" mode, service mode, setting the automatic engine start. Entering and exiting the menu is done by long-pressing button 4: ![icon-long-4.png](/uploads/images/gallery/2023-11/icon-long-4.png "Документация StarLine > _Управление_комплексом_с_помощью_брелока_E96_E96v2 > icon-long-4.png")![icon-note-1.png](/uploads/images/gallery/2023-11/icon-note-1.png "Документация StarLine > _Управление_комплексом_с_помощью_брелока_E96_E96v2 > icon-note-1.png"). If no buttons on the remote key are pressed within 15 seconds, there will be an automatic exit from the menu. When entering the menu, the cursor will be set to the first icon. Transition to the next and previous menu items is done by short pressing buttons ![icon-short-1.png](/uploads/images/gallery/2023-11/icon-short-1.png "Документация StarLine > _Управление_комплексом_с_помощью_брелока_E96_E96v2 > icon-short-1.png") or ![icon-short-4.png](/uploads/images/gallery/2023-11/icon-short-4.png "Документация StarLine > _Управление_комплексом_с_помощью_брелока_E96_E96v2 > icon-short-4.png"), respectively. Selecting a function is done by short pressing buttons 2 and 3: ![icon-short-double-2-3.png](/uploads/images/gallery/2023-11/icon-short-double-2-3.png "Документация StarLine > _Управление_комплексом_с_помощью_брелока_E96_E96v2 > icon-short-double-2-3.png"). Changing the parameter value is done by short pressing buttons ![icon-short-2.png](/uploads/images/gallery/2023-11/icon-short-2.png "Документация StarLine > _Управление_комплексом_с_помощью_брелока_E96_E96v2 > icon-short-2.png") or ![icon-short-3.png](/uploads/images/gallery/2023-11/icon-short-3.png "Документация StarLine > _Управление_комплексом_с_помощью_брелока_E96_E96v2 > icon-short-3.png") (decrease and increase, respectively). Holding the button for a long time increases the speed of changing the parameter value. Transitions between menu items, changing parameters, and exiting the menu will be confirmed by a melodic sound signal. Descriptions and management of settings are provided in the table.
IconParameterDescriptionSetting Step
![Режим «Свободные руки».png](/uploads/images/gallery/2023-11/rezim-svobodnye-ruki.png "Документация StarLine > _Управление_комплексом_с_помощью_брелока_E96_E96v2 > icon-mode-handsfree.png")
"Hands-Free" modeEnable/disable "Hands-Free" mode
![Включен автоматический запуск по будильнику.jpg](/uploads/images/gallery/2023-11/vkliucen-avtomaticeskii-zapusk-po-budilniku.jpg "Документация StarLine > _Управление_комплексом_с_помощью_брелока_E96_E96v2 > icon-start-wakeup.png")
Automatic engine start and preheater start by alarm clockSet the hours and minutes for engine start. Switching between engine and preheater start settings is done by short pressing buttons ![1_2.png](/uploads/images/gallery/2023-11/1-2.png "Документация StarLine > _Управление_комплексом_с_помощью_брелока_E96_E96v2 > 1_2.png") and ![3_4.png](/uploads/images/gallery/2023-11/3-4.png "Документация StarLine > _Управление_комплексом_с_помощью_брелока_E96_E96v2 > 3_4.png") on the remote key. When setting the engine start, the screen will display the digit "1", for preheater start — the digit "2". 1 minute
![Включен автоматический периодический запуск.jpg](/uploads/images/gallery/2023-11/vkliucen-avtomaticeskii-periodiceskii-zapusk.jpg "Документация StarLine > _Управление_комплексом_с_помощью_брелока_E96_E96v2 > icon-start-timer.png")
Automatic start by timer Set the frequency of engine start in hours1 hour
![Включен автоматический запуск по температуре.png](/uploads/images/gallery/2023-11/vkliucen-avtomaticeskii-zapusk-po-temperature.png "Документация StarLine > _Управление_комплексом_с_помощью_брелока_E96_E96v2 > icon-start-temperature.png")
Automatic start by temperatureSet the temperature value in degrees Celsius1 ºС
![Включен автоматический запуск по падению напряжения АКБ.png](/uploads/images/gallery/2023-11/vkliucen-avtomaticeskii-zapusk-po-padeniiu-napriazeniia-akb.png "Документация StarLine > _Управление_комплексом_с_помощью_брелока_E96_E96v2 > icon-start-voltage.png")
Automatic start by voltageSet the battery voltage value in Volts0.1 V
![Сервисный режим.png](/uploads/images/gallery/2023-11/servisnyi-rezim.png "Документация StarLine > _Управление_комплексом_с_помощью_брелока_E96_E96v2 > icon-mode-service.png")
Service modeEnable/disable service mode
### Settings Menu The settings menu is intended for configuring the complex operation parameters. Entering and exiting the settings menu is done by long-pressing button 4: ![icon-long-4.png](/uploads/images/gallery/2023-11/icon-long-4.png "Документация StarLine > _Управление_комплексом_с_помощью_брелока_E96_E96v2 > icon-long-4.png")![icon-note-2.png](/uploads/images/gallery/2023-11/icon-note-2.png "Документация StarLine > _Управление_комплексом_с_помощью_брелока_E96_E96v2 > icon-note-1.png"). After entering the menu, the current state of the complex settings will appear on the remote key screen: [![image.png](/uploads/images/gallery/2024-02/scaled-1680-/YvBimage.png)](/uploads/images/gallery/2024-02/YvBimage.png)[![image.png](/uploads/images/gallery/2024-02/scaled-1680-/a3vimage.png)](/uploads/images/gallery/2024-02/a3vimage.png)[![image.png](/uploads/images/gallery/2024-02/scaled-1680-/ZcXimage.png)](/uploads/images/gallery/2024-02/ZcXimage.png) - 1 — parameter value; - 2 — parameter number. Transition to menu items is done by short pressing buttons ![icon-short-1.png](/uploads/images/gallery/2023-11/icon-short-1.png "Документация StarLine > _Управление_комплексом_с_помощью_брелока_E96_E96v2 > icon-short-1.png") or ![icon-short-4.png](/uploads/images/gallery/2023-11/icon-short-4.png "Документация StarLine > _Управление_комплексом_с_помощью_брелока_E96_E96v2 > icon-short-4.png"), to the previous and next item, respectively. Decreasing and increasing the parameter value is done by short pressing buttons ![icon-short-2.png](/uploads/images/gallery/2023-11/icon-short-2.png "Документация StarLine > _Управление_комплексом_с_помощью_брелока_E96_E96v2 > icon-short-2.png") or ![icon-short-3.png](/uploads/images/gallery/2023-11/icon-short-3.png "Документация StarLine > _Управление_комплексом_с_помощью_брелока_E96_E96v2 > icon-short-3.png"), respectively. The longer the press, the more units the value changes. Changing the parameter and exiting the menu will be confirmed by a melodic sound signal, transitions between menu items — by a vibration signal. **Setting the Time Zone** To set the time zone, select the first item in the settings menu. Then, using buttons ![icon-short-2.png](/uploads/images/gallery/2023-11/icon-short-2.png "Документация StarLine > _Управление_комплексом_с_помощью_брелока_E96_E96v2 > icon-short-2.png") and ![icon-short-3.png](/uploads/images/gallery/2023-11/icon-short-3.png "Документация StarLine > _Управление_комплексом_с_помощью_брелока_E96_E96v2 > icon-short-3.png") set the desired value. The minimum step size is 1 hour. **Setting Light and Sound Indicators for Arming and Disarming** To configure the operation of light and sound indicators when arming and disarming, select the second item in the settings menu. Then, using buttons ![icon-short-2.png](/uploads/images/gallery/2023-11/icon-short-2.png "Документация StarLine > _Управление_комплексом_с_помощью_брелока_E96_E96v2 > icon-short-2.png") and ![icon-short-3.png](/uploads/images/gallery/2023-11/icon-short-3.png "Документация StarLine > _Управление_комплексом_с_помощью_брелока_E96_E96v2 > icon-short-3.png") set the desired value. Description of configuration options: - for silent arming and disarming (without light and sound indicators), set the value to 0; - for quiet (only light indication) — value 1; - for full (light and sound indication) — value 2; - for using only sound indication — value 3. **Setting Siren Volume for Arming and Disarming** To set the siren volume level, select the third item in the settings menu. Then, using buttons ![icon-short-2.png](/uploads/images/gallery/2023-11/icon-short-2.png "Документация StarLine > _Управление_комплексом_с_помощью_брелока_E96_E96v2 > icon-short-2.png") and ![icon-short-3.png](/uploads/images/gallery/2023-11/icon-short-3.png "Документация StarLine > _Управление_комплексом_с_помощью_брелока_E96_E96v2 > icon-short-3.png"), select the desired siren volume level. 0 — no sound, 10 — maximum volume level. **Setting Light and Sound Indicators in "Alarm" Mode** To configure light and sound indicators in "Alarm" mode, select the fourth item in the settings menu. Then, using buttons ![icon-short-2.png](/uploads/images/gallery/2023-11/icon-short-2.png "Документация StarLine > _Управление_комплексом_с_помощью_брелока_E96_E96v2 > icon-short-2.png") and ![icon-short-3.png](/uploads/images/gallery/2023-11/icon-short-3.png "Документация StarLine > _Управление_комплексом_с_помощью_брелока_E96_E96v2 > icon-short-3.png"), set the desired value. Description of configuration options: - for hidden indication (without light and sound indicators) set the value to 0; - for quiet (only light indication) — value 1; - for full (light and sound indication) — value 2. **Setting Siren Volume in "Alarm" Mode** To set the siren volume in "Alarm" mode, select the fifth item in the settings menu. Then, using buttons ![icon-short-2.png](/uploads/images/gallery/2023-11/icon-short-2.png "Документация StarLine > _Управление_комплексом_с_помощью_брелока_E96_E96v2 > icon-short-2.png") and ![icon-short-3.png](/uploads/images/gallery/2023-11/icon-short-3.png "Документация StarLine > _Управление_комплексом_с_помощью_брелока_E96_E96v2 > icon-short-3.png"), set the desired siren volume level. 0 — no sound, 10 — maximum volume level. **Setting Motion Sensor Sensitivity** To adjust the motion sensor sensitivity level, select the sixth item in the settings menu. Then, using buttons ![icon-short-2.png](/uploads/images/gallery/2023-11/icon-short-2.png "Документация StarLine > _Управление_комплексом_с_помощью_брелока_E96_E96v2 > icon-short-2.png") and ![icon-short-3.png](/uploads/images/gallery/2023-11/icon-short-3.png "Документация StarLine > _Управление_комплексом_с_помощью_брелока_E96_E96v2 > icon-short-3.png"), set the desired value from 0 to 30. 0 — sensor disabled, 30 — maximum sensitivity level. **Setting Tilt Sensor Sensitivity** To adjust the tilt sensor sensitivity level, select the seventh item in the settings menu. Then, using buttons ![icon-short-2.png](/uploads/images/gallery/2023-11/icon-short-2.png "Документация StarLine > _Управление_комплексом_с_помощью_брелока_E96_E96v2 > icon-short-2.png") and ![icon-short-3.png](/uploads/images/gallery/2023-11/icon-short-3.png "Документация StarLine > _Управление_комплексом_с_помощью_брелока_E96_E96v2 > icon-short-3.png"), set the desired value from 0 to 30. 0 — sensor disabled, 30 — maximum sensitivity level. **Setting Warning Shock Sensor Sensitivity** To adjust the pre-warning shock sensor sensitivity level, select the eighth item in the settings menu. Then, using buttons ![icon-short-2.png](/uploads/images/gallery/2023-11/icon-short-2.png "Документация StarLine > _Управление_комплексом_с_помощью_брелока_E96_E96v2 > icon-short-2.png") and ![icon-short-3.png](/uploads/images/gallery/2023-11/icon-short-3.png "Документация StarLine > _Управление_комплексом_с_помощью_брелока_E96_E96v2 > icon-short-3.png"), set the desired value from 1 to 30. 0 — sensor disabled, 30 — maximum sensitivity level. The selected pre-warning shock sensor sensitivity value must be greater than the alarm shock sensor sensitivity value. **Setting Alarm Shock Sensor Sensitivity** To adjust the alarm shock sensor sensitivity level, select the ninth item in the settings menu. Then, using buttons ![icon-short-2.png](/uploads/images/gallery/2023-11/icon-short-2.png "Документация StarLine > _Управление_комплексом_с_помощью_брелока_E96_E96v2 > icon-short-2.png") and ![icon-short-3.png](/uploads/images/gallery/2023-11/icon-short-3.png "Документация StarLine > _Управление_комплексом_с_помощью_брелока_E96_E96v2 > icon-short-3.png"), set the desired value from 0 to 29. 0 — sensor disabled, 29 — maximum sensitivity level. The selected alarm shock sensor sensitivity value must be lower than the pre-warning shock sensor sensitivity value. **Setting Tag Loss Zone Range** To set the range of the tag loss zone, select the tenth item in the settings menu. Then, using buttons ![icon-short-2.png](/uploads/images/gallery/2023-11/icon-short-2.png "Документация StarLine > _Управление_комплексом_с_помощью_брелока_E96_E96v2 > icon-short-2.png") and ![icon-short-3.png](/uploads/images/gallery/2023-11/icon-short-3.png "Документация StarLine > _Управление_комплексом_с_помощью_брелока_E96_E96v2 > icon-short-3.png"), set the desired value from 3 to 10. 3 — minimum range, 10 — maximum range. The tag loss zone range should be greater than the tag detection zone range.

Ensure that the set tag loss zone range is sufficient from all sides of the vehicle.

**Setting Tag Detection Zone Range** To set the range of the tag detection zone, select the eleventh item in the settings menu. Then, using buttons ![icon-short-2.png](/uploads/images/gallery/2023-11/icon-short-2.png "Документация StarLine > _Управление_комплексом_с_помощью_брелока_E96_E96v2 > icon-short-2.png") and ![icon-short-3.png](/uploads/images/gallery/2023-11/icon-short-3.png "Документация StarLine > _Управление_комплексом_с_помощью_брелока_E96_E96v2 > icon-short-3.png"), set the desired value from 1 to 8. 1 — minimum range, 8 — maximum range.

The detection zone should be smaller than the tag loss zone range.

**Setting the Communication Check Period with the Remote Key** To set the communication check period with the remote key, select the twelfth item in the settings menu. Then, using buttons ![icon-short-2.png](/uploads/images/gallery/2023-11/icon-short-2.png "Документация StarLine > _Управление_комплексом_с_помощью_брелока_E96_E96v2 > icon-short-2.png") and ![icon-short-3.png](/uploads/images/gallery/2023-11/icon-short-3.png "Документация StarLine > _Управление_комплексом_с_помощью_брелока_E96_E96v2 > icon-short-3.png"), select the value 0 or 1. Description of configuration options: - 0 — communication check disabled; - 1 — communication check occurs every 3 minutes.
### Remote Sound Profile Menu The menu offers 4 sound profiles with settings for various types of remote signals: command confirmation, alarm, and button press. Profile selection is done by pressing buttons on the remote.

The sound profile settings shown in the table are set by default.

Profile NameButton CombinationDescription
1SOUND 2![icon-long-3.png](/uploads/images/gallery/2023-11/icon-long-3.png "Документация StarLine > _Управление_комплексом_с_помощью_брелока_E96_E96v2 > icon-long-3.png")![icon-note-1.png](/uploads/images/gallery/2023-11/icon-note-1.png "Документация StarLine > _Управление_комплексом_с_помощью_брелока_E96_E96v2 > icon-note-1.png")[![icon-short-1.png](/uploads/images/gallery/2023-11/scaled-1680-/icon-short-1.png)](/uploads/images/gallery/2023-11/icon-short-1.png) Maximum volume with all signals, vibration signal enabled.
2SOUND1
![icon-long-3.png](/uploads/images/gallery/2023-11/icon-long-3.png "Документация StarLine > _Управление_комплексом_с_помощью_брелока_E96_E96v2 > icon-long-3.png")![icon-note-1.png](/uploads/images/gallery/2023-11/icon-note-1.png "Документация StarLine > _Управление_комплексом_с_помощью_брелока_E96_E96v2 > icon-note-1.png")![icon-short-2.png](/uploads/images/gallery/2023-11/icon-short-2.png "Документация StarLine > _Управление_комплексом_с_помощью_брелока_E96_E96v2 > icon-short-2.png")
Minimum volume with all signals, vibration signal enabled.
3SOUND 0
![icon-long-3.png](/uploads/images/gallery/2023-11/icon-long-3.png "Документация StarLine > _Управление_комплексом_с_помощью_брелока_E96_E96v2 > icon-long-3.png")![icon-note-1.png](/uploads/images/gallery/2023-11/icon-note-1.png "Документация StarLine > _Управление_комплексом_с_помощью_брелока_E96_E96v2 > icon-note-1.png")![icon-short-3.png](/uploads/images/gallery/2023-11/icon-short-3.png "Документация StarLine > _Управление_комплексом_с_помощью_брелока_E96_E96v2 > icon-short-3.png")
Vibration signal only, sound volume disabled.
4SOUND --
![icon-long-3.png](/uploads/images/gallery/2023-11/icon-long-3.png "Документация StarLine > _Управление_комплексом_с_помощью_брелока_E96_E96v2 > icon-long-3.png")![icon-note-1.png](/uploads/images/gallery/2023-11/icon-note-1.png "Документация StarLine > _Управление_комплексом_с_помощью_брелока_E96_E96v2 > icon-note-1.png")![icon-short-4.png](/uploads/images/gallery/2023-11/icon-short-4.png "Документация StarLine > _Управление_комплексом_с_помощью_брелока_E96_E96v2 > icon-short-4.png")
Silent mode, sound volume and vibration signal disabled.
### Adjusting Sound Profile Settings: Enter the menu by long press of the button **![icon-long-3.png](/uploads/images/gallery/2023-11/iC9icon-long-3.png "Документация StarLine > _Управление_комплексом_с_помощью_брелока_E96_E96v2 > icon-long-3.png")![icon-note-2.png](/uploads/images/gallery/2023-11/icon-note-2.png "Документация StarLine > _Управление_комплексом_с_помощью_брелока_E96_E96v2 > icon-note-1.png").** After entering, the current profile settings will be displayed. **Adjusting Command Confirmation Volume** [![image.png](/uploads/images/gallery/2024-02/scaled-1680-/Cs0image.png)](/uploads/images/gallery/2024-02/Cs0image.png) [![image.png](/uploads/images/gallery/2024-02/scaled-1680-/k70image.png)](/uploads/images/gallery/2024-02/k70image.png) - 1 — volume level of the selected signal type; - 2 — number of the selected sound profile; - 3 — indication of volume settings for command confirmation signals; - 4 — vibration signal: ![Сработал тревожный уровень датчика удара.png](/uploads/images/gallery/2023-11/srabotal-trevoznyi-uroven-datcika-udara.png "Документация StarLine > _Управление_комплексом_с_помощью_брелока_E96_E96v2 > Сработал тревожный уровень датчика удара.png")— on, ![Датчик удара отключен.png](/uploads/images/gallery/2023-11/datcik-udara-otkliucen.png "Документация StarLine > _Управление_комплексом_с_помощью_брелока_E96_E96v2 > Датчик удара отключен.png") — off. Volume adjustment is done by short pressing the buttons ![icon-short-2.png](/uploads/images/gallery/2023-11/6GHicon-short-2.png "Документация StarLine > _Управление_комплексом_с_помощью_брелока_E96_E96v2 > icon-short-2.png") or ![icon-short-3.png](/uploads/images/gallery/2023-11/icon-short-3.png "Документация StarLine > _Управление_комплексом_с_помощью_брелока_E96_E96v2 > icon-short-3.png"), respectively. A short press of the button ![icon-short-4.png](/uploads/images/gallery/2023-11/icon-short-4.png "Документация StarLine > _Управление_комплексом_с_помощью_брелока_E96_E96v2 > icon-short-4.png") enables or disables the vibration signal. To switch to adjusting the next type of signal within the selected sound profile, press ![icon-short-1.png](/uploads/images/gallery/2023-11/icon-short-1.png "Документация StarLine > _Управление_комплексом_с_помощью_брелока_E96_E96v2 > icon-short-1.png"). **Adjusting Alarm Signal Volume** [![image.png](/uploads/images/gallery/2024-02/scaled-1680-/gQJimage.png)](/uploads/images/gallery/2024-02/gQJimage.png)[![image.png](/uploads/images/gallery/2024-02/scaled-1680-/4Tvimage.png)](/uploads/images/gallery/2024-02/4Tvimage.png) - 1 — Selected signal type volume level; - 2 — Selected Sound Profile Number; - 3 — Vibration Signal: ![Сработал тревожный уровень датчика удара.png](/uploads/images/gallery/2023-11/srabotal-trevoznyi-uroven-datcika-udara.png "Документация StarLine > _Управление_комплексом_с_помощью_брелока_E96_E96v2 > Сработал тревожный уровень датчика удара.png")— on, ![Датчик удара отключен.png](/uploads/images/gallery/2023-11/datcik-udara-otkliucen.png "Документация StarLine > _Управление_комплексом_с_помощью_брелока_E96_E96v2 > Датчик удара отключен.png") — off; - 4 — Volume Adjustment Indication for Alarm Signals. Volume adjustment is done by short pressing the buttons ![icon-short-2.png](/uploads/images/gallery/2023-11/icon-short-2.png "Документация StarLine > _Управление_комплексом_с_помощью_брелока_E96_E96v2 > icon-short-2.png") or ![icon-short-3.png](/uploads/images/gallery/2023-11/icon-short-3.png "Документация StarLine > _Управление_комплексом_с_помощью_брелока_E96_E96v2 > icon-short-3.png"), respectively. A short press of the button ![icon-short-4.png](/uploads/images/gallery/2023-11/icon-short-4.png "Документация StarLine > _Управление_комплексом_с_помощью_брелока_E96_E96v2 > icon-short-4.png") enables or disables the vibration signal. To switch to adjusting the next type of signal within the selected sound profile, press ![icon-short-1.png](/uploads/images/gallery/2023-11/icon-short-1.png "Документация StarLine > _Управление_комплексом_с_помощью_брелока_E96_E96v2 > icon-short-1.png"). **Adjusting Button Press Signal Volume** [![image.png](/uploads/images/gallery/2024-02/scaled-1680-/mHYimage.png)](/uploads/images/gallery/2024-02/mHYimage.png)[![image.png](/uploads/images/gallery/2024-02/scaled-1680-/eakimage.png)](/uploads/images/gallery/2024-02/eakimage.png) - 1 — Volume Adjustment Indication for Button Presses. - 2 — Selected signal type volume level; - 3 — Selected Sound Profile Number; - 4 — Vibration Signal: ![Сработал тревожный уровень датчика удара.png](/uploads/images/gallery/2023-11/srabotal-trevoznyi-uroven-datcika-udara.png "Документация StarLine > _Управление_комплексом_с_помощью_брелока_E96_E96v2 > Сработал тревожный уровень датчика удара.png")— on, ![Датчик удара отключен.png](/uploads/images/gallery/2023-11/datcik-udara-otkliucen.png "Документация StarLine > _Управление_комплексом_с_помощью_брелока_E96_E96v2 > Датчик удара отключен.png") — off. Volume adjustment is done by short pressing the buttons ![icon-short-2.png](/uploads/images/gallery/2023-11/icon-short-2.png "Документация StarLine > _Управление_комплексом_с_помощью_брелока_E96_E96v2 > icon-short-2.png") or ![icon-short-3.png](/uploads/images/gallery/2023-11/icon-short-3.png "Документация StarLine > _Управление_комплексом_с_помощью_брелока_E96_E96v2 > icon-short-3.png"), respectively. A short press of the button ![icon-short-4.png](/uploads/images/gallery/2023-11/icon-short-4.png "Документация StarLine > _Управление_комплексом_с_помощью_брелока_E96_E96v2 > icon-short-4.png") enables or disables the vibration signal. To switch to adjusting the next type of signal within the selected sound profile, press ![icon-short-1.png](/uploads/images/gallery/2023-11/icon-short-1.png "Документация StarLine > _Управление_комплексом_с_помощью_брелока_E96_E96v2 > icon-short-1.png"). Exiting the menu automatically occurs after 10 seconds without pressing any buttons on the remote. After exiting, the name of the set profile will be displayed on the screen for several seconds: [![image.png](/uploads/images/gallery/2024-02/scaled-1680-/9E8image.png)](/uploads/images/gallery/2024-02/9E8image.png) ### Resetting Profile Settings to Factory Defaults To reset profile settings to factory defaults, follow these steps: 1. Select the desired sound profile using the corresponding button combination. 2. Enter the sound profile menu by second-level long press of the 3 button: **![icon-long-3.png](/uploads/images/gallery/2023-11/icon-long-3.png "Документация StarLine > _Управление_комплексом_с_помощью_брелока_E96_E96v2 > icon-long-3.png")![icon-note-2.png](/uploads/images/gallery/2023-11/icon-note-2.png "Документация StarLine > _Управление_комплексом_с_помощью_брелока_E96_E96v2 > icon-note-1.png")**. 3. Repeat the second-level long press of the 3 button: ![icon-long-3.png](/uploads/images/gallery/2023-11/icon-long-3.png "Документация StarLine > _Управление_комплексом_с_помощью_брелока_E96_E96v2 > icon-long-3.png")![icon-note-1.png](/uploads/images/gallery/2023-11/icon-note-1.png "Документация StarLine > _Управление_комплексом_с_помощью_брелока_E96_E96v2 > icon-note-1.png")[![icon-note-1.png](/uploads/images/gallery/2023-11/scaled-1680-/icon-note-1.png)](/uploads/images/gallery/2023-11/icon-note-1.png). ### Selecting a Sound Theme In the sound profile menu, you can also set the tone of the remote key's sound signals by selecting one of the sound themes. To select a sound theme, follow these steps: 1. Enter the sound profile menu by performing a second-level long press on button 3: **![icon-long-3.png](/uploads/images/gallery/2023-11/icon-long-3.png "Документация StarLine > _Управление_комплексом_с_помощью_брелока_E96_E96v2 > icon-long-3.png")![icon-note-2.png](/uploads/images/gallery/2023-11/icon-note-2.png "Документация StarLine > _Управление_комплексом_с_помощью_брелока_E96_E96v2 > icon-note-1.png")**. 2. Briefly press buttons ![icon-short-double-2-3.png](/uploads/images/gallery/2023-11/icon-short-double-2-3.png "Документация StarLine > _Управление_комплексом_с_помощью_брелока_E96_E96v2 > icon-short-double-2-3.png") simultaneously. The screen will display the name of the sound theme: BR-1 or BR-2**.** 3. Briefly press buttons ![icon-short-double-2-3.png](/uploads/images/gallery/2023-11/icon-short-double-2-3.png "Документация StarLine > _Управление_комплексом_с_помощью_брелока_E96_E96v2 > icon-short-double-2-3.png") simultaneously to select the next sound theme.

By default, the BR-1 theme is set

You will automatically exit the menu after 10 seconds if no buttons on the remote key are pressed ### Automatic Button Lock Function When this function is activated, the remote key buttons are automatically locked after the backlight turns off. The function is enabled and disabled by performing a second-level long press on buttons 1 and 4: ![icon-long-double-1-4.png](/uploads/images/gallery/2023-11/icon-long-double-1-4.png "Документация StarLine > _Управление_комплексом_с_помощью_брелока_E96_E96v2 > icon-logn-double-1-4.png")![icon-note-2.png](/uploads/images/gallery/2023-11/icon-note-2.png "Документация StarLine > _Управление_комплексом_с_помощью_брелока_E96_E96v2 > icon-note-2.png"). ### Remote Key Locator Function To locate the remote key, hold the service button for 5 seconds — the remote key will emit a sound signal. ### Setting Time and Date To set the current time and date, follow these steps: 1. Enter the time and date settings menu by sequentially pressing button 4: ![icon-long-4.png](/uploads/images/gallery/2023-11/icon-long-4.png "Документация StarLine > _Управление_комплексом_с_помощью_брелока_E96_E96v2 > icon-long-4.png")![icon-note-1.png](/uploads/images/gallery/2023-11/icon-note-1.png "Документация StarLine > _Управление_комплексом_с_помощью_брелока_E96_E96v2 > icon-note-1.png")![icon-short-4.png](/uploads/images/gallery/2023-11/icon-short-4.png "Документация StarLine > _Управление_комплексом_с_помощью_брелока_E96_E96v2 > icon-short-4.png"). 2. Use a short press of button ![icon-short-2.png](/uploads/images/gallery/2023-11/icon-short-2.png "Документация StarLine > _Управление_комплексом_с_помощью_брелока_E96_E96v2 > icon-short-2.png") to set the hours and a short press of button ![icon-short-3.png](/uploads/images/gallery/2023-11/icon-short-3.png "Документация StarLine > _Управление_комплексом_с_помощью_брелока_E96_E96v2 > icon-short-3.png") to set the minutes. [![image.png](/uploads/images/gallery/2024-02/scaled-1680-/6B4image.png)
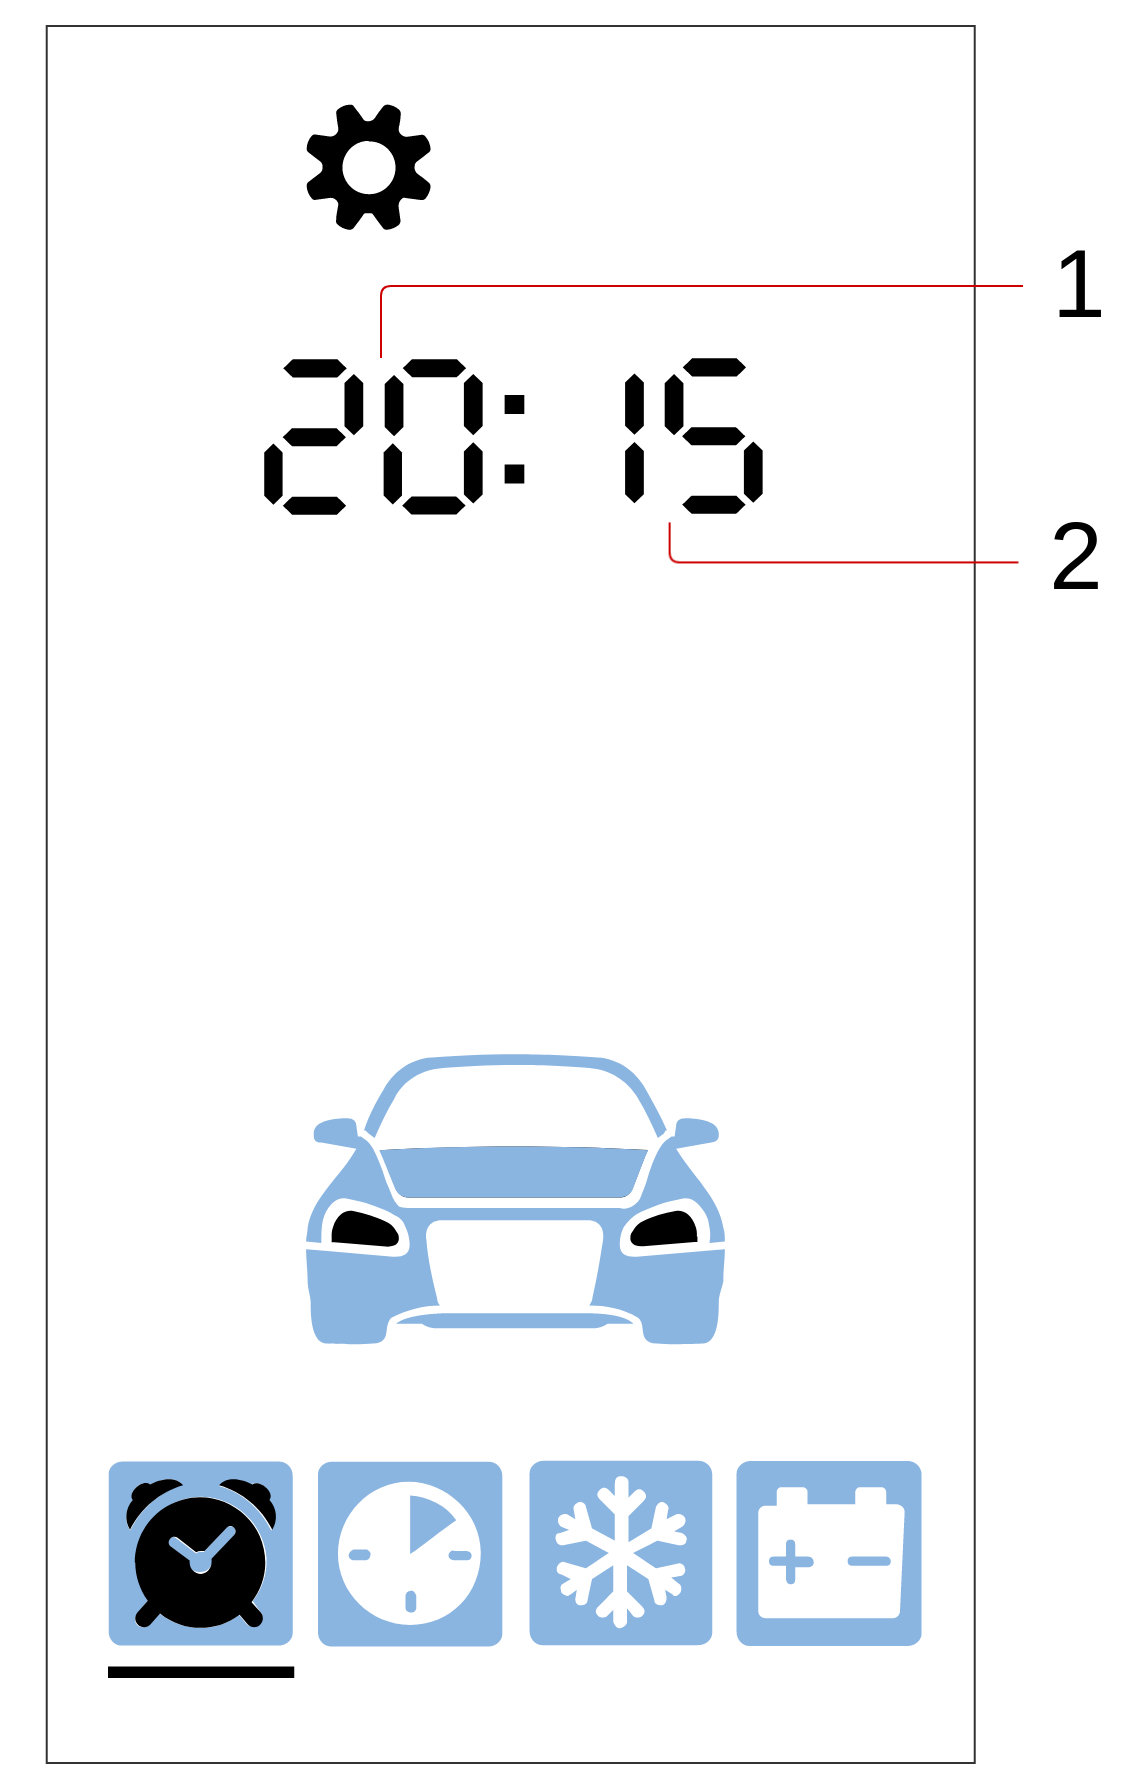
](/uploads/images/gallery/2024-02/6B4image.png)[![image.png](/uploads/images/gallery/2024-02/scaled-1680-/6Zgimage.png)
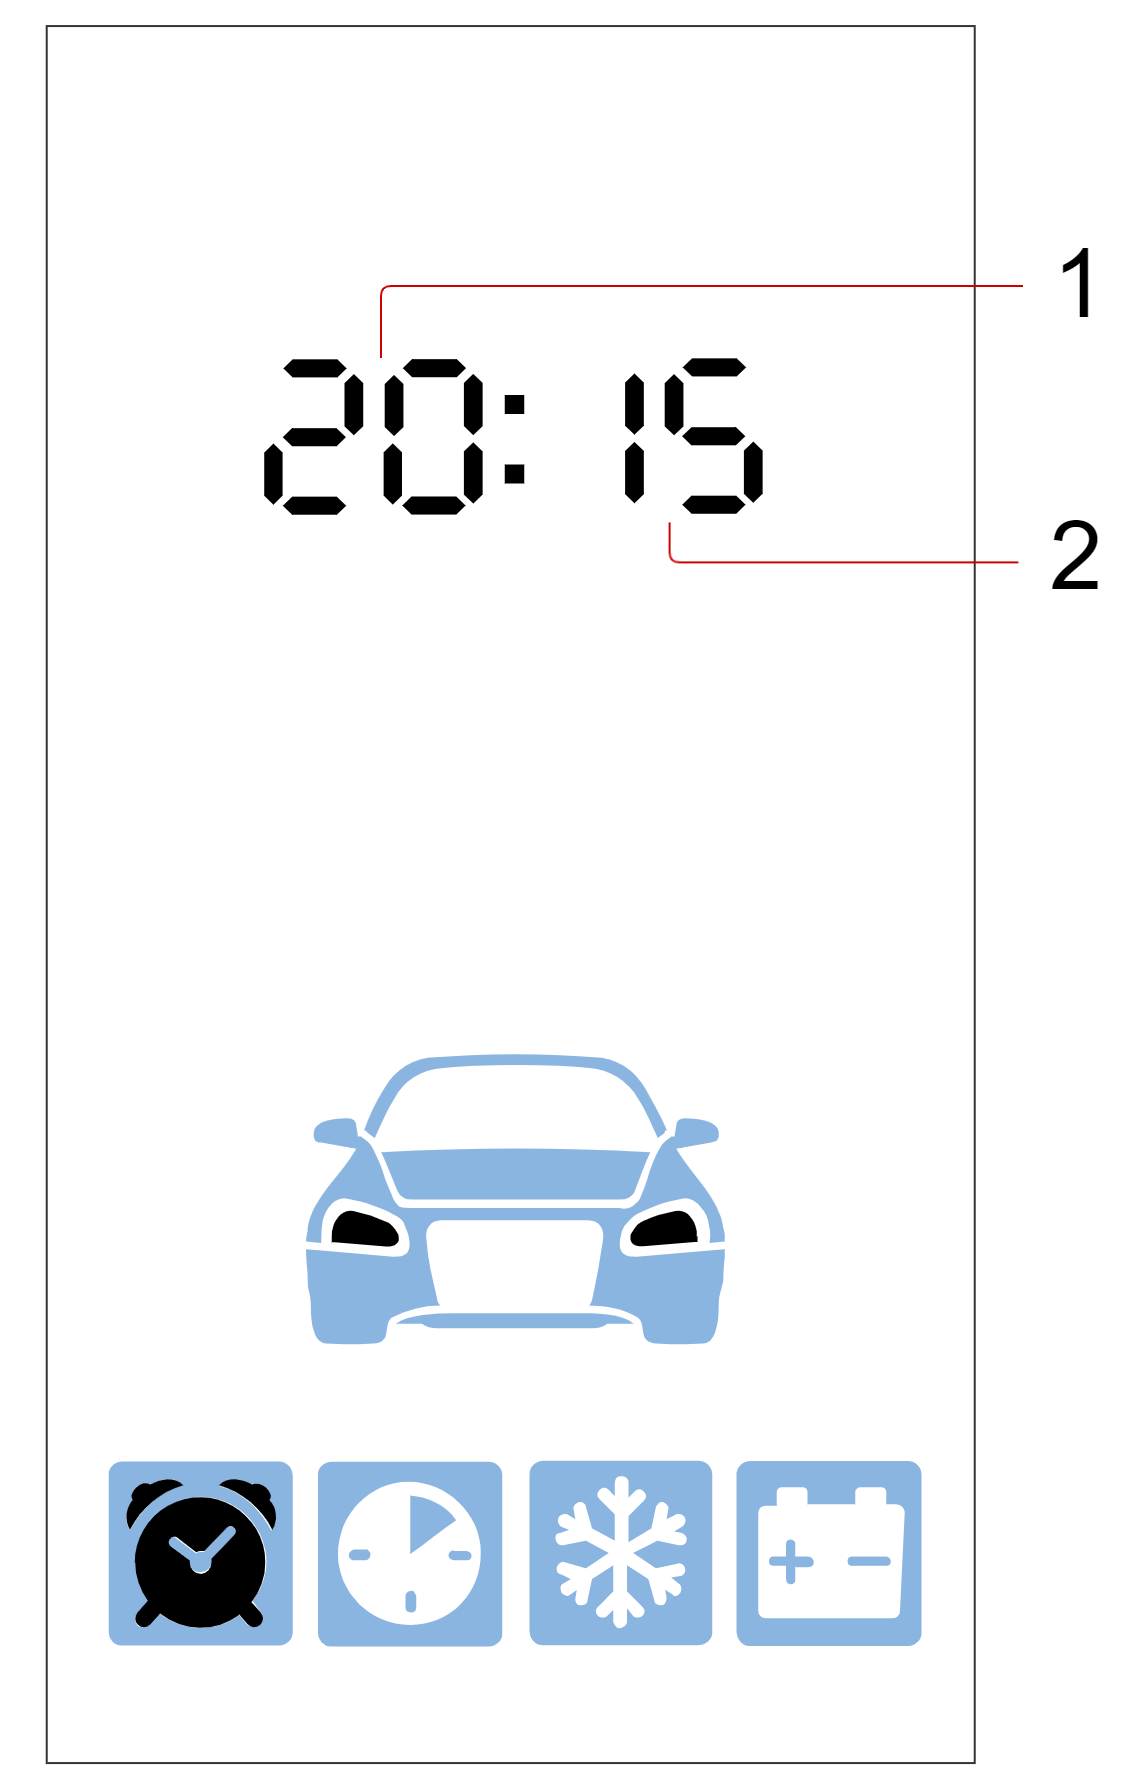
](/uploads/images/gallery/2024-02/6Zgimage.png) - 1 — Hours; - 2 — Minutes. 3. Briefly press button ![icon-short-1.png](/uploads/images/gallery/2023-11/icon-short-1.png "Документация StarLine > _Управление_комплексом_с_помощью_брелока_E96_E96v2 > icon-short-1.png") to proceed to set the current date. [![image.png](/uploads/images/gallery/2024-02/scaled-1680-/oawimage.png)
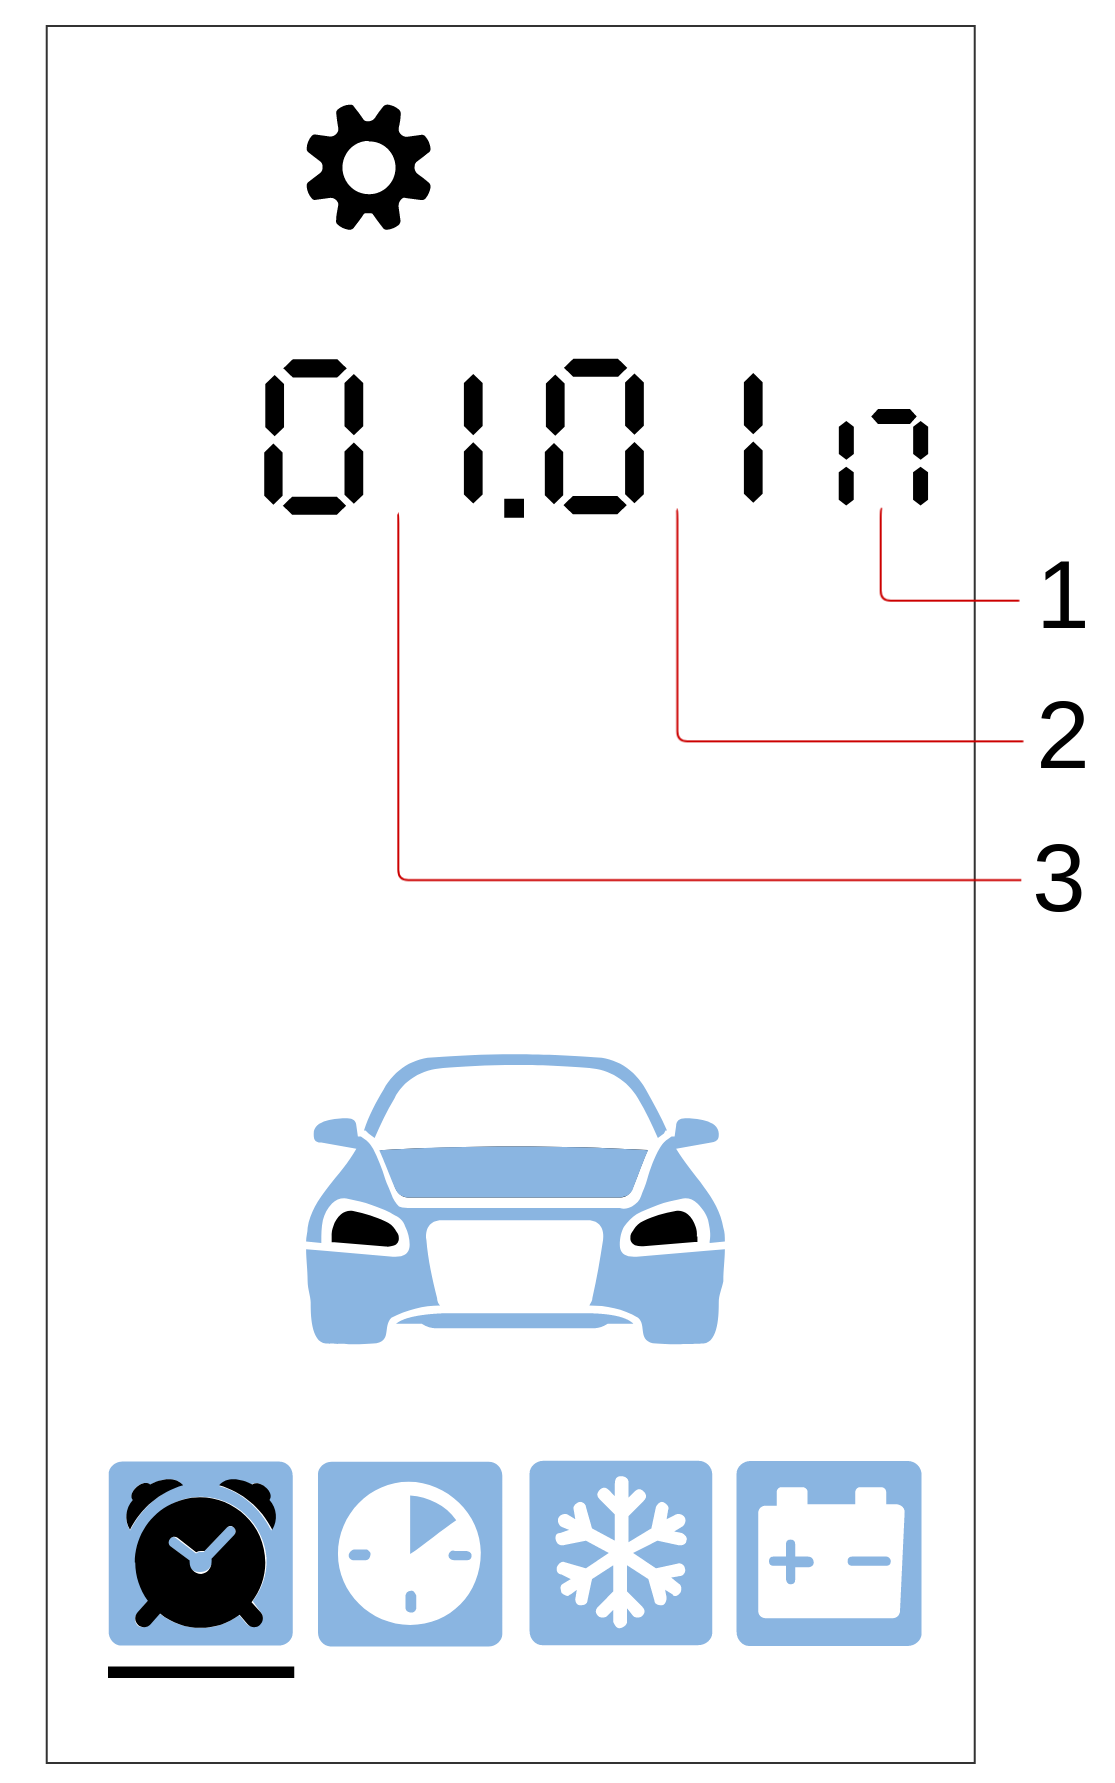
](/uploads/images/gallery/2024-02/oawimage.png)[![image.png](/uploads/images/gallery/2024-02/scaled-1680-/84timage.png)
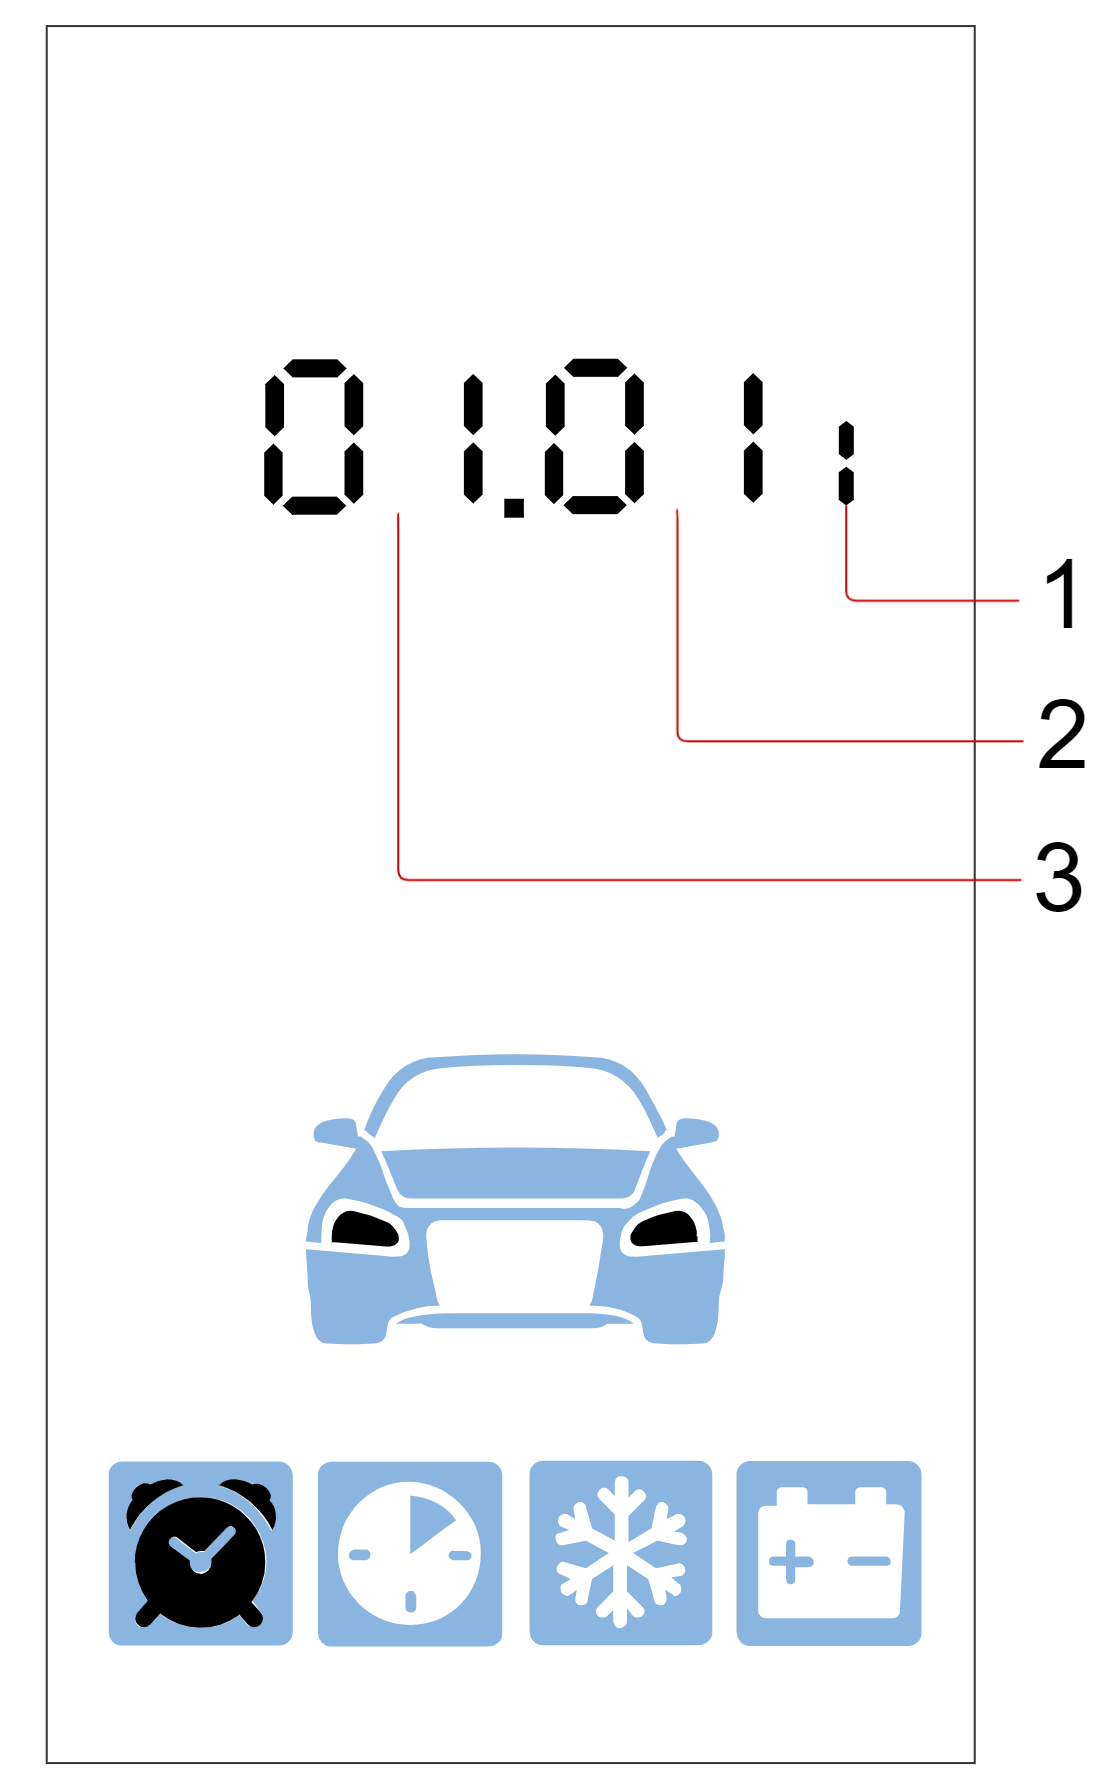
](/uploads/images/gallery/2024-02/84timage.png) - 1 — Day; - 2 — Month; - 3 — Year. 4. Use a short press of button ![icon-short-2.png](/uploads/images/gallery/2023-11/icon-short-2.png "Документация StarLine > _Управление_комплексом_с_помощью_брелока_E96_E96v2 > icon-short-2.png") to set the current day, a short press of button ![icon-short-3.png](/uploads/images/gallery/2023-11/icon-short-3.png "Документация StarLine > _Управление_комплексом_с_помощью_брелока_E96_E96v2 > icon-short-3.png") to set the current month, and a short press of button ![icon-short-4.png](/uploads/images/gallery/2023-11/icon-short-4.png "Документация StarLine > _Управление_комплексом_с_помощью_брелока_E96_E96v2 > icon-short-4.png") to set the current year. 5. To exit the menu, press buttons ![icon-short-double-2-3.png](/uploads/images/gallery/2023-11/icon-short-double-2-3.png "Документация StarLine > _Управление_комплексом_с_помощью_брелока_E96_E96v2 > icon-short-double-2-3.png") simultaneously. # Operating Modes
Security modes Armed
Disarmed
Antihijack
Alarm
Panic
Additional modes Hands-Free
Service mode
Device registration
Security modes provide protection for the vehicle against theft. Additional modes are intended for adding new devices ("Device Registration" mode), disabling security functions for vehicle servicing ("Service Mode"), and convenient system control ("Hands-Free" mode). ### Armed Mode In "Armed" mode, the following zones are monitored: - Ignition - Doors - Trunk - Hood - Shock sensor - Tilt sensor - Motion sensor - Additional sensor If any of these zones are breached, the system will switch to "Alarm" mode.

Arming is only possible with the ignition off. If the arming command is sent while the ignition is on, only the central lock will be activated.

Arming can be activated in one of the following ways: - Short press on button ![icon-short-1.png](/uploads/images/gallery/2023-11/icon-short-1.png ".modesfull v2.29.0 > icon-short-1.png") of the remote key; - When the tag is lost or the door handle sensor is touched in "Hands-Free" mode - By pressing the tag button once in "Disarmed" or "Alarm" mode Successful arming will be confirmed by 1 sound signal and 1 light signal.

If the doors, hood, or trunk are not properly closed, or if any of the door, hood, or trunk switches are faulty (permanently closed), the system will warn you with 4 sound signals and 4 light signals. Restore the breached security zone and check for a single confirming signal indicating entry into the armed mode.

#### Silent Arming Silent arming, which does not use sound signals (siren), can be performed by triple press on button ![icon-short-1.png](/uploads/images/gallery/2023-11/icon-short-1.png ".modesfull v2.29.0 > icon-short-1.png") of the remote key; Successful arming will be confirmed by 1 light signal.

If the doors, hood, or trunk are not properly closed, or if any of the door, hood, or trunk switches are faulty (permanently closed), the system will warn you with 4 light signals. Restore the breached security zone and check for a single confirming signal indicating entry into the armed mode.

#### Emergency Arming If the tag or remote key battery is dead, and there is no access to the [starline.online](https://starline.online/) personal account and StarLine mobile app, use emergency arming: 1. Press the service button or the transceiver button 3 times. 2. Turn on the ignition. Three sound signals will follow. 3. Check for two short sound signals. 4. Turn off the ignition. 5. Exit the vehicle and close all doors. ### Disarmed Mode Disarming can be performed in one of the following ways: - Short press on button ![icon-short-2.png](/uploads/images/gallery/2023-11/icon-short-2.png ".modesfull v2.29.0 > icon-short-2.png") of the remote key; - Upon detection of the tag or touching the door handle sensor ("Hands-Free" mode) - By pressing the tag button once in "Armed" mode Successful disarming will be confirmed by 2 sound signals and 2 light signals. If the "Alarm" mode was activated during the armed state, 3 sound signals and 3 light signals will follow. After disarming, all events that occurred during the armed state will be displayed on the remote key screen.

If no actions are taken within 30 seconds after disarming, the system will automatically switch to "Armed" mode and lock the central locking system.

#### Silent Disarming Silent disarming, which does not use sound signals (siren), can be performed by triple press on button ![icon-short-2.png](/uploads/images/gallery/2023-11/icon-short-2.png ".modesfull v2.29.0 > icon-short-2.png") of the remote key; Successful silent disarming will be confirmed by 2 light signals. If the "Alarm" mode was activated during the armed state, 3 light signals will follow. After disarming, all events that occurred during the armed state will be displayed on the remote key screen.

If no actions are taken within 30 seconds after disarming, the system will automatically switch to "Armed" mode and lock the central locking system.

### Central Locking During Travel Function This function is designed for automatically locking the central locking system during a trip based on one of the configurable conditions: - When the ignition is turned on - When the vehicle starts moving and the brake pedal is pressed - When the handbrake is released - When the gear selector is shifted from the "Park" position for vehicles with automatic transmission - When the set speed threshold is exceeded

Enabling, disabling, and configuring the "Central Locking During Travel" function is performed by an installation specialist.

### Central Lock Unlocking During Travel Function This function is designed for automatically unlocking the central locking system during a trip based on one of the configurable conditions: - When the ignition is turned off - When the gear selector is shifted to the "Park" position for vehicles with automatic transmission - When the engine is stopped - When the ignition is turned off or the gear selector is shifted to the "Park" position for vehicles with automatic transmission - When the handbrake is engaged

Enabling, disabling, and configuring the "Central Lock Unlocking During Travel" function is performed by an installation specialist.

### Trunk Unlocking in Armed Mode Function This function allows the trunk to be opened with the standard vehicle remote key without disarming the system, provided that the tag and/or the system's remote key is within range.

Enabling, disabling, and configuring the "Trunk Unlocking in Armed Mode" function is performed by the installation specialist during setup.

### Keyless Entry System Lock Function

To use this function, tag authorization must be enabled.

The "Keyless Entry System Lock" function provides an additional level of protection against theft in case the standard vehicle key is stolen. In the "Armed" mode, the system blocks the operation of the keyless entry system when the tag is out of range.

By default, the "Keyless Entry System Lock" function is disabled. Contact an installation specialist to activate it.

### Alarm Mode The "Alarm" mode is activated when any of the zones in the "Armed" mode is breached. The system will trigger the siren and the hazard lights for 30 seconds and notify the owner via the remote key. If the zone is not restored, the system will repeat the alarm cycle one more time. When one of the warning zones is breached, 3 sound signals and 3 light signals will follow. Resetting the "Alarm" mode without disarming the system is done by a short press on buttons ![icon-short-1.png](/uploads/images/gallery/2023-11/icon-short-1.png ".modesfull v2.29.0 > icon-short-1.png") or ![icon-short-2.png](/uploads/images/gallery/2023-11/icon-short-2.png ".modesfull v2.29.0 > icon-short-2.png") on the remote key. Notification options is configured by an installation specialist: - Sound notification with siren and hazard lights - Notification with hazard lights only - No light or sound indication

By default, sound notification with siren and hazard lights is enabled.

The maximum number of zone activations is limited to 8 cycles per arming period.

### Panic Mode The "Panic" mode is designed to ensure the safety of the owner and the vehicle. This mode is activated by the owner’s command via a double press on button 1 of the remote key (![icon-short-1.png](/uploads/images/gallery/2023-11/icon-short-1.png ".modesfull v2.29.0 > icon-short-1.png")![icon-short-1.png](/uploads/images/gallery/2023-11/icon-short-1.png ".modesfull v2.29.0 > icon-short-1.png")). Upon receiving the command, the system activates the siren and hazard lights for 10 seconds to attract attention.

This mode can also be used to locate the vehicle in a parking lot.

### Anti-Hijack Mode The "Anti-Hijack" mode is designed to protect the driver from robbery during driving. The system switches to this mode either by the owner’s command or when the tag/remote key is not detected. The algorithm works as follows: - One of the security zones is breached (doors, hood, or trunk); - The motion sensor is triggered; - After 30 seconds, the system starts searching for the tag/remote control; - If the tag/remote control is not detected within 30 seconds, the system will activate warning signals about the upcoming engine blocking with the siren and hazard lights for 10 seconds; - The engine will be blocked either after 3 minutes or upon pressing the brake pedal. The exit from the "Antihijack" mode due to the disappearance of the tag or remote control can be done in one of the following ways: - When the tag/remote control reappears within range; - By entering the emergency disarm code, specified on the owner's PIN envelope, using the service button.

If the emergency disarm code is entered incorrectly 3 times, the ability to enter the code will be blocked for 15 minutes, and the owner will receive an SMS notification.

By default, the "Anti-Hijack" by tag or remote key loss option is disabled. To enable it, hold the tag button until a long red flash appears, then release the button.

### Hands-Free mode The "Hands-Free" mode is designed for automatic enabling/disabling of the security mode. You can enable or disable the "Hands-Free" mode in the cursor menu of the remote key by selecting the corresponding item;

By default, the "Hands-Free" mode is disabled. All mode operation parameters are configured by the installation specialist during installation.

There are several options for enabling and disabling the alarm in the "Hands-Free" mode: - Enabling the alarm when the tag is lost from sight - Enabling the alarm by holding the door handle sensor (purchased separately) with the tag in sight - Disabling the alarm when the tag appears in sight - Disabling the alarm by touching the door handle sensor (purchased separately) with the tag in sight

By default, the tag's operating range is set to the maximum value. To change it, please contact an installation specialist.

If the tag is lost from view while the doors, hood, or trunk are open, the system will notify about this event in one or more of the following ways: - Siren notification about cancellation of transition to the "Armed" mode; - Cancellation of transition to the "Armed" mode. If the connection is lost or the tag's power element is depleted during the trip, but an event is recorded inside the cabin, the system will ignore the tag signal loss. Ten seconds after the door is opened, the system will automatically switch to the "Alarm" mode.

In the "Hands-Free" mode, automatic arming will not be executed if the tag is within sight.

##### **Disabling "Hands-Free" Mode for 1 Security Cycle** If the tag remains within range during parking (for example, you're in a cafe while your car is parked nearby), it is recommended to disable the security deactivation in "Hands-Free" mode for 1 security cycle. After completing the security cycle, the system will automatically return to its previous operating mode after opening one of the doors, the trunk, or the hood. You can disable the security deactivation in "Hands-Free" mode for 1 security cycle using one of the following methods: - Arming the security system by pressing a button on the tag; - Arming the security system using the standard key fob; - Arming the security system with two commands using the standard key fob within 10 seconds. Successful disabling of the "Hands-Free" mode for 1 security cycle will be confirmed by 1 audible signal. If the system is in the "Disarmed" mode while the vehicle owner is nearby (for example, unloading the trunk at the cottage), it is recommended to disable the security activation in "Hands-Free" mode for 1 security cycle. After turning on the ignition or sending the "Arm" command, the system will automatically return to its previous "Hands-Free" mode. You can disable the security activation in "Hands-Free" mode for 1 security cycle using one of the following methods: - Disarming the security system by pressing a button on the tag; - Disarming the security system using the standard key fob; - Disarming the security system with two commands using the standard key fob within 10 seconds. Successful disabling of the "Hands-Free" mode for 1 security cycle will be confirmed by 1 audible signal. ### Service mode Service Mode is intended for temporarily disabling security functions and restricting access to system settings. It is recommended during service maintenance.

Enabling Service Mode is only possible from the "Disarmed" mode near the vehicle.

The following functions and modes are unavailable in Service Mode: - Arming and disarming the security system; - "Hands-Free" mode; - Unlocking and locking the central lock during a trip; - Remote and automatic engine start; - "Turbo Timer" function; - Pre-heater control; - Trunk release; - Transition to the "Panic" mode; - Activation of the "Anti-Hijacking" mode by tag or key fob loss; - Main unit calibration procedure; You can enable and disable the Service Mode using one of the following methods: - Selecting the corresponding item in the tag cursor menu; - Short press of the buttons ![icon-service-mode.png](/uploads/images/gallery/2023-11/icon-service-mode.png ".modesfull v2.29.0 > icon-service-mode.png") of the remote key; - Holding down the tag button for 5 seconds; Entering Service Mode will be confirmed by a yellow LED indication on the tag.

In Service Mode, transition to other additional modes is prohibited!

##### **Automatic Exit from Service Mode**

For this function to work, owner authorization must be enabled, sensors must be activated, and vehicle speed information must be available.

The system will automatically exit Service Mode and wait for owner authorization when leaving the service station based on the established event with the ignition on. After successful authorization, the system will switch to the "Disarmed" mode. If authorization fails, the security system will switch to the "Alarm" mode. ### Immobilizer mode The Immobilizer Mode prevents movement without additional owner authorization. Upon disarming or turning off the ignition, the system will wait for authorization confirmation either by the presence of the key fob in the vicinity or by entering the owner's authorization code using the vehicle's standard buttons (e.g., multimedia or window control buttons) while the ignition is on. If owner authorization is not confirmed within 1 minute, attempting to start the engine will result in it being locked for 1 minute or until the owner's authorization is successfully completed.

When the Immobilizer Mode is enabled alongside the "Slave" mode, both authorization conditions must be met to disarm the system.

### Vehicle Status Control With this function, users can request information such as engine and cabin temperature, battery voltage, and fuel level. Requests can be made by the owner with a short press of the remote key button ![icon-short-3.png](/uploads/images/gallery/2023-11/icon-short-3.png ".modesfull v2.29.0 > icon-short-3.png"). The information will be displayed on the remote key's screen.

The engine temperature readings displayed by the system depend on the location of the engine temperature sensor and may differ from those shown on the vehicle's dashboard.

If the request is made during automatic engine start, the remaining engine runtime will also be displayed in addition to the aforementioned values.

### Engine Start Function The engine start function allows remote and automatic engine starting/stopping. **Preparing a Manual Transmission (MT) Vehicle for Remote and Automatic Engine Start** Before starting the engine, you need to perform the "Program Neutral" procedure: 1. Engage the parking brake while the engine is running. 2. Remove the key from the ignition switch. The engine will continue to run. 3. Exit the vehicle, close the doors, trunk, and hood, and arm the security system. The engine will be stopped. 4. The system will enter the "Armed" mode. 5. The key fob will display the "N" icon. 6. The system is now ready for remote and automatic engine start.

If a door is opened or the ignition is turned on after performing the "Program Neutral" procedure, remote and automatic engine start will be canceled until the next "Program Neutral" algorithm execution.

**Preparing an Automatic Transmission (AT) Vehicle for Remote and Automatic Engine Star** Ensure that the AT selector is in the "Park" position. #### Engine Start Remote engine start can be initiated by one of the following methods: - Long press of button 1 on the remote key: ![icon-long-1.png](/uploads/images/gallery/2023-11/icon-long-1.png ".modesfull v2.29.0 > icon-long-1.png")![icon-note-1.png](/uploads/images/gallery/2023-11/icon-note-1.png ".modesfull v2.29.0 > icon-note-1.png"); - Triple press of the factory alarm system activation button within a 5-second interval (availability depends on the car model, consult your installation specialist). Automatic engine start can occur under the following conditions: - Based on temperature value — engine starts when the engine temperature drops below a set value. - Based on battery voltage value — engine starts when the battery voltage decreases. - Based on time period — engine starts with a specified runtime after a set repeating time interval. - Based on the alarm clock — engine starts at a specified time. Temperature and battery voltage values, interval, and schedule are set in the remote key cursor menu.

The minimum engine runtime for remote start is 10 minutes. To change it, please consult an installation specialist.

Automatic engine start will not occur if less than 1 hour has passed since the last start or if the previous automatic start failed. After a trip, automatic engine start is possible no earlier than 5 minutes after the engine has been stopped.

#### Engine Stop The engine stops if: - long press of button 2 on the key fob is performed: ![icon-long-2.png](/uploads/images/gallery/2023-11/icon-long-2.png ".modesfull v2.29.0 > icon-long-2.png")![icon-note-1.png](/uploads/images/gallery/2023-11/icon-note-1.png ".modesfull v2.29.0 > icon-note-1.png"); - The factory alarm system activation button is pressed three times within a 5-second interval (availability depends on the car model, consult your installation specialist). - The "Alarm" mode is activated. - The vehicle starts moving. - The hood is opened. - The parking brake is released (for MT vehicles). - The AT selector is shifted out of the "Park" position (for AT vehicles). - The brake pedal is pressed. - The engine reaches the maximum temperature threshold specified during the security system setup to protect the engine from overheating. **Car driving continuation after remote engine starting** To continue driving the car, without stopping the engine after remote starting, do as follows: - **for cars with ignition lock:** - deactivate complex security; - insert the key into the ignition lock, turn it to position «Ignition on» and start moving; - the LED on the valet button will go out at movement start, pressing of the brake pedal or parking brake release; - **for cars with START/STOP button:** Several options are possible depending on the car and complex connection method: - **first variant (\*):** - deactivate complex security; - hold the brake pedal for 3 seconds; - the LED on the service button will go out, after which movement can be started (the START/STOP button need not be pressed); - **second variant (\*):** - deactivate complex security; - press the START/STOP button 1 or 2 times (\*); - the LED on the service button will go out, after which movement can be started.

(\*) Ask the installation specialist during mounting about the connection method of your complex and the operation algorithm.

### Function «Engine starting preheater» The function allows for engine preheating before starting. The starting preheater can be controlled both in the manual and automatic mode. #### **Manual mode** In the manual mode the starting preheater is switched on/off by a command. The starting preheater can be switched on by sequentially pressing buttons 2 and 1 on the remote key: ![icon-long-2.png](/uploads/images/gallery/2023-11/icon-long-2.png ".modesfull v2.29.0 > icon-long-2.png")![icon-note-1.png](/uploads/images/gallery/2023-11/icon-note-1.png ".modesfull v2.29.0 > icon-note-1.png")![icon-short-1.png](/uploads/images/gallery/2023-11/icon-short-1.png ".modesfull v2.29.0 > icon-short-1.png").

The preheater operates for 20 minutes in this mode. To change its duration, consult your installation specialist.

If the preheater has factory settings different from those set by the installation specialist, the operating time may differ from the specified time.

Operation can be prolonged by sending a repeated command for starting preheater switch-on. The starting preheater can be switched off by sequentially pressing button 2 on the remote key: ![icon-long-2.png](/uploads/images/gallery/2023-11/icon-long-2.png ".modesfull v2.29.0 > icon-long-2.png")![icon-note-1.png](/uploads/images/gallery/2023-11/icon-note-1.png ".modesfull v2.29.0 > icon-note-1.png") ![icon-short-2.png](/uploads/images/gallery/2023-11/icon-short-2.png ".modesfull v2.29.0 > icon-short-2.png").

To protect the engine from overheating, the preheater will stop when the maximum temperature threshold specified during the security system setup is reached. This helps protect the engine from overheating.

#### **Automatic mode**

The automatic mode is activated by the installation specialist during complex setting after mounting.

In automatic mode, the preheater is activated before remote and/or automatic engine start. Automatic engine start can occur under the following conditions: - Based on temperature value — preheater starts when the engine temperature drops below a set value. - Based on the alarm clock — preheater starts at a specified time. The temperature value and schedule are set in the remote key cursor menu. If the engine temperature before remote or automatic start is lower than the set value, the preheater will start. When the engine reaches the set temperature (during automatic start) or after the set time elapses, the engine will start. The preheater is turned off after the set time elapses or when the temperature threshold for disconnection is reached.

The preheater operates for 10 minutes in this mode. To extend the operation, you need to manually send the command to turn on the preheater. To adjust the operation time and temperature threshold for preheating, please consult an installation specialist.

### «Turbotimer» function For vehicles with turbochargers, use the "Turbotimer" function to cool the engine turbine.

The "Turbotimer" function is activated by the installation specialist during installation.

To activate the function on vehicles with an ignition key, follow these steps: - Engage the parking brake with the engine running. The service button LED will light up. - Remove the key from the ignition switch. The engine will continue to run. - Exit the vehicle, close the doors, trunk, hood, and activate the "Armed" mode. - When the turbine cools down, the engine will shut down. To activate the function on vehicles with a START/STOP button, follow these steps: - Engage the parking brake with the engine running. The service button LED will light up. - Exit the vehicle, close the doors, trunk, hood, and activate the "Armed" mode. - When the turbine cools down, the engine will shut down.

The cooling time for the turbine is calculated automatically and depends on the engine speed before the end of the trip. The maximum turbine cooling time is 5 minutes. For vehicles with a START/STOP button, the turbotimer operation time is automatically extended until the system enters the "Armed" mode.

### Beach mode In "Beach Mode," there is no need for a tag or key fob to enable/disable the security system (they can be left inside the car). Owner authorization is achieved by entering the emergency disarm code by touching the door handle with a capacitive sensor StarLine ES-1 (optional). In this mode, the system does not respond to key fob commands. To activate "Beach Mode," follow these steps: 1. Switch the system to the "Disarmed" mode and turn off the ignition. 2. Press the service button three times and turn on the ignition. This will be followed by three audible signals confirming the activation of "Beach Mode." Turn off the ignition. 3. Exit the car and touch the door handle three times. The system will enter the "Armed" mode.

"Beach Mode" deactivates the "Hands-Free" mode until the security system is turned off.

Exiting the mode is done by entering the emergency disarm code by touching the door handle with an interval of no more than 3 seconds. The correct input of the code digit will be confirmed by audible and visual signals, the quantity of which will correspond to the code digit. The correct input of the code will be confirmed by 2 audible and visual signals.

If the emergency disarm code is entered incorrectly 3 times, the possibility of re-entering the code will be blocked for 15 minutes.

After disarming the system, if no actions or commands are given, the system will automatically switch to the "Armed" mode after 30 seconds, and the "Beach" mode will remain active.

### Video recorder control

The "Video Recorder Control" function is activated by the installation specialist during the installation of the system.

The system automatically activates the video recorder for recording in the following cases: - When the ignition is turned on, it activates for 5 minutes; - When switching to the "Alarm" mode or triggering the pre-alarm level, it activates for 2 minutes.

If the engine is started when the "Armed" mode is activated, the video recorder will continue to operate until the engine is stopped.

### Risky parking mode Use this mode when parking in areas with a high risk of theft. In this mode the system will require owner authorization with the factory buttons each time the system is disarmed.

This mode operates independently of the "Immobilizer mode" settings.

To enable/disable the mode, follow these steps: 1. Disarm the alarm. 2. Turn off the ignition. 3. Press the service button twice. 4. Turn on the ignition. Two audible signals will follow. Enabling the mode will be confirmed by one audible signal and one visual signal, while disabling it will be confirmed by two audible and two visual signals. # Device Registration To register new remote keys, tags, smartphones, use the "Device Registration" mode.

To prevent unauthorized registration of new accessories, entry to registration mode is permitted in Disarmed mode only. If Immobilizer mode enabled then authorization must be passed to fully disarm a system.

Tags and smartphones shall be registered in one registration cycle. All previously paired tags and smartphones will be deleted from memory if not paired again together with the new ones. A total of up to 5 devices can be registered in the system.

When registering new primary and additional remote keys, all previous remote keys will be removed from memory, and they must be registered again. A total of up to 4 remote keys can be registered in the system.

All steps of device registration must be completed without long pauses between them.

### Entering the device registration mode 1. Set the system to "Disarmed" mode. ![6.png](/uploads/images/gallery/2023-11/6.png) 2. Turn off the ignition (if it was on). ![7.png](/uploads/images/gallery/2023-11/7.png) 3. Press the service button 7 times. ![8.png](/uploads/images/gallery/2023-11/8.png) 4. Turn on the ignition. There will be 7 flashes of the service button LED and 7 audible signals. ![9.png](/uploads/images/gallery/2023-11/9.png) 5. Entry into the registration mode will be confirmed by 2 flashes of the service button LED and 2 audible signals.![2.png](/uploads/images/gallery/2023-11/2.png) ### Registration of primary and additional remote keys 1. Press buttons 1 and 2 of the remote key briefly. ![n_Кнопка 1 _Кнопка 2.png](/uploads/images/gallery/2023-11/n-knopka-1-knopka-2.png) 2. After 3 seconds, successful registration will be confirmed by a short sound signal from the remote key, 2 flashes of the service button or transceiver LED, and 2 sound signals. If the remote key is not registered, the remote key will emit 4 sound signals. 3. Perform steps 1 and 2 for each remote key. ### Registration of tags 1. Remove the power element from the tag. ![12.png](/uploads/images/gallery/2023-11/12.png) 2. Press and hold the tag button and insert the power element. The LED of the tag will light up red. ![13.png](/uploads/images/gallery/2023-11/13.png) 3. Release the button and monitor the series of red flashes for 10 seconds. ![14.png](/uploads/images/gallery/2023-11/14.png) 4. Successful registration will be confirmed by a green flash, 2 flashes of the LED on the transceiver, and 2 sound signals. If the tag is not registered, the LED of the tag will remain red. ![n_Кнопка-трансивера-и-метка_2.png](/uploads/images/gallery/2023-11/n-knopka-transivera-i-metka-2.png) 5. Repeat steps 1-3 for the remaining tags. ### Registration of a smartphone: 1. Enable Bluetooth in the smartphone settings. 2. Select StarLine equipment from the list of available devices. 3. Enter the code "000000" (on the iOS platform, press the "Pair" button to enter the code).

If multiple registered smartphones are simultaneously in the vicinity, the system will only work with the one that connects first.

### Removing a smartphone from the memory of the security system A previously recorded smartphone in the system's memory will be automatically removed after registering a new smartphone or tag.

Make sure to remove the system from the list of paired Bluetooth devices on your smartphone.

### Exiting the device registration mode Exiting the "Device Registration" mode is automatic after 5 minutes or when the ignition is turned off. ![7.png](/uploads/images/gallery/2023-11/7.png) The exit will be confirmed by 2 flashes of the service button or transceiver LED and 2 sound signals, followed by signals corresponding to the total number of registered remote keys, BT tags, and smartphones. # Emergency disarming Use the emergency disarmament code provided on the owner's plastic card or PIN envelope in the following situations: - Depleted battery in the tag or remote key. - "Antihijack" mode is activated. **PIN envelope** **![pinEnvelope.jpg](/uploads/images/gallery/2023-11/pinenvelope.jpg ".emergencyfull v2.23.3 > Пин-конверт.jpg")** ### Entering emergency disarm code via the service button To emergency disarm the system, follow these steps: 1. Ensure that the ignition is off. ![7.png](/uploads/images/gallery/2023-11/7.png ".emergencyfull v2.23.3 > 18.png") 2. Press the service button a number of times corresponding to the first digit of the emergency disarm code. ![4_1.png](/uploads/images/gallery/2023-11/4-1.png ".emergencyfull v2.23.3 > 4_1.png") 3. After 3 seconds, the digit entry will be confirmed by flashes of the service button LED. The number of flashes will correspond to the sequential number of the emergency disarm code digit (1, 2, 3, or 4 times). 4. Repeat steps 1 and 2 for the remaining digits. If the emergency disarmament code is entered correctly, the system will emit 3 short sound signals and 3 light signals, and transition to the "Disarmed" mode.

If the emergency disarmament code is entered incorrectly 3 times, the ability to re-enter the code will be blocked for 15 minutes. An attempt to enter a digit will be indicated by 5 flashes of the service button LED.

**Example of entering the code 5342 using the service button.** **![схема ввода кода экстренного выключения охраны _кнопка_.png](/uploads/images/gallery/2023-11/sxema-vvoda-koda-ekstrennogo-vykliuceniia-oxrany-knopka.png ".emergencyfull v2.23.3 > схема ввода кода экстренного выключения охраны _кнопка_.png")** ### Entering emergency disarm code via the StarLine EC-1 Capacitive Sensor The emergency disarm code can be entered using the StarLine EC-1 capacitive sensor (installed optionally). To disarm the system, follow these steps: 1. Touch the door handle 3 times. A single sound signal will follow. 2. Touch the door handle a number of times corresponding to the first digit of the emergency disarmament code. The input will be confirmed by a flash of the service button LED. 3. Enter the remaining digits of the code as in step 2. Flashes of the service button LED will follow. The number of flashes will correspond to the sequential number of the emergency disarmament code digit (1, 2, 3, or 4 times). 4. If the emergency disarmament code is entered correctly, there will be 2 flashes of the service button LED and 2 sound signals. The system will transition to the "Disarmed" mode. If the code is entered incorrectly, there will be 4 flashes of the service button LED and 4 sound signals.

If the emergency disarmament code is entered incorrectly 3 times, the ability to re-enter the code will be blocked for 15 minutes. An attempt to enter a digit will be indicated by 5 flashes of the service button LED.

# Changing the emergency disarm code

To change the code, you need to know the current emergency disarm code.

The initial emergency disarm code is indicated on the owner's plastic card or PIN envelope included in the delivery set. **PIN envelope** ![pinEnvelope.jpg](/uploads/images/gallery/2023-11/scaled-1680-/pinenvelope.jpg)

The emergency disarm code may contain any digits except zero.

### Changing the emergency disarm code via the service button To change the emergency disarmament code using the service button, you need to first enter the current code and then the new code twice: 1. Put the system in the "Disarmed" mode. 2. Press the service button 4 times. 3. Turn on the ignition. Confirm the action by observing 4 flashes of the service button LED and 4 sound signals. 4. The system's transition to the emergency disarm code change mode will be confirmed by 2 short flashes of the service button LED and 2 sound signals.

If there is no activity within 5 seconds, the system will automatically exit the emergency disarm code change mode.

5. Turn off the ignition. 6. Turn on the ignition and press the service button a number of times corresponding to the first digit of the current emergency disarm code. 7. Turn off the ignition. The service button LED will light up, and the number of flashes will correspond to the digit position of the emergency disarm code (1, 2, 3, or 4 times). 8. Repeat steps 6...7 for the remaining code digits. 9. There will be 2 flashes of the service button LED and 2 sound signals, confirming the correct entry of the current code. 10. Turn on the ignition. Press the service button a number of times corresponding to the first digit of the new emergency disarm code. 11. Turn off the ignition. The service button LED will light up, and the number of flashes will correspond to the digit position of the emergency disarm code (1, 2, 3, or 4 times). 12. Repeat steps 10...11 for the remaining new code digits. 13. There will be 2 flashes of the service button LED and 2 sound signals, confirming the acceptance of the new emergency disarm code. 14. Enter the new code again by repeating steps 10...12. 15. There will be 2 flashes of the service button LED and 2 sound signals, confirming the recording of the new emergency disarm code. ##### Example of changing the emergency disarm code using the service button To change the current emergency disarm code from 7184 to the new one, 5463, follow these steps: 1. 1. Ensure that the system is in "Disarmed" mode. 2. Press the service button 4 times. 3. Turn on the ignition. The service button will flash 4 times, accompanied by 4 beep sounds. 4. The system will confirm the transition to the emergency disarm code change mode with 2 short flashes of the service button LED and 2 beep sounds. 5. Turn on the ignition. 6. Press the service button 7 times. Turn off the ignition. 7. The service button will flash once. 8. Turn on the ignition. 9. Press the service button once. Turn off the ignition. 10. The service button will flash twice. 11. Turn on the ignition. 12. Press the service button 8 times. Turn off the ignition. 13. The service button will flash three times. 14. Turn on the ignition. 15. Press the service button 4 times. Turn off the ignition. 16. The service button will flash four times. 17. Two short LED flashes and 2 beep sounds will confirm the correct entry of the current code. 18. Turn on the ignition. 19. Press the service button 5 times. Turn off the ignition. 20. The service button will flash once. 21. Turn on the ignition. 22. Press the service button 4 times. Turn off the ignition. 23. The service button will flash twice. 24. Turn on the ignition. 25. Press the service button 6 times. Turn off the ignition. 26. The service button will flash three times. 27. Press the service button 3 times. Turn off the ignition. 28. The service button will flash four times. 29. Two short LED flashes and 2 beep sounds will confirm the acceptance of the new emergency disarm code. 30. Turn on the ignition. 31. Press the service button 5 times. Turn off the ignition. 32. The service button will flash once. 33. Turn on the ignition. 34. Press the service button 4 times. Turn off the ignition. 35. The service button will flash twice. 36. Turn on the ignition. 37. Press the service button 6 times. Turn off the ignition. 38. The service button will flash three times. 39. Press the service button 3 times. Turn off the ignition. 40. The service button will flash four times. 41. Two short LED flashes and 2 beep sounds will confirm the recording of the new emergency disarm code. # Changing the owner authorization code The owner authorization code is used to authenticate the user via the car's built-in buttons. To change the owner authorization code, follow these steps: 1. Set the system to "Disarmed" mode. ![6.png](/uploads/images/gallery/2023-11/6.png ".changeauthorizationcodefull v2.20.3 > 6.png") 2. Turn off the ignition if it is on. ![7.png](/uploads/images/gallery/2023-11/7.png ".changeauthorizationcodefull v2.20.3 > 7.png") 3. Press the service button 7 times. ![8.png](/uploads/images/gallery/2023-11/8.png ".changeauthorizationcodefull v2.20.3 > 8.png") 4. Turn on the ignition. The service button LED will flash 7 times, accompanied by 7 beep sounds. ![9.png](/uploads/images/gallery/2023-11/9.png ".changeauthorizationcodefull v2.20.3 > 9.png") 5. The system will confirm entering the registration mode with 2 flashes of the service button LED and 2 beep sounds. ![2.png](/uploads/images/gallery/2023-11/2.png ".changeauthorizationcodefull v2.20.3 > 2.png") 6. Enter the new owner authorization code using the car's built-in buttons with an interval of no more than 3 seconds between presses. Each press will be accompanied by a single flash of the service button LED. ![23.png](/uploads/images/gallery/2023-11/23.png ".changeauthorizationcodefull v2.20.3 > 23.png")

The owner authorization code consists of a sequence containing from 2 to 25 presses of the car's built-in buttons. Refer to the list of supported car buttons on the [can.starline.ru](http://can.starline.ru) website. If there is no flash of the service button LED after pressing the car's built-in button, then the button is not supported in this car.

7. Two flashes of the service button LED and 2 beep sounds will confirm the acceptance of the code 3 seconds after the completion of entering the owner's code. ![2.png](/uploads/images/gallery/2023-11/2.png ".changeauthorizationcodefull v2.20.3 > 2.png") 8. Enter the owner authorization code again. 9. If the code is entered correctly, there will be 2 flashes of the service button LED and 2 beep sounds. If the code is entered incorrectly, there will be 4 flashes of the service button LED and 4 beep sounds. In this case, repeat steps 5 to 8. 10. Turn off the ignition after 10 seconds to exit the registration mode. ![7.png](/uploads/images/gallery/2023-11/7.png ".changeauthorizationcodefull v2.20.3 > 7.png") 11. Exiting the "Device Registration" mode will be confirmed by 2 flashes of the service button LED and 2 beep sounds, after which there will be signals corresponding to the total number of registered remote keys, BLE tags, and smartphones. #### Deleting the owner authorization code To delete the owner authorization code, follow these steps: 1. Set the system to "Disarmed" mode. ![6.png](/uploads/images/gallery/2023-11/6.png ".changeauthorizationcodefull v2.20.3 > 6.png") 2. Turn off the ignition if it is on. ![7.png](/uploads/images/gallery/2023-11/7.png ".changeauthorizationcodefull v2.20.3 > 7.png") 3. Press the service button 7 times. ![8.png](/uploads/images/gallery/2023-11/8.png ".changeauthorizationcodefull v2.20.3 > 8.png") 4. Turn on the ignition. The service button LED will flash 7 times, accompanied by 7 beep sounds. ![9.png](/uploads/images/gallery/2023-11/9.png ".changeauthorizationcodefull v2.20.3 > 9.png") 5. Entering the registration mode will be confirmed by 2 flashes of the service button LED and 2 beep sounds. ![2.png](/uploads/images/gallery/2023-11/2.png ".changeauthorizationcodefull v2.20.3 > 2.png") 6. Press the service button 3 times. 7. Wait for the long signal of the service button LED, confirming the deletion of the code from the system memory. 8. Turn off the ignition. ![7.png](/uploads/images/gallery/2023-11/7.png ".changeauthorizationcodefull v2.20.3 > 7.png") 9. Exiting the "Device Registration" mode will be confirmed by 2 flashes of the service button LED and 2 beep sounds, after which there will be signals corresponding to the total number of registered remote keys, BLE tags, and smartphones. # Installiation manual An installiation manual is available at the link(to do). The connection diagram is available in the current instructions on the ‘[Connection Diagram](https://bookstack.starline.ru/books/starline-a90-wIg/page/connection-diagram)’ page. # Connection diagram # Software All descriptions of software versions for the main unit, remote keys, and tags are available at the link: Software(to do)