# User manual

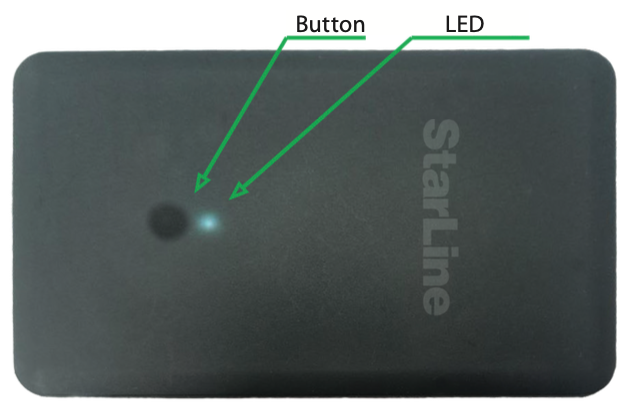
StarLine wireless transponder card (hereinafter referred to as the card) is designed to control the vehicle security system functions using the secure Bluetooth Smart protocol. The card is supplied from factory in transport (power saving) mode, i.e. inactive! To switch it to normal operating mode, press the card button 5 times, followed by 3 short beeps.

[![SL Card Tag.png](https://help.starline.ru/uploads/images/gallery/2026-07/scaled-1680-/sl-card-tag.png)](https://help.starline.ru/uploads/images/gallery/2026-07/sl-card-tag.png)

### TECHNICAL SPECIFICATION


<div class="table-wrap" id="bkmrk--1"></div><table border="1" class="confluenceTable" id="bkmrk-%D0%9D%D0%B0%D0%BF%D1%80%D1%8F%D0%B6%D0%B5%D0%BD%D0%B8%D0%B5-%D0%BF%D0%B8%D1%82%D0%B0%D0%BD%D0%B8%D1%8F-%D0%B2" style="border-collapse: collapse; width: 76.2963%; height: 305.82px; border-color: rgb(0, 0, 0);"><tbody><tr style="height: 35.5156px;"><td class="confluenceTd" style="height: 35.5156px; border-color: rgb(0, 0, 0);">Radio range

</td><td class="confluenceTd" style="height: 35.5156px; border-color: rgb(0, 0, 0);">Bluetooth 2.4 GHz

</td></tr><tr style="height: 57.7969px;"><td style="height: 57.7969px; border-color: rgb(0, 0, 0);">Power supply

</td><td style="height: 57.7969px; border-color: rgb(0, 0, 0);">Built in Li-pol battery 3.7 V

130 mAh

</td></tr><tr style="height: 35.3984px;"><td style="height: 35.3984px; border-color: rgb(0, 0, 0);">Battery runtime

</td><td style="height: 35.3984px; border-color: rgb(0, 0, 0);">up to 4 months

</td></tr><tr style="height: 35.3984px;"><td class="confluenceTd" style="height: 35.3984px; border-color: rgb(0, 0, 0);">Battery charge time

</td><td class="confluenceTd" style="height: 35.3984px; border-color: rgb(0, 0, 0);">up to 2 hours

</td></tr><tr style="height: 35.5156px;"><td style="height: 35.5156px; border-color: rgb(0, 0, 0);">Operation temperature

</td><td style="height: 35.5156px; border-color: rgb(0, 0, 0);">0 ... 40 C<span class="s1">0</span>

</td></tr><tr style="height: 35.3984px;"><td class="confluenceTd" style="height: 35.3984px; border-color: rgb(0, 0, 0);">Waterproof rating

</td><td class="confluenceTd" style="height: 35.3984px; border-color: rgb(0, 0, 0);">IP65

</td></tr><tr style="height: 35.3984px;"><td class="confluenceTd" style="height: 35.3984px; border-color: rgb(0, 0, 0);">Dimensions

</td><td class="confluenceTd" style="height: 35.3984px; border-color: rgb(0, 0, 0);">85 x 54 x 2 mm

</td></tr><tr style="height: 35.3984px;"><td style="border-color: rgb(0, 0, 0); height: 35.3984px;">Weight

</td><td style="border-color: rgb(0, 0, 0); height: 35.3984px;">13 gr

</td></tr></tbody></table>

### PAIRING CARD IN SECURITY SYSTEM

<p class="callout warning">The main unit firmware version must be 2.42 and above</p>

1\. When security systems is disarmed and ignition Off, press the service button 7 times and switch IGN On. Entry to registration mode will be confirmed by 7 flashes of the service button LED and 7 beeps of the main unit built-in buzzer.

2\. Press the card button 7 times, wait for a 2-second beep during which press the button once briefly.

During pairing process the card emits short sounds:

**1 short beep** – pairing successful

**2 short beeps** – pairing failed

3\. Switch IGN Off

Exiting registration mode will be confirmed by 2 flashes of the service button LED and 2 beeps of the main unit built-in buzzer. And then followed by a number of beeps corresponding to the number of registered devices.

<p class="callout info">Transponders and smartphones must be all paired in one registration cycle. All previously paired transponders and smartphones will be deleted from memory</p>

### <span style="color: rgb(0, 0, 0);">  
USING THE TRANSPONDER CARD</span>


[![StarLine_card_tag.png](https://help.starline.ru/uploads/images/gallery/2026-07/scaled-1680-/starline-card-tag.png)](https://help.starline.ru/uploads/images/gallery/2026-07/starline-card-tag.png)

Duration of a card button pressing:

**short** – press and release button, followed by a sound of corresponding current operation mode;

**long** – press and hold button until a long beep

Duration of long pressing can be of 2 levels:

**1 level** — press and hold button followed by beeps of current operating mode and then long beep, during which the button must be released.

**2 level** — press and hold button followed by beeps of current operating mode and a long beep, then followed by serial beeps, during which the button must be released.

<div class="page-content clearfix" component="page-display" id="bkmrk--5" option:page-display:page-id="963"><div dir="auto"><div class="conf-macro output-block" data-hasbody="false" data-macro-name="include" id="bkmrk--6"></div></div></div><table border="1" id="bkmrk-commands-button-pres" style="border-collapse: collapse; width: 80.9877%; border-width: 1px; border-color: rgb(0, 0, 0); height: 214px;"><colgroup><col style="width: 34.0996%;"></col><col style="width: 38.8889%;"></col><col style="width: 27.0115%;"></col></colgroup><tbody><tr style="height: 29.8px;"><td class="align-center" style="border-color: rgb(0, 0, 0); height: 29.8px;">**Commands**

</td><td class="align-center" style="border-color: rgb(0, 0, 0); height: 29.8px;">**Button press**

**sequence**

</td><td style="border-color: rgb(0, 0, 0);">**Sounds**

</td></tr><tr style="height: 29.8px;"><td class="align-center" style="border-color: rgb(0, 0, 0); height: 29.8px;">Arm / disarm

</td><td class="align-center" style="border-color: rgb(0, 0, 0); height: 29.8px;">1 short press

</td><td style="border-color: rgb(0, 0, 0);">1 short

</td></tr><tr style="height: 29.8px;"><td class="align-center" style="border-color: rgb(0, 0, 0); height: 29.8px;">Anti-hijack

switch On / Off

</td><td class="align-center" style="border-color: rgb(0, 0, 0); height: 29.8px;">long press 1 level

</td><td style="border-color: rgb(0, 0, 0);">2 short

</td></tr><tr style="height: 29.8px;"><td class="align-center" style="border-color: rgb(0, 0, 0); height: 29.8px;">Service mode

switch On / Off

</td><td class="align-center" style="border-color: rgb(0, 0, 0); height: 29.8px;">long press 2 level

</td><td style="border-color: rgb(0, 0, 0);">3 short

</td></tr></tbody></table>

<p class="callout warning">NOTE! To save card from damaging, recommend carrying it in a wallet or card holder</p>

<p class="callout warning">Device contains an irreplaceable lithium battery. Do not disassemble, break, or burn the card, or expose it to moisture, direct sunlight, low air pressure, or extreme temperatures below 0 °C or above 65 °C. Use only original charging cable. If the card overheats, swells up, or fails to charge, stop using it immediately</p>

### CHARGING


Connect the charger magnetic plug to the card contacts. The built-in LED will be blinking white. When battery is fully charged, the LED will lit permanently and turn off once charger is unplugged.

[![SL_card_charging.png](https://help.starline.ru/uploads/images/gallery/2026-07/scaled-1680-/sl-card-charging.png)](https://help.starline.ru/uploads/images/gallery/2026-07/sl-card-charging.png)
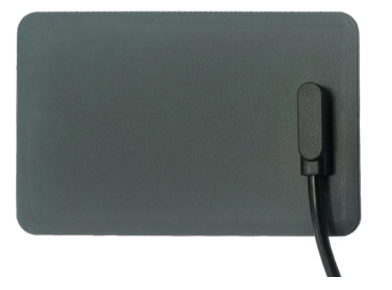
When connecting or disconnecting charger, card indicates a charge level with sounds:

<table border="1" id="bkmrk-%D0%97%D0%B2%D1%83%D0%BA%D0%BE%D0%B2%D1%8B%D0%B5-%D1%81%D0%B8%D0%B3%D0%BD%D0%B0%D0%BB%D1%8B-%D0%A3%D1%80%D0%BE" style="border-collapse: collapse; width: 51.1111%; border-width: 1px; border-color: rgb(0, 0, 0); height: 178.8px;"><colgroup><col style="width: 54.3128%;"></col><col style="width: 45.7114%;"></col></colgroup><tbody><tr style="height: 29.8px;"><td class="align-center" style="border-color: rgb(0, 0, 0); height: 29.8px;">**Sound signals**

</td><td class="align-center" style="border-color: rgb(0, 0, 0); height: 29.8px;">**Charge level**

</td></tr><tr style="height: 29.8px;"><td class="align-center" style="border-color: rgb(0, 0, 0); height: 29.8px;">1 short

</td><td class="align-center" style="border-color: rgb(0, 0, 0); height: 29.8px;">&lt; 25%</td></tr><tr style="height: 29.8px;"><td class="align-center" style="border-color: rgb(0, 0, 0); height: 29.8px;">2 short

</td><td class="align-center" style="border-color: rgb(0, 0, 0); height: 29.8px;">&gt;= 25%</td></tr><tr style="height: 29.8px;"><td class="align-center" style="border-color: rgb(0, 0, 0); height: 29.8px;">3 short

</td><td class="align-center" style="border-color: rgb(0, 0, 0); height: 29.8px;">&gt;= 50%</td></tr><tr style="height: 29.8px;"><td class="align-center" style="border-color: rgb(0, 0, 0); height: 29.8px;">4 short

</td><td class="align-center" style="border-color: rgb(0, 0, 0); height: 29.8px;">&gt;= 75%</td></tr><tr style="height: 29.8px;"><td class="align-center" style="border-color: rgb(0, 0, 0); height: 29.8px;">1 long

</td><td class="align-center" style="border-color: rgb(0, 0, 0); height: 29.8px;">= 100%</td></tr></tbody></table>


<p class="callout success">Do not dispose the faulty and broken transponder card along with a regular household waste. It must be disposed at a designated electric and electronic appliances collection point</p>