StarLine E9v2, E9v3
- User manual
- Safety precautions
- General description
- Technical Specifications
- Personal information
- StarLine.online service and mobile app
- Control with wireless tag (transponder)
- Control with 2-way remote key (optional accessory)
- Lights and sound indication
- Operation modes
- Accessories registration
- Owner authorisation code (PIN-to-Drive)
- Emergency disarming
- Connection diagram
- Firmware
User manual
Safety precautions
ATTENTION!
Read the manual before using the security system. Pay special attention to sections marked with  . To check if this security system is suitable for your vehicle, follow vehicle manual and manufacturer requirements.
StarLine security system is a complex electronic appliance that connects to vehicle wiring and equipment, including engine controls.
It must be installed only by qualified, trained auto electronics technicians who have passed safety training.
Configured parameters must comply with vehicle manual requirements.
The user is fully responsible for any damage to people, animals, or property resulting from improper use of security system or violation of safety precautions in this manual.
Manufacturer is not responsible for losses or injuries caused by breaching these safety rules.
If your system includes a wireless tag (transponder), follow these recommendations:
-
do not carry a tag with vehicle's original keys
-
always switch system to service mode before handing over a vehicle for maintenance or car wash
-
do not give tags to other people to prevent unauthorised access to security functions
-
keep tags out of reach of children and animals
- store the spare tag and battery in the vehicle in its original factory packaging
Safety precautions when charging vehicle storage battery
Battery charging applies voltage above the normal 12V/24V to battery and vehicle circuits, which can damage factory electronics and optional equipment.
Do NOT use chargers or jump-starters directly on the vehicle without disconnecting the battery terminals in these modes:
-
rapid charging with high current ("boost" or similar modes)
-
START modes for engine starting
Never use starting/charging devices for engine starting if main battery is disconnected, main battery is faulty (short circuits, broken plates, etc.).
Never use faulty charging devices, and other power supply equipment (i.e. welding inverters), not dedicated to charge 12V and 24V vehicle batteries.
Avoid the "light up" method of starting with using cables from a donor vehicle battery. The owner is fully responsible for short circuits, voltage surges, or damage to security system and vehicle electronics.
Follow a safe storage battery charging procedure!
Before charging a battery terminals must be disconnected from vehicle circuits.
After charging, connect battery terminals back to vehicle circuits.
This is necessary because battery health (internal shorts, plate damage, etc.) can't be checked without special equipment. Connecting a charger to a faulty battery risks over voltage damage to vehicle electronics and security system.
General description
Security telematic system StarLine E9 (hereinafter the system) is intended for vehicle securing against theft, immobilising and convenient remote control via cellular networks and location monitoring with use of global satellite positioning systems.
Depending on delivery set StarLine security system can be controlled with radio remote key, wireless radio tag (transponder), with voice calls, text messages and mobile app or at starline.online web monitoring service account.
Major benefits
-
embedded buzzer for installer and owner notification
-
«Slave» mode to arm and disarm security systems with use of factory
key or Keyless-go
-
driver authentication by wireless tag, or by PIN code entered with factory buttons (Pin-
to-Drive)
-
Anti-hijack mode by a tag loss on trip or by remote command
-
short range radio control secured with Dialogue Code and 128
bit encryption keys, ensuring security against all existing code
grabbers
-
embedded CAN and LIN interfaces for easier integration with
modern vehicles
-
control over vehicle statuses (battery voltage, faults, mileage, fuel
level, distance to empty etc.)
-
remote and automatic engine start by preset temperature, timer, battery charge level
-
factory immobiliser bypass with external immobilizer bypass module or with embedded data immobilizer bypass via CAN, LIN interfaces
-
remote control over parking heaters and auxiliary heaters
-
data recording and storage a trip data in non-volatile memory
(“black box”)
-
universal programmable input and output channels
-
Flexible Logic for customized system operation in various individual scenarios
-
universal StarLine Master installer’s software for system
configuration and updating
Supported features depend on delivery set and vehicle model
Technical Specifications
| Parameter | Values |
|---|---|
|
Short range control |
2.4GHz Bluetooth Low Energy |
|
Middle range radio control range |
868 MHz |
|
Rated radio control distance |
up to 1500 m |
|
Rated radio notification distance |
up to 2000 m |
|
Interfaces |
• 2xCAN or 3xCAN-FD • 15 OC negative outputs – 200 mA max • 2 positive outputs – 2 А max • 1 universal input • external microphone sensor input |
|
Input voltage |
8 – 16 V |
|
Rated current |
8,7 mA |
|
Tag battery |
CR2032 3V |
|
Remote key battery |
LR03 AAA 1.5V |
|
Operating temperature range |
−40 °С ... +85 °С |
|
Main unit dimensions |
105 х 63 х 16 mm |
|
Main unit weight |
63 g |
Personal information
StarLine.online service and mobile app
Make sure that a proper local SIM card with active balance, internet traffic and permission to operate with M2M smart devices is installed and configured at installation.
SIM card boot PIN code must be disabled prior to inserting into the main unit.
Make sure the local network support cellular standards and bands described in device technical specification.
1. Download StarLine 2 mobile app from your phone store (App Store, Google Play, Huawei AppGallery) or browse starline.onlineweb tracking service
2. Register a new or sign in to existing StarLine account
3. Go to "Device adding" ("+" button) menu on the main screen, select "Add new device" — Next — "GSM module, alarm
system, smart tracker" — "Use activation code"
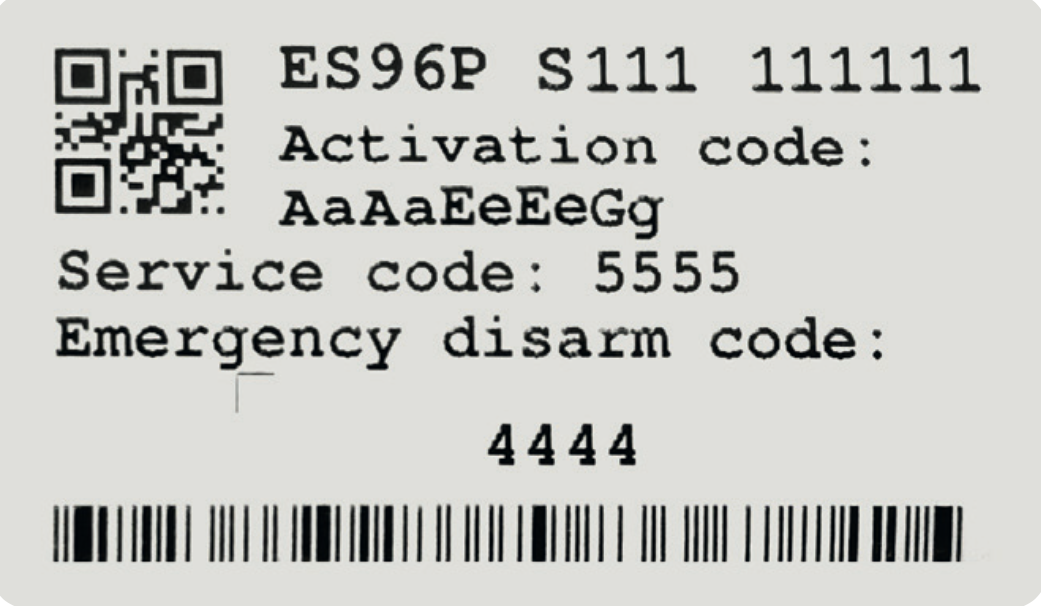
4. Enter the one-time activation code printed on attached sticker
5. System will be registered on server and appear in device list on the main screen
Activation code can not be used again to add device into another account. Use SMS command 00581 and the one-time PIN code in this case.
 .
. 
Control with wireless tag (transponder)
The included and optional tags are supplied from factory in transport (power saving) mode, i.e. inactive! Pushing a tag button in this mode is indicated by green and red alternating flashes of the built-in LED. To switch it to normal mode push a tag button several times until flashing color turns to green
Connection check
- green–Regular mode, Anti-hijack is disabled
- red–Anti-hijack mode is enabled
- yellow–Service mode is enabled
Control over security system
Duration of a tag button pushing:
- short – push and release button, followed with a flash of corresponding current operation mode;
- long–push and hold button until LED begins flashing.
Duration of long push are of 2 levels:
-
1 level – push and hold button followed with double short
flashes of a current operating mode and then long flash at
which button must be released;
-
2 level – push and hold the tag button followed with double
short flashes of a current operating mode, then one long flash
and then followed with serial flashes at which button must be released
|
Command
|
Button push
|
|---|---|
| Arm/Disarm | 1 short |
|
Enable / disable Anti-hijack by a tag away |
long 1 level |
| Enable/Disable Service mode |
long 2 level |
Replacing a tag battery
Wireless tag (transponder) is equipped with CR2032 type Li-ion battery.
Tag battery discharging is indicated with 3 sounds of embedded main unit buzzer (or siren) at ignition On. Then battery must be replaced as soon as possible
To replace battery open a tag casing carefully with a flat metal or plastic item, remove discharged battery from slot. Install a new battery in the slot observing correct polarity (positive side up, as shown on picture). Then fix a cover back. Tag is ready for operation.

A smartphone with support of Bluetooth 4.2 and above can also be used as a tag. See Devices registration article to pair a smartphone as a tag.
The smartphone operation as a tag may be limited by operating system restrictions and power saving settings in a particular phone
Control with 2-way remote key (optional accessory)
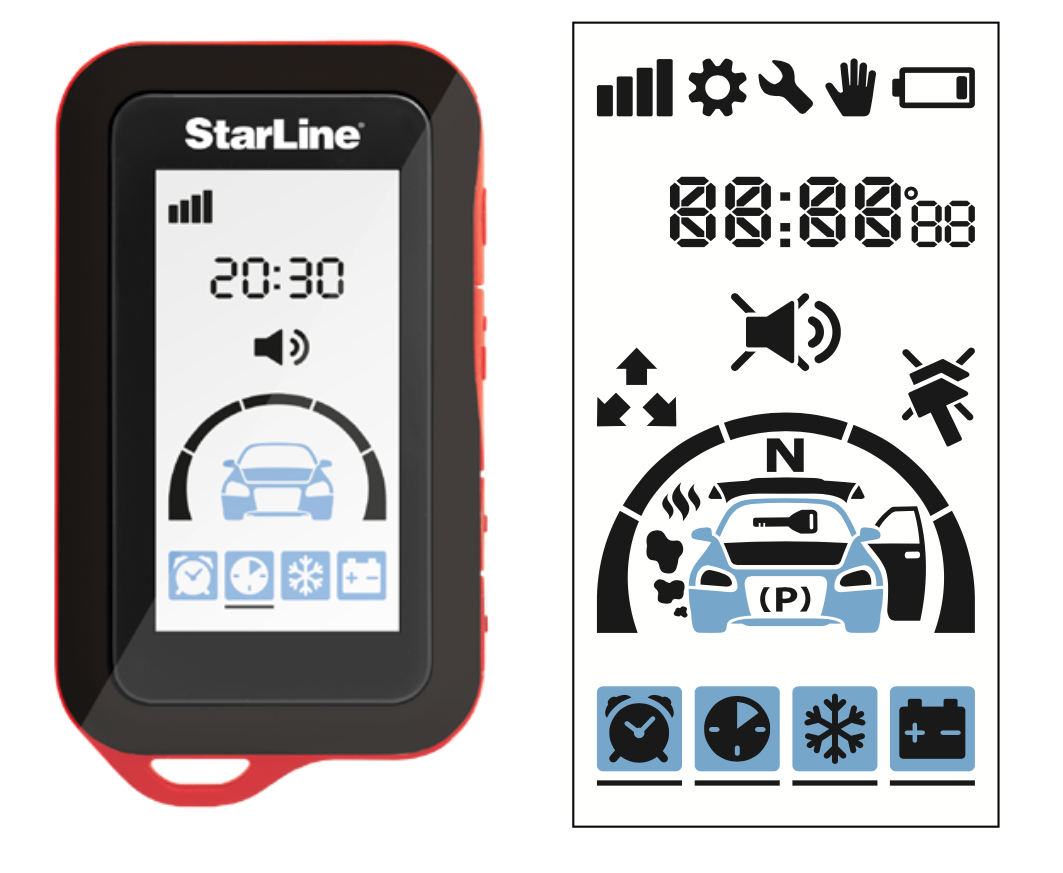
LCD remote control and matching external RF868 transceiver are optional accessories and can be ordered from local dealer
Display icons meaning
Remote engine start
| Icons | Meaning |
|---|---|
|
|
Engine is running |
|
|
Automatic engine start by timer enabled |
|
|
Periodic automatic engine start enabled |
|
|
Automatic engine start by temperature enabled |
|
|
Automatic engine start by battery voltage drop enabled |
|
|
Program neutral executed |
|
|
Parking heater activated (blinking) |


Operating Modes
| Icons | Meaning |
|---|---|
|
|
Armed |
|
|
Hands-Free mode |
|
|
Service mode |
|
|
Programming mode |
|
|
Buttons lock |
|
|
Anti-hijack mode |


Secured zones
| Icons | Meaning |
|---|---|
|
|
Ignition switched On |
|
|
Parking brake tighten |
|
|
Hood open |
|
|
Door open |
|
|
Trunk open |


Sensors
| Icons | Meaning |
|---|---|
|
|
Motion or tilt sensors triggered |
|
|
Auxiliary sensor 1 triggered |
|
|
Auxiliary sensor 2 triggered |
|
|
Tilt sensor triggered |
|
|
Motion sensor triggered |
|
|
Shock sensor warning level triggered |
|
|
Alarm level of shock sensor triggered |
|
|
Shock sensor disabled |


Additional indicators
| Icons | Meaning |
|---|---|
|
|
Data transfer |
|
|
Replace remote battery |
|
|
Siren sounds enabled |
|
|
Siren sounds disabled |


Control commands

| Short Push |
Pushing one or two buttons once less than 1,5 sec. Example:
|
|---|---|
| Long Press |
Pushing and holding a button or two buttons until melody and vibration come up. • 1 level long push – push and hold until a first melody
|
| Double push |
Double push of one button within 1 sec. Example: |
| Triple push |
Triple push of one button within 1 sec. Example: |
| Sequential push |
Double push of one or two buttons with different duration. First pushing is long (1 or 2 level) and second push is short. Firs button must be released before pushing next button. Example: |

Control commands
| Commands | Button combinations |
|---|---|
| Arm |
 |
|
Silent arming |
|
| Disarm |
 |
|
Silent disarming |
|
|
Request vehicle statuses (engine and cabin temperature, battery voltage, fuel level). At remote start – remaining engine run time. |
 |
|
Start engine |
  |
|
Stop engine |
 |
|
Start parking heater |
|
|
Stop parking heater |
|
|
Find car on parking |
 |
|
Switch shock sensor On / Off |
|
|
Switch motion / tilt sensor On / Off |
|
|
Enable Panic |
|
|
Unlock trunk |
|
|
Enable automatic engine start |
configuration menu |
|
Enable / disable Service mode |
 or configuration menu or configuration menu |
|
Enable / disable Hands free mode |
configuration menu |
|
Enable/disable buttons lock |
 |
|
Enable/disable auto buttons lock |
  |
|
Enable vibration only |
|
|
Enable sound profile 2 |
|
|
Enable sound profile 1 |
|
|
Enable sound profile 0 |
|
|
Enable sound profile -- |
 |
|
Activate Flexible Logic program |
|
Modes menu
Some options and operation modes are controlled in Modes menu: Hands Free mode, Service mode, Autostart settings.
Modes menu is entered and exited with 4 button long push level 1:  . Modes menu is automatically exited when no any buttons pushed 15 sec.
Modes submenu is flipped with and buttons short push forward and backward accordingly.
Submenu options are selected with 2 and 3 buttons short push: .
Parameters are tuned with and buttons short push up and down accordingly.
| Icons | Parameters | Description |
Tune step |
|---|---|---|---|
 |
Hands Free mode | Enable/disable Hands Free mode | — |
 |
Automatic engine and parking heater start by timer |
Set engine start hour and min. Engine start settings are indicated with digit 1, parking heater settings – with digit 2. |
1 min |
 |
Periodic engine start |
Set engine start interval in hours |
1 hour |
 |
Automatic engine start by temperature |
Set engine start temperature in Celsius degrees |
1 ºС |
 |
Automatic engine start by battery voltage |
Set main storage battery voltage limit in Volts |
0,1 V |
 |
Service mode | Enable/disable service mode | — |
 and
and  .
.Time and date setup
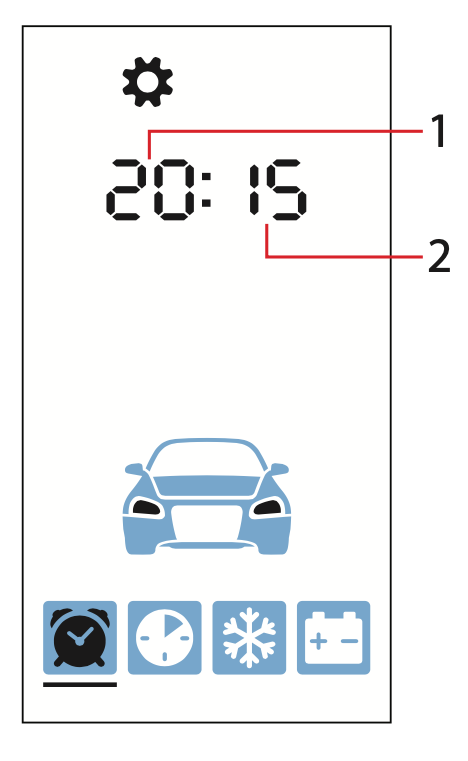
1.Enter time set up menu with sequential pushing button: .
2.Set current time hours with button and minutes with button.
-
1 – hours
-
2 – minutes
3. Push button to turn to current date setting.
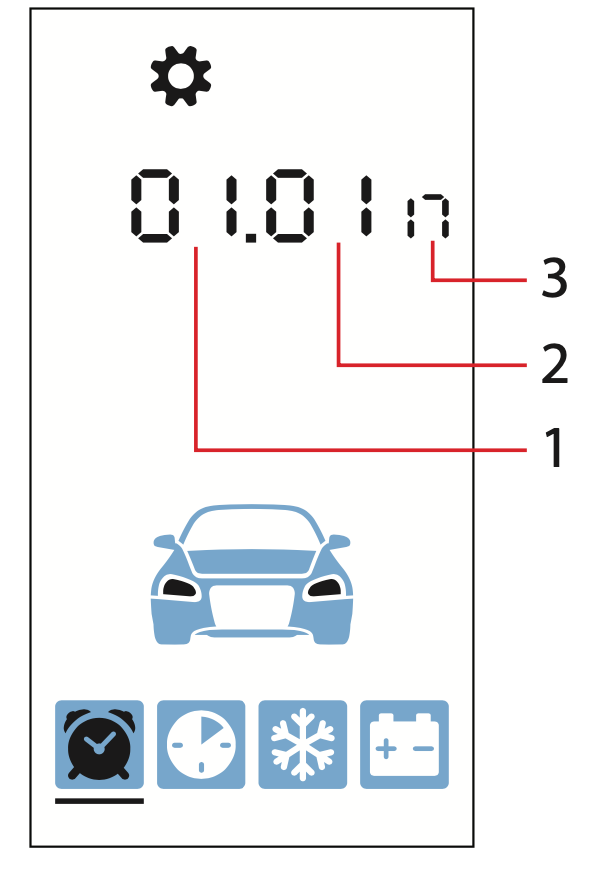
-
1–date
-
2 – month
-
3–year
4. Set current date with button, current month with button and year with button.
5. Push buttons together to exit from time setup menu.
Main settings Menu
Operation parameters are set in the Setting menu.
Settings menu is entered and exited with 4 button long push level 2: .
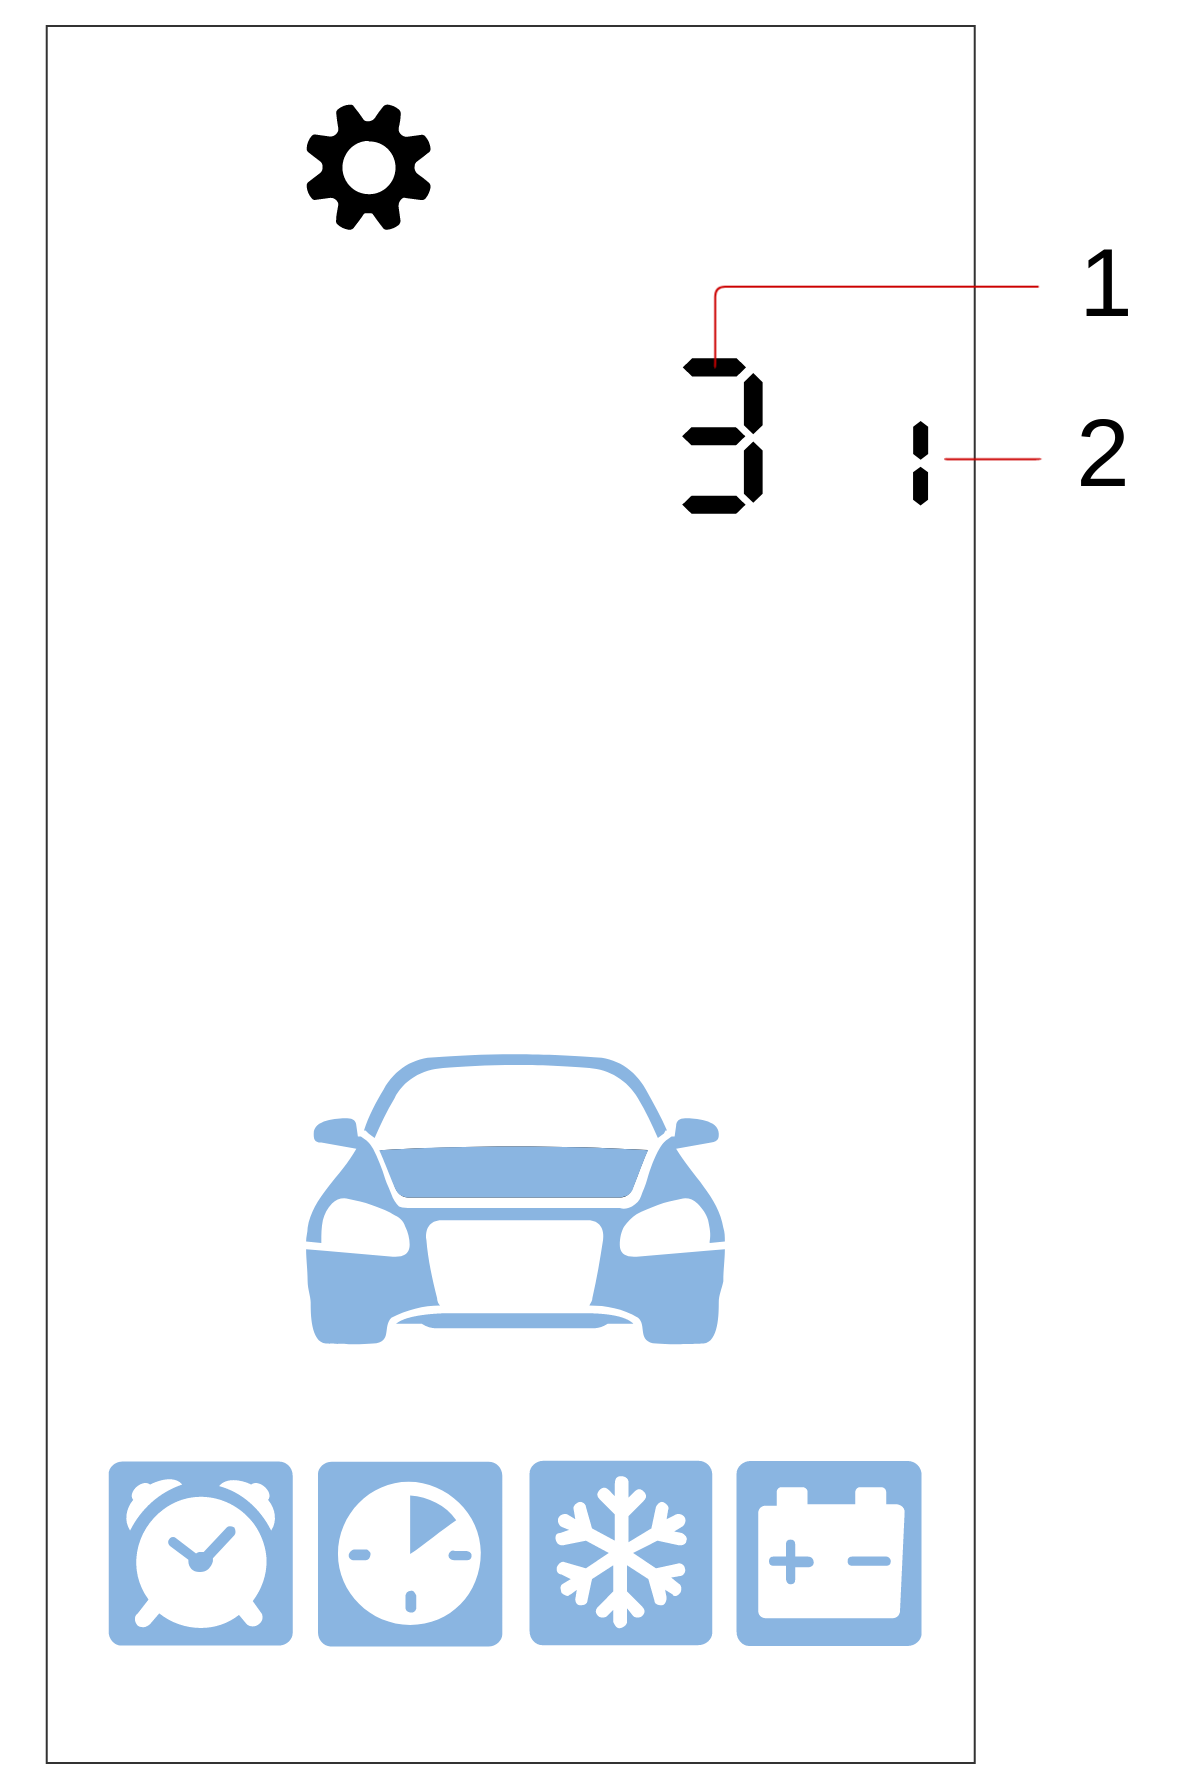
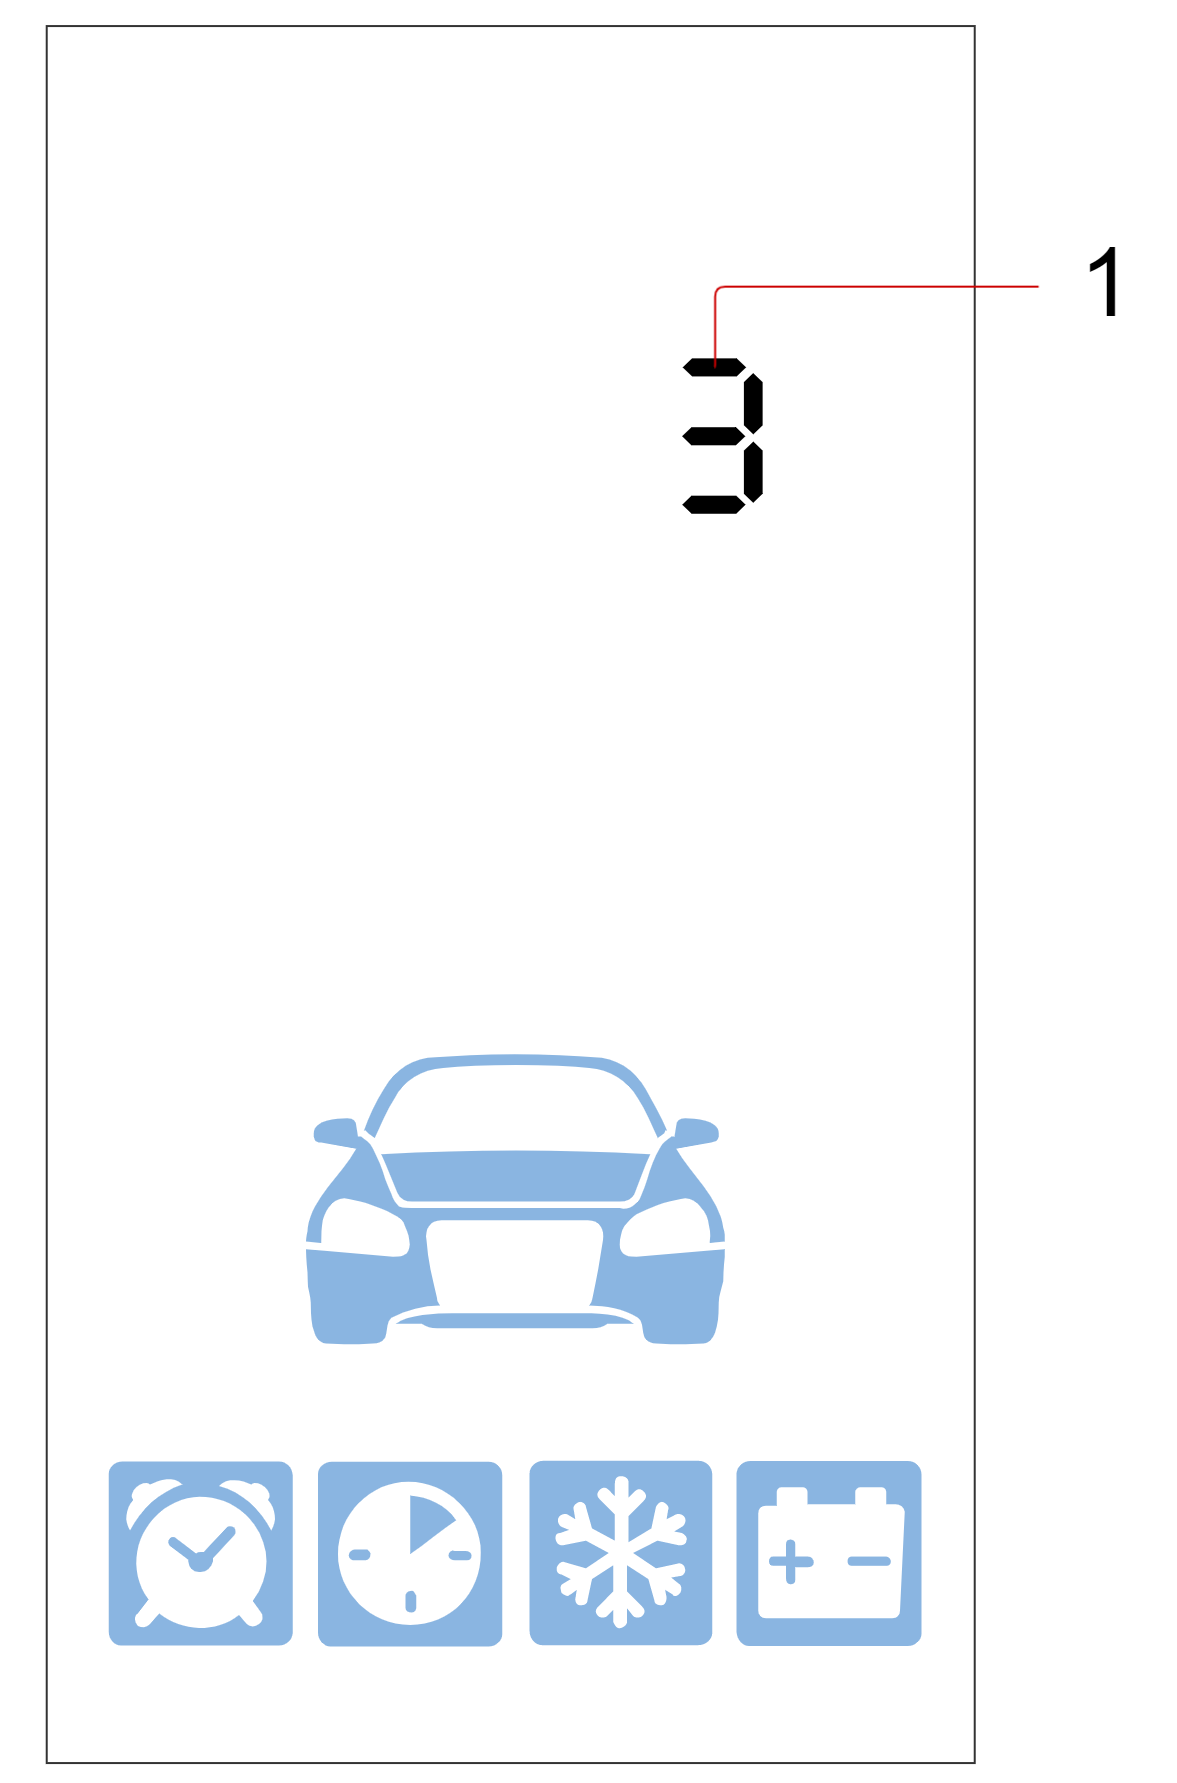
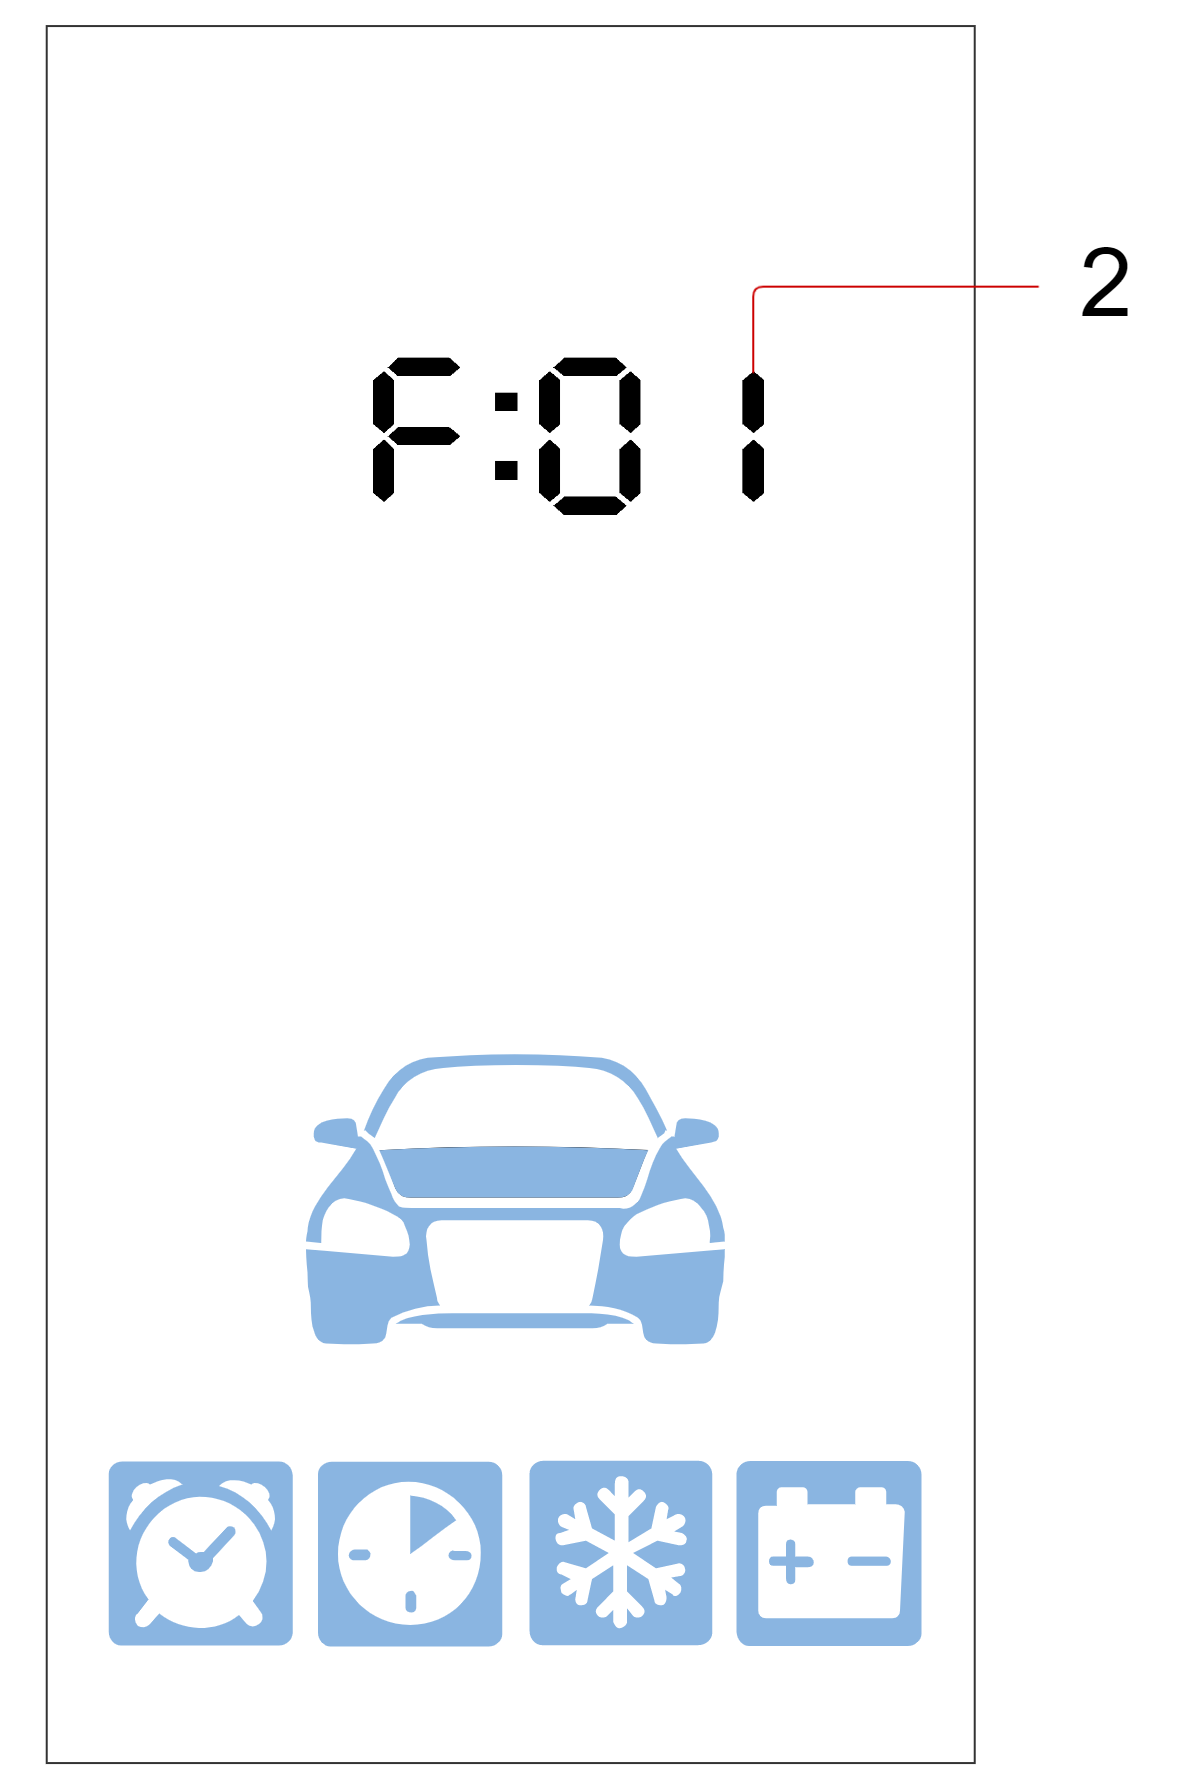
- 1 — parameter function number
- 2 — parameter value
Operation menu points are flipped with and buttons up and down accordingly.
Parameters are tuned with and buttons short push up and down accordingly.
Time zone setup
Select 1 item of Settings menu and set matching time zone with and buttons.
Current time is automatically retrieved from cellular network and satellites data (if GPS module is available).
Setting lights and siren indication at Arming and Disarming
Select 2 item of Settings menu and set the mode with and buttons:
Setting siren volume at Arming and Disarming
Select 3 item of Settings menu and set siren volume level with and buttons:
0 — silent mode, 10 — max volume
Setting lights and siren indication in Alarm mode
Select 4 item of Settings menu and set the mode with and buttons:
Setting siren volume setup in Alarm mode
Select 5 item of Settings menu and set siren volume level with and buttons:
0 — silent mode, 10 — max volume
Setting motion sensor sensitivity
Select 6 item of Settings menu and set sensor sensitivity from 0 to 30 level with and buttons:
0 - motion sensor is disabled, 30 – max sensitivity
Setting tilt sensor sensitivity
Select 7 item of Settings menu and set sensor sensitivity from 0 to 30 level with and buttons:
0 – tilt sensor is disabled, 30 – max sensitivity
Setting shock sensor warning level sensitivity
Select 8 item of Settings menu and set sensor sensitivity from 0 to 30 level with and buttons:
0 – warning level shock sensor is disabled, 30 – max sensitivity
The warning shock sensor sensitivity must be set over the main shock sensor level
Setting shock sensor main alarm level sensitivity
Select 9 item of Settings menu and set sensor sensitivity from 0 to 30 level with and buttons:
0 – main alarm shock sensor is disabled, 30 – max sensitivity
The main alarm shock sensor sensitivity must be set below the warning shock sensor level
Setting tag (transponder) loss range
Select 10 item of Settings menu and set tag loss range value from 3 to 10 level with and buttons:
3 – min distance, 10 – max distance
Setting tag (transponder) detection range
Select 11 item of Settings menu and set tag detection range value from 1 to 8 level with and buttons:
1 – min distance, 8 – max distance
Tag detection range must be set less than a tag loss range
Setting remote key connection control
Select 12 item of Settings menu and set connection control period to 1 or 2 value with and buttons:
0 – connection control is disabled, 1 – connection check every 3 min
Setting turbotimer run time
Select 13 item of Settings menu and set turbotimer run time from 1 to 5 min with and buttons
Remote engine start must be enabled in system configuration parameters for this option
Setting remote / automatic engine start duration
Select 14 item of Settings menu and set engine run time from 10 to 60 min with and buttons
Settings max duration of extended remote / automatic engine start
Select 15 item of Settings menu and set extended engine run time from 15 to 60 min with and buttons
Setting parking heater starting max duration
Select 16 item of Settings menu and set max parking heater starting interval from 1 to 10 min with and buttons
Setting parking heater run time duration
Select 17 item of Settings menu and set parking heater run time from 5 to 60 min with and buttons
Setting parking heater activation before remote engine start
Select 18 item of Settings menu and set parking heater activation before remote engine start with and buttons:
0 – do not start parking heater
1 - start parking heater before remote engine start
Setting parking heater activation before automatic engine start
Select 19 item of Settings menu and set parking heater activation before automatic engine start with and buttons:
0 – do not start parking
1 - start parking heater before automatic engine start
Settings temperature for parking heater activation before remote and automatic engine start
Select 20 item of Settings menu and set parking heater activation temperature before remote and automatic engine start from –5 to –30 ºС with and buttons.
Setting temperature for automatic engine start
Select 21 item of Settings menu and set automatic engine start temperature from +10 to –40 ºС with and buttons
Setting 2 way remote key detection range
Select 22 item of Settings menu and set remote key detection range from 1 to 10 level with and buttons:
1 – min distance, 10 – max distance.
Sound profile menu
|
№ |
Profile | Button combination |
Description (at default settings) |
|---|---|---|---|
| 1 | SOUND 2 |
|
All signals at max level and vibration enabled. |
| 2 | SOUND 1 |
|
All signals at min level and vibration enabled. |
| 3 | SOUND 0 |
|
Vibration only, all sounds Off |
| 4 | SOUND - |
|
Fully silent, vibration and all sounds Off |

Changing sound profile settings
Sound profile menu is entered with long pushing level 2.
Setting commands confirmation signals
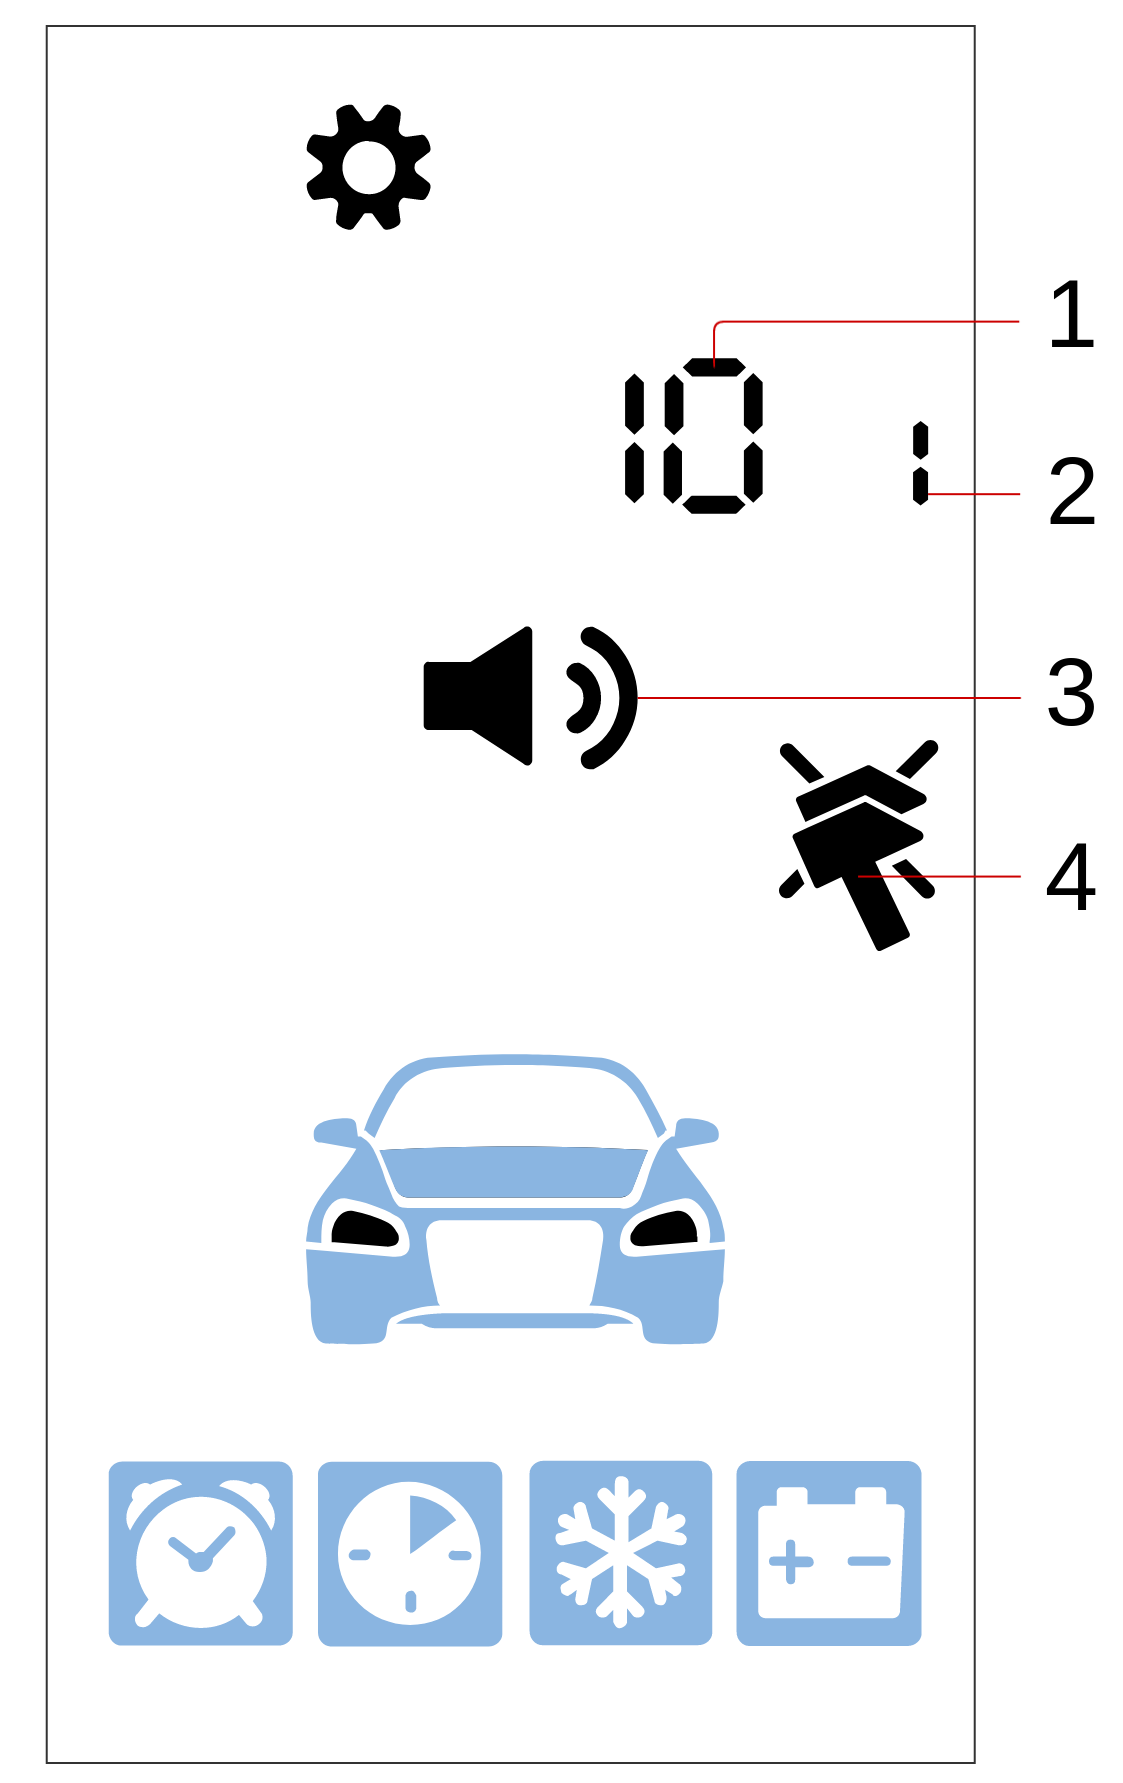
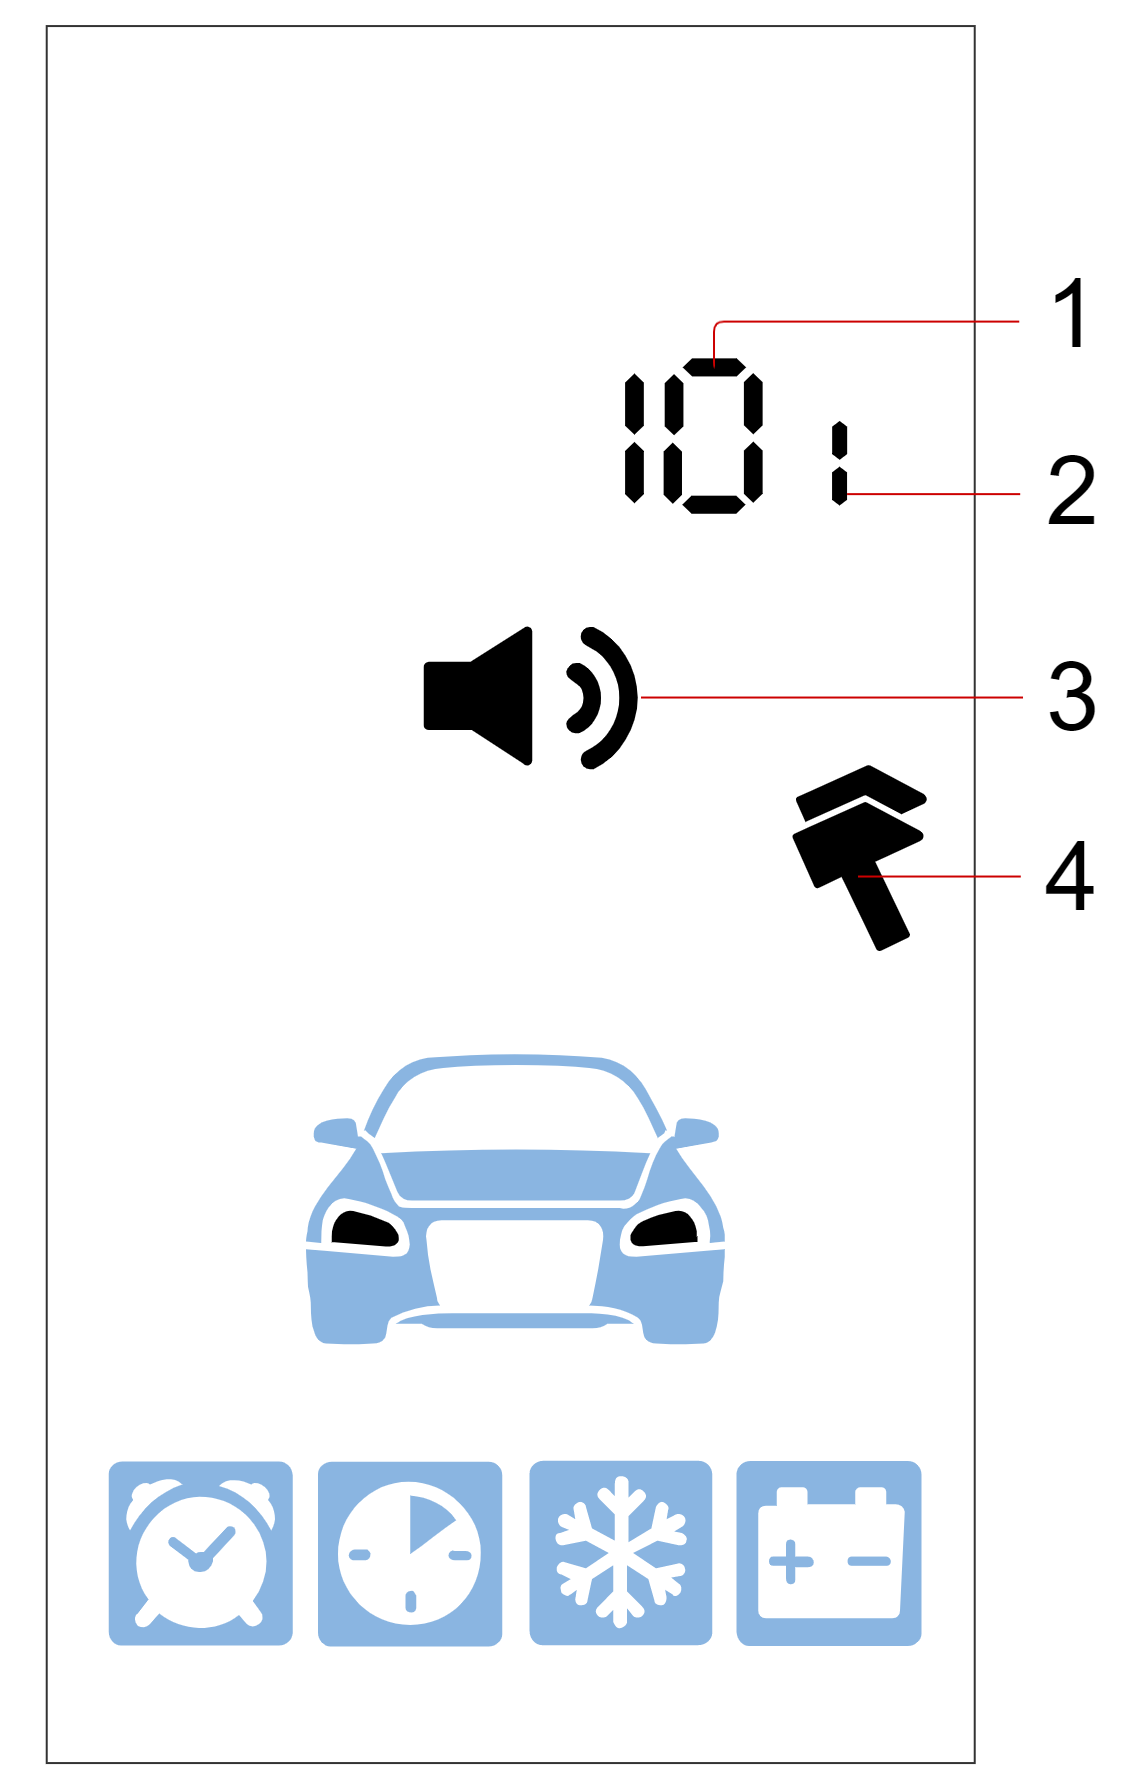
- 1 — selected signal type volume level
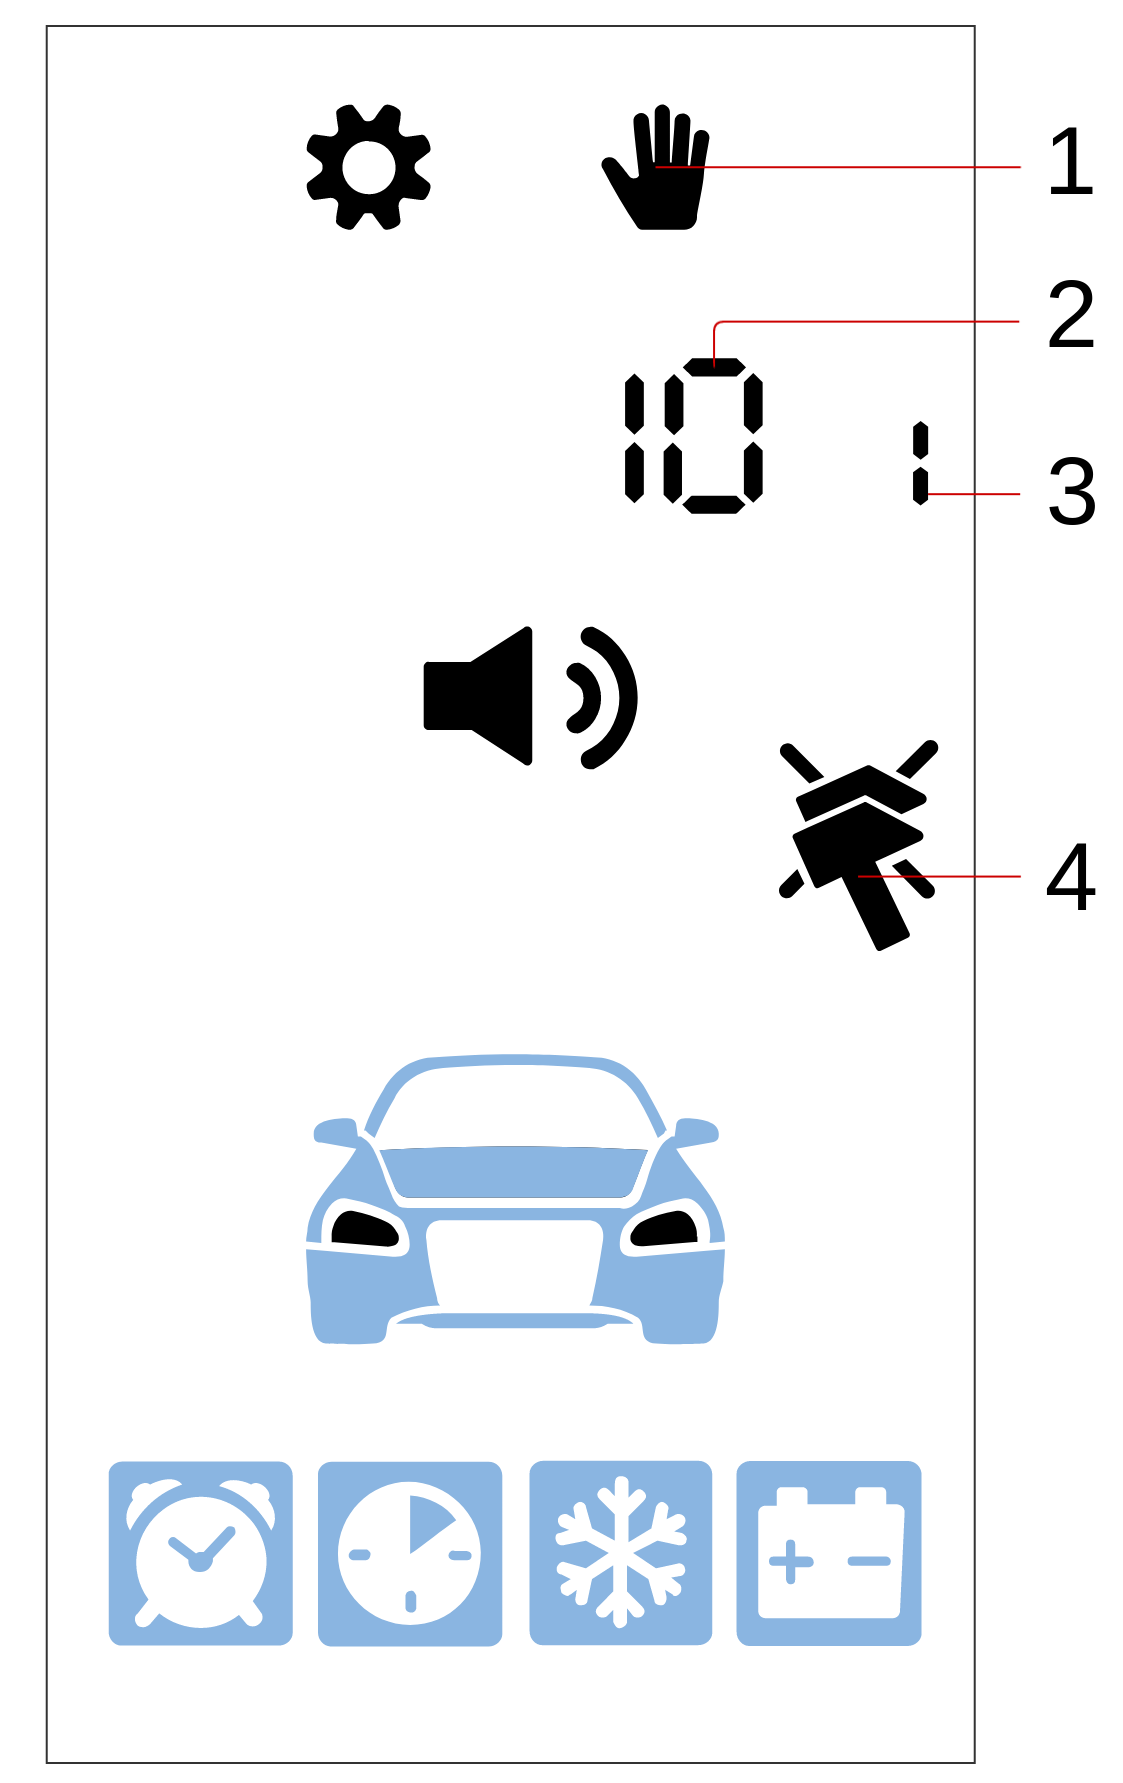
- 2 — selected sound profile number
- 3 — commands confirmation sound settings icon
- 4 — vibration:
 — enabled,
  — disabled
Sounds volume is tuned with and buttons short push
Vibration is enabled and disabled with button short push
Next sound signal type is flipped with button short push
Setting alarm sounds volume
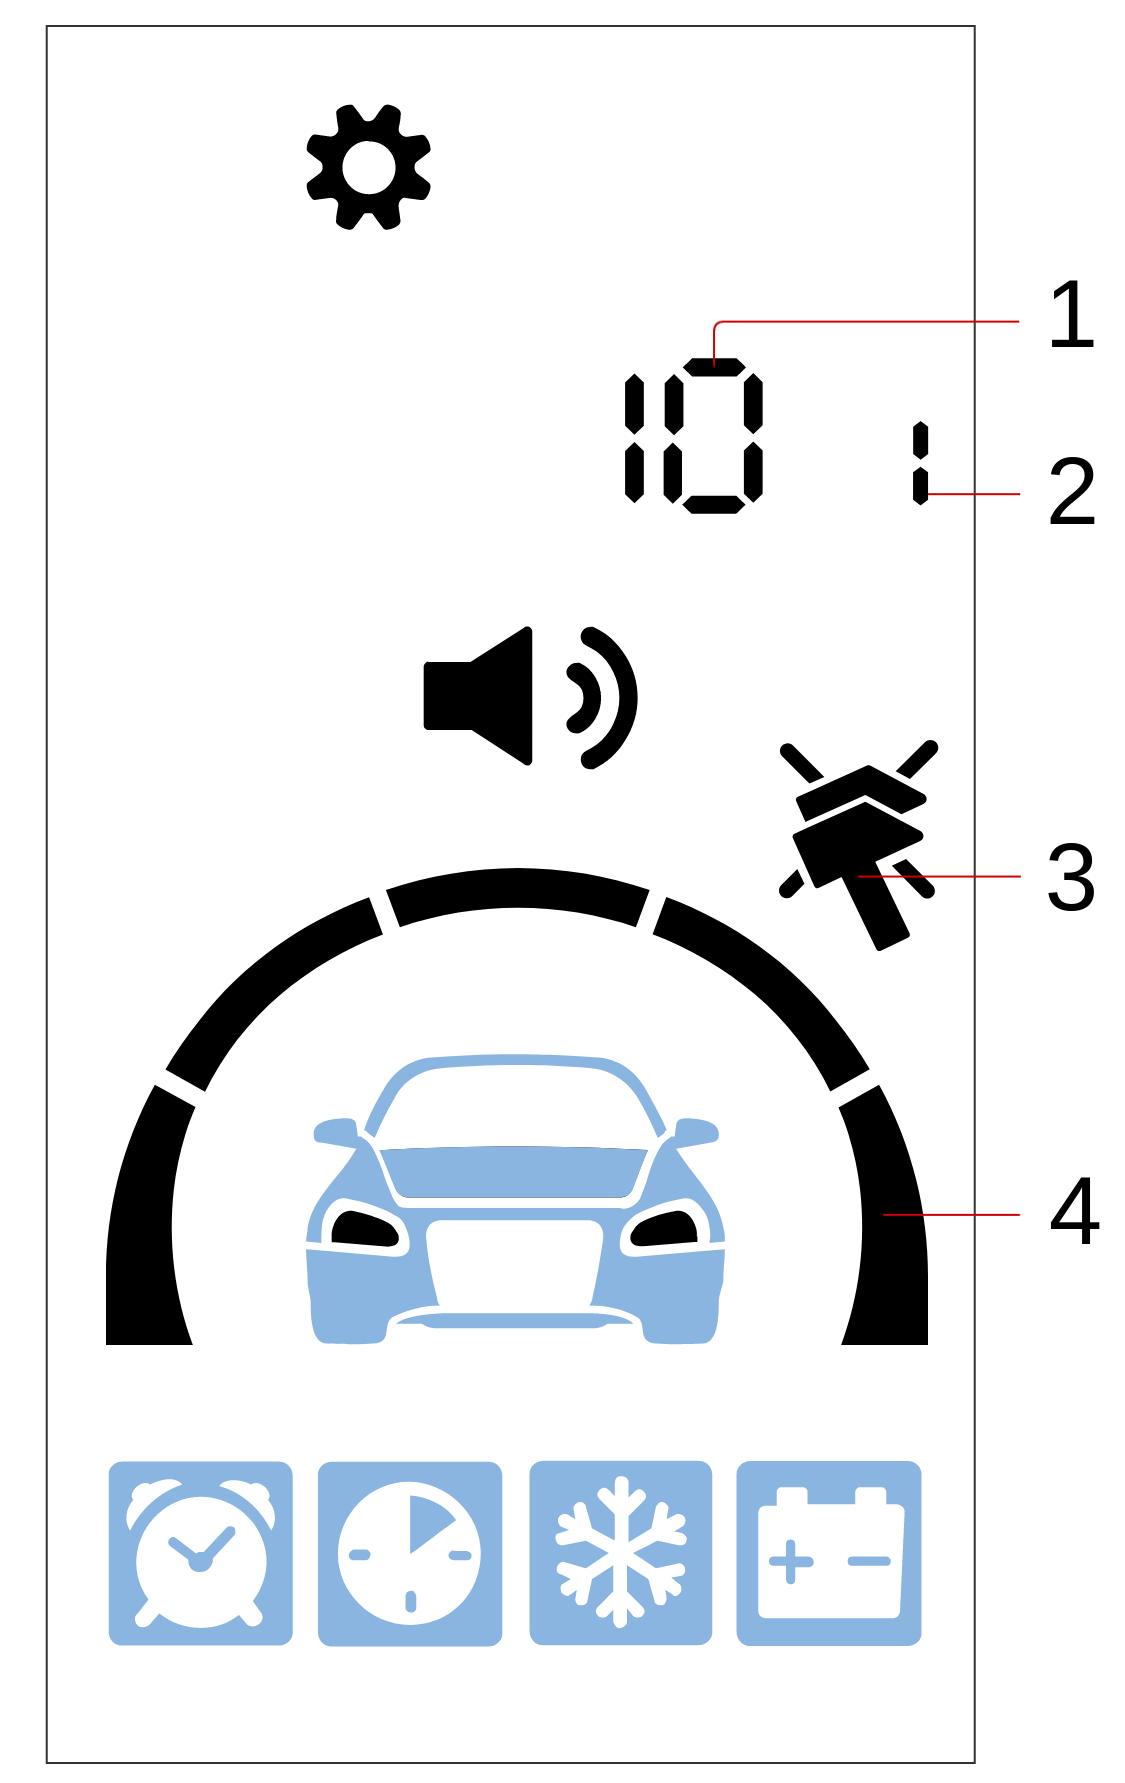
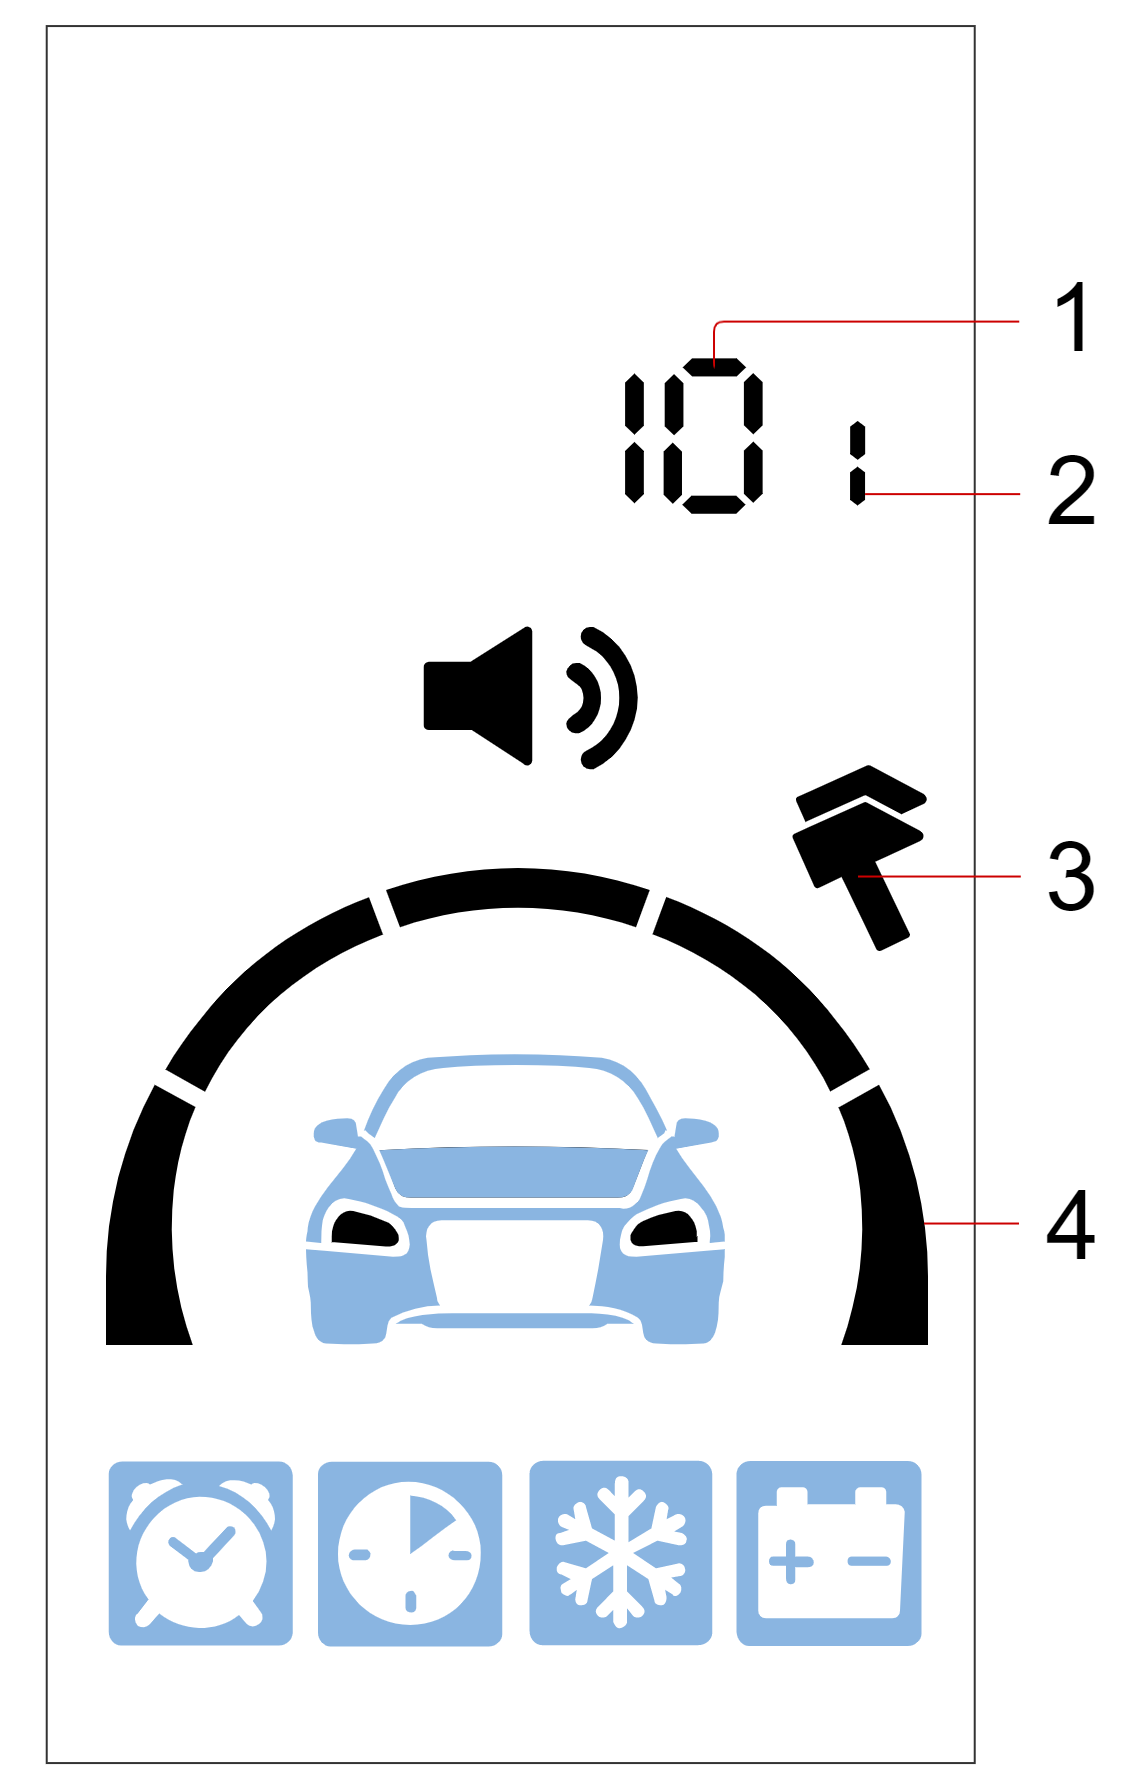
- 1 — Selected signal type volume level
- 2 — Selected sound profile number
- 3 — Vibration: — enabled, — disabled
- 4 — Alarm sounds volume settings icon
Sounds volume is tuned with or buttons short push
Vibration is enabled and disabled with button short push
Next sound signal type is flipped with button short push
Setting buttons push sound volume
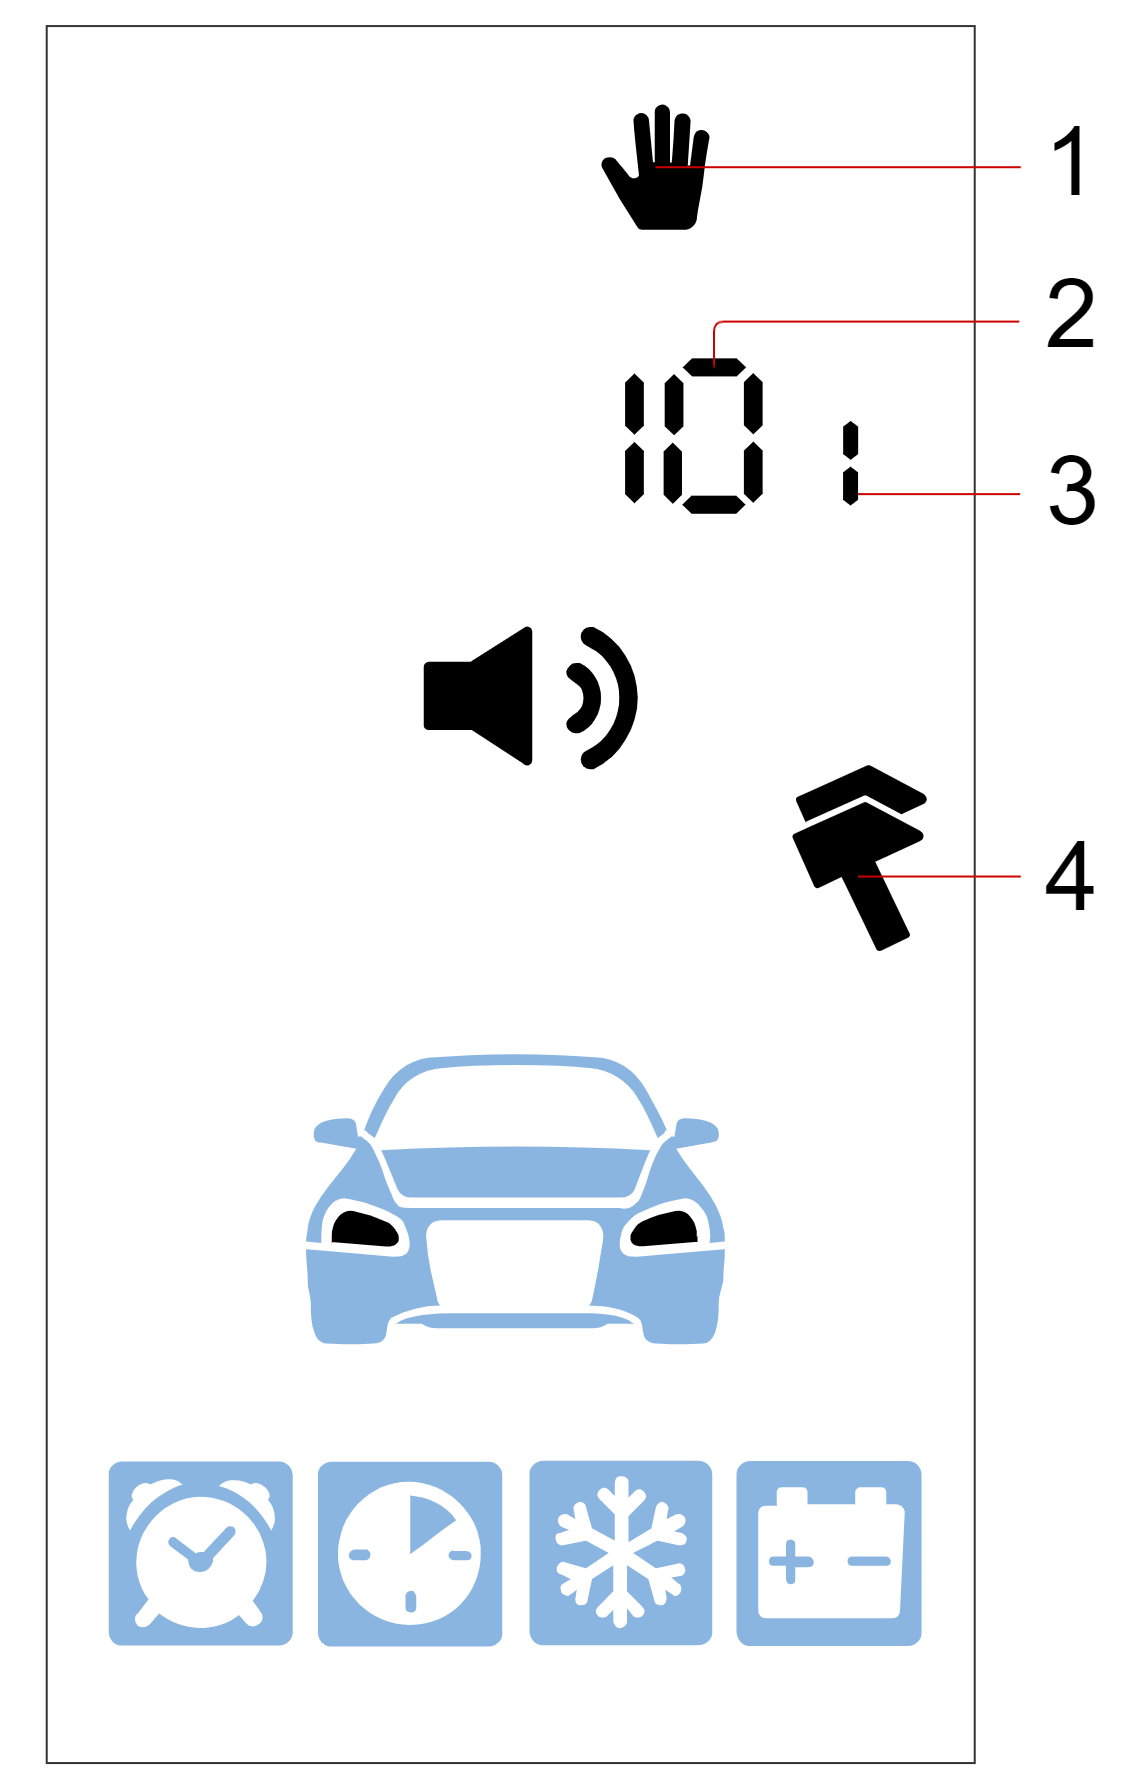
-
1 — buttons sound volume setting icon
2 — selected volume
3 — selected sound profile
4 — vibration:
- enebled, - disaabled
Sounds volume is tuned with or buttons short push
Vibration is enabled and disabled with button short push
Next sound signal type is flipped with button short push
Sound profile settings menu is automatically exited in 10 sec if no any buttons pushed.
After exit the set sound profile is indicated for several sec.
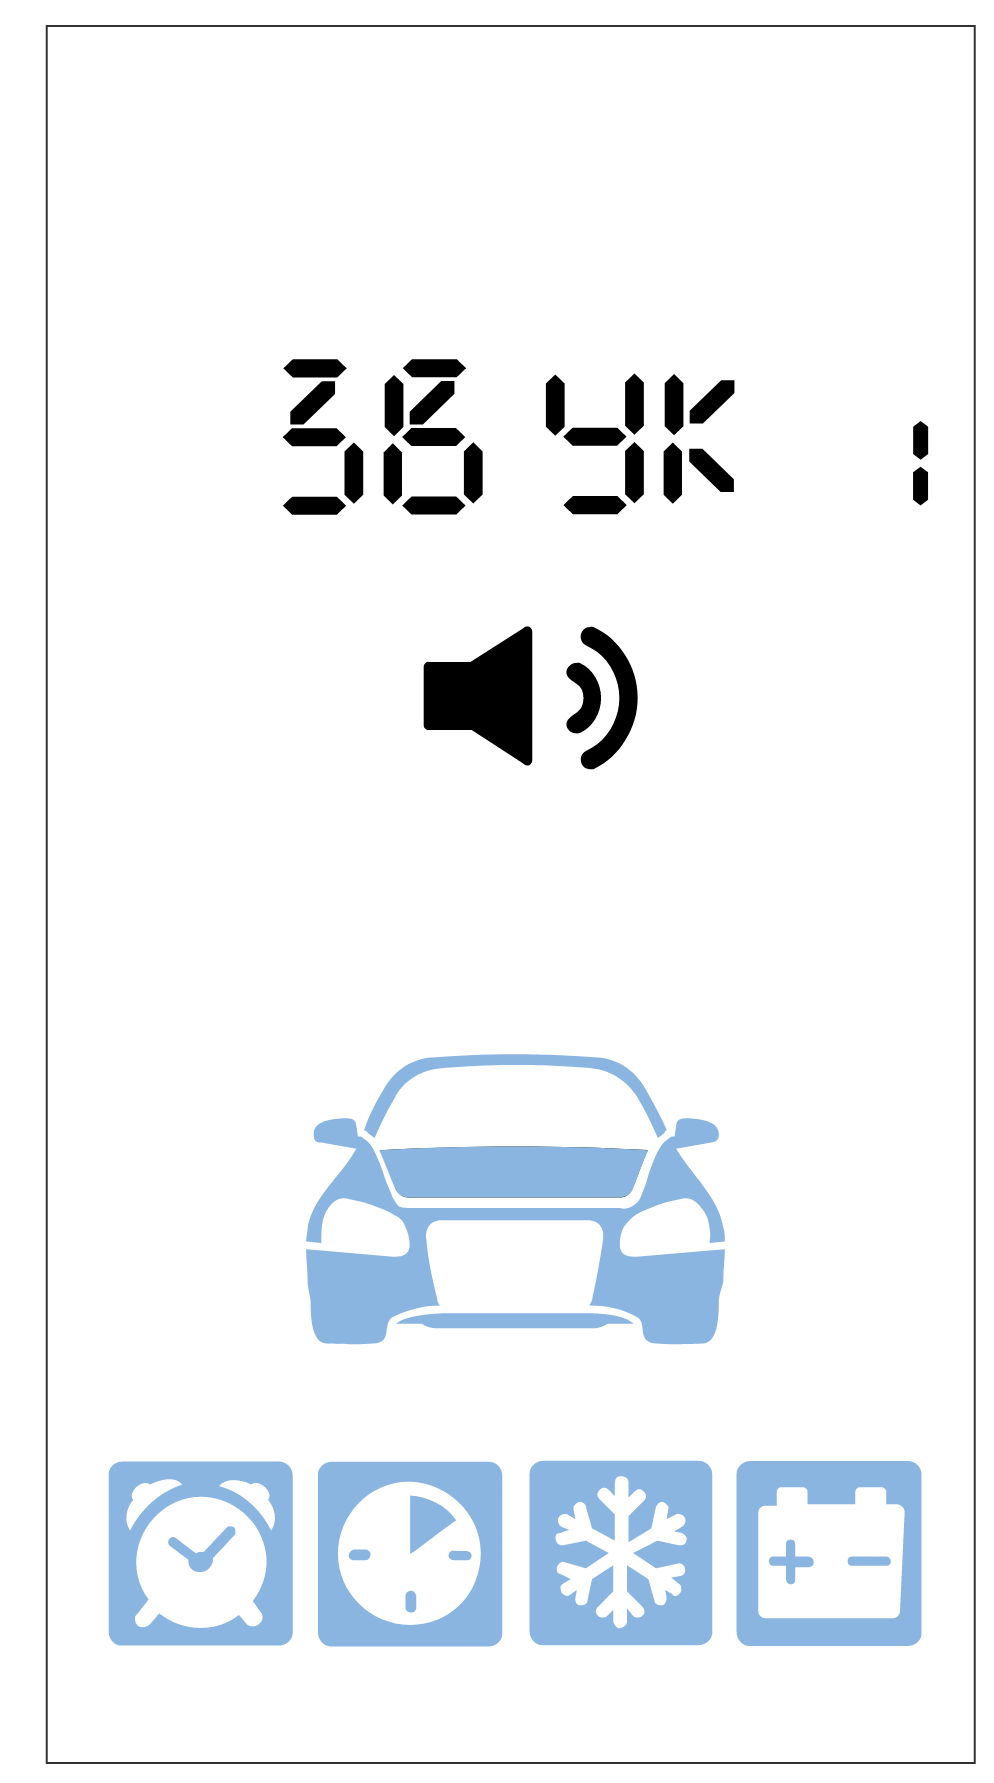
Resetting sound profile to factory default settings
-
select the necessary sound profile with corresponding buttons combination
- enter sounds profile menu with

 long pushing level 2
 -
hold 3 button until next sound signal


Setting sounds tone
The sounds tone can be also setup in sounds profile menu.
- enter to sounds profile menu with long pushing level 2
- push buttons
 shortly. The current sounds tone St-1 or St-2 shall be displayed. St-1 tone is set as default
- Push buttons shortly to select next tone
Buttons auto lock
The option locks buttons automatically each time after backlit off.
It is enabled and disabled with long push level 2
Remote key searching
Push and hold service (valet) button for 5 sec – remote key shall beep.
Lights and sound indication
Security system indicates its status by means of sounds (siren or buzzer) and lights (hazard or other lights)
 — short signal;
 — long signal.
| Events | Lights | Sounds |
|---|---|---|
| Arming |
|
|
|
Arming with one of secured zones breach |
|
|
|
Arming with Hands free mode disabling |
|
|
|
Arming with Hands free mode disabling and one of secured zones breach |
|
|
| Disarming |
|
|
|
Disarming (one of secured zones breached in armed mode) |
|
 |
|
Disarming with Hands free mode disabling |
— |
|
| Alarm |
30 sec |
30 sec |
|
Warn away alarm |
|
|
| Panic | 10 sec | 10 sec |
|
Trunk unlock |
|
|
|
Anti-Hijack mode off |
-
|
|
LED service button indication
|
State of security system |
LED light |
|---|---|
| Disarmed | Off |
|
Disarmed with ignition On and one of secured zones breach (doors, hood, trunk) |
1 flash per 5 sec |
| Armed |
1 flash per 1 sec |
|
Armed with Hands free mode active |
2 flashes per 1 sec |
|
Engine is running |
Continuous On |
|
Service (valet) mode |
Off |
|
Immobilizer mode active |
Off |
|
Anti-Hijack mode active |
10 times per 1 second |
|
Invalid emergency disarm code entered |
4 flashes |
|
Emergency disarm code entry blocked for 15 min |
5 flashes |
|
Valid emergency disarm code entered |
2 flashes |
Embedded buzzer sound indication
| Events | Sounds |
|---|---|
| Waiting for authorisation | 10 sec |
|
Tag battery discharged (at ignition On) |
|
|
Valid authorisation PIN code entered |
|
|
Invalid authorisation PIN code entered |
|
Operation modes
| Security modes |
Armed |
| Disarmed | |
| Anti-hijack | |
| Alarm | |
| Panic | |
|
Supplementary modes |
«Slave» |
| Hands Free | |
| Service mode | |
| Registration | |
| Configuration |
Armed Mode
The following zones are controlled in armed mode: ignition, doors, trunk, hood, shock sensor, tilt sensor, motion sensor, auxiliary sensor. If any zone is breached then system shall trigger alarm.
System can be armed when ignition off only. If arming command received at ignition on, then only doors are locked.
System is armed in one of following ways:
- Pushing remote key
 button shortly
 - Pushing tag button once shortly in disarmed mode
- Command from StarLine mobile app;
- Arming with factory security system in "Slave";
-
Tag loss or holding capacitive sensor in Hands Free mode
System shall confirm arming with 1 lights flash and 1 siren sound.
If any of doors, hood, trunk are still open then system shall warn thereof by 4 siren sounds and 4 lights flashes. Shut the breached zone and make sure that 1 light and sound of arming confirmation followed.
Silent arming
System can be armed silently without siren sound confirmation with triple pushing remote key button  .
.
Silent arming is confirmed with 1 lights flash.
Emergency arming
In case of a tag, remote key batteries discharged and other methods of arming via app and starline.online not available, then system can be armed with following way:
- Push service button or external transceiver button 3 times.
- Switch ignition On 3 beeps will follow.
- Make sure next 2 beeps come up.
- Switch ignition Off.
- Leave vehicle and shut the doors.
Disarmed mode
System is disarmed by one of following ways:
- Short push of remote key
 button
 -
Pushing tag button once shortly in armed or alarm mode
- Command from StarLine mobile app
-
Disarming factory security system (Slave)
-
Tag detection or touching capacitive sensor in Hands Free mode
Disarming is confirmed with 2 siren sounds and 2 lights flashed. If alarm was triggered while armed mode then 3 siren sounds and 3 lights flashes come up at disarming.
All events happened in armed mode will be indicated on remote key display after disarming.
If no any actions taken after disarming (i.e. doors, trunk were not open), then system shall automatically turn to armed mode back and lock the doors (Re-arming).
Silent Disarming
System can be disarmed silently without siren sound confirmation in following ways:
-
Triple pushing remote key button
- Command from StarLine mobile app
Silent disarming is confirmed with 2 lights flashes. If alarm was triggering while armed mode then 3 lights shall follow at silent disarming.
Automatic doors locking on a trip
System can make automatic doors locking on a trip at one of following selected terms:
- ignition is switched On
- vehicle starts moving and brake pedal pressed
- parking brake released
- automatic transmission is shifted from parking position
- preset vehicle speed is reached
Automatic doors unlocking on a trip
System can make automatic doors unlocking on a trip at one of following selected terms:
- ignition is switched Off
- automatic transmission is shifted to parking position
- engine is stopped
- ignition is switched Off and automatic transmission is shifted to parking positioning
- parking brake is tighten
Automatic doors lock / unlock option can be enabled and configured in StarLine mobile app or starline.online account.
Trunk unlock in armed mode
If this option is enabled in system configuration then owner can unlock and open trunk by means of a factory remote / trunk lid button in armed mode once StarLine tag is visible in detection range.
Blocking factory Keyless-Go system
The option of factory Keyless-Go blocking via CAN bus brings higher level security as it protects against factory key stealing and relay attack with specific radio hacking devices. The system shall lock factory Keyless-Go system once StarLine tag is away of detection range. And then unlocks it once tag is detected again in range.
This option is disabled in default settings and must be enabled in system configuration. Owner authorisation with tag must be enabled for this option operation. Find out if the option is supported for your vehicle via CAN bus at can.starline.bz
Alarm Mode
Alarm shall go off when any of secured zones is breached in armed mode.
System activates siren alert sound, hazards lights flashing for 30 seconds. If breached zone is not restored system repeats alert cycle once again.
Any warning zone breaching is followed with 3 lights flashes and 3 siren sounds.
Alarm mode can be aborted with short push of a tag button and or  remote key buttons.
The maximum number of zone triggering is limited to 8 times within 1 security cycle.
Panic mode
Panic mode ensures owner and vehicle security and informs on intrusion attempt. This mode can also be used to easily locate vehicle in a parking lot.
Mode can be activated with double pushing remote key button, or a command from StarLine mobile app.
System shall activate siren alert and hazard lights flashing for 10 sec in order to scare an intruder and attract other people attention.
Anti-hijack mode
Anti-hijack mode secures driver against assault attempts on trip.
The mode is activated by a tag or remote key loss on trip.
Anti-hijack operation algorithm depends on a vehicle speed reading from CAN bus.
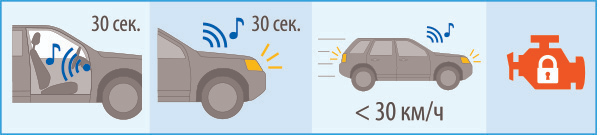
1. Anti-hijack operation sequence when speed supported from CAN bus:
-
any of secured zones has been breached (doors, hood or trunk)
-
motions sensor has triggered
-
in 30 sec system begins seeking for a tag or remote key
-
in another 30 sec, if a tag or remote key has not been detected, system enables warning sound and lights for 10 sec
-
by reaching a speed below 30 km/h engine will be safely stopped.
System enables warning sounds and lights on upcoming engine blocking for 10 seconds. Then by reaching a speed below 30 km/h engine will be safely stopped.
2. Anti-hijack operation sequence when speed from CAN bus is not supported:
-
any of secured zones has been breached (doors, hood or trunk)
-
motions sensor has triggered
-
in 30 sec system begins seeking for a tag or remote key
-
in another 30 sec, if a tag or remote key has not been detected,
system enables warning sound and lights for 10 sec
-
engine will be stopped in 3 min or at brake pedal pressing.
3. Exit from Anti-hijack mode by a tag or remote key loss is made by one of following ways:
• when tag or remote key is detected in range
• entering emergency disarm code with service button or external transceiver button
In case of invalid emergency disarm code is entered 3 times, then a code entry will be blocked for 15 min.
By default, Anti-hijack mode when the tag or remote key is lost is turned off.
To turn it on, press and hold the button on the tag until you see a long red flash, then release the button.
Slave mode
Slave mode allows to control security system by means of a factory remote control or Keyless-Go system.
System detects unlocking doors and disarming factory security and waits for owner authorisation with any of below methods before disarming itself:
-
Tag or remote key detection in range at disarming during adjusted interval from 15 to 60 sec
-
Entering personal PIN code with factory buttons at ignition On during adjusted interval from 15 to 60 sec
It is highly recommended to enable above mentioned secondary owner authorisation methods in Slave mode in system configuration settings.
Hands Free mode
Hands free mode allows automatic system arming and disarming by a tag loss and detection in range.
The mode can be enabled and disabled in remote key operation modes menu.
In this mode system is armed either by a tag loss from range or with holding door sensor (optional accessory) with a tag in range.
Systems is disarmed by a tag detection in range or with touching door sensor (optional accessory) with a tag in range.
If any of door, hood or trunk left open when tag is away, then system shall inform owner with siren alert on arming abort.
Once a breached zone restored, system shall turn armed.
If tag is lost on a trip (i.e. battery critically discharged) then system shall turn armed mode in 10 sec after any door open (auto arming).
Auto arming is not executed in Hands Free mode when tag is in range.
Disabling Hands Free mode for 1 security cycle
When tag is within detection range at a parking place, then it is recommended to disable arming and disarming in Hands Free mode for 1 security cycle.
Hands Free is enabled / disabled for 1 cycle by one of following ways depending on current state (disarmed / armed) accordingly:
- arming/disarming with a tag button accordingly
- arming/disarming with remote key button 1 and 2
System shall confirm successful disabling Hands Free for once cycle with 1 sound.
System shall return to default Hands Free by following ways depending on current state (disarmed / armed) accordingly:
• disarming and any of door, hood or trunk open
• switching ignition On or arming command received
Service (Valet) mode
Service mode is used for temporary security deactivation and restricting access to system configuration while vehicle maintenance, car wash etc.
Service mode can be activated from disarmed state only.
In service mode following features are disabled:
- Arming and disarming
- Hands Free mode
-
Doors lock and unlock in trip
- Remote and automatic engine start
- Turbotimer
- Trunk unlock
-
Arming with open trunk with factory remote
- Panic
-
Anti-hijack by a tag or remote key loss
-
Entry to system configuration settings
-
Entry to registration mode
Service mode is enabled by any of following ways:
-
Tag button long push level 1 (if this option is enabled in system configuration)
- Short push of remote key
 buttons
 - Command from StarLine mobile app
-
In remote key operation modes menu
 buttons
Service mode activation is confirmed with a tag LED light turned yellow.
Service mode is disabled by one of following ways:
-
Tag button long push level 1 (if this option is enabled in system configuration)
- Short push of remote key buttons
- Command from StarLine mobile app
-
In remote key operation modes menu
-
Emergency disarm code entry
Automatic Exit from Service Mode
If this option is enabled in system configuration then system automatically turns from Service mode to Waiting for authorisation at configured event and ignition On.
This option requires owner authorisation, embedded sensors and vehicle speed from CAN bus to be enabled in system configuration.
Immobiliser mode
Immobiliser mode prohibits unauthorised drive attempt.
Depending on settings system waits for owner authorisation with a tag or remote in detection range or PIN code entered with factory buttons after every disarming or every ignition switching Off and at next ignition switching On.
PIN code can be entered with factory buttons only when ignition is switched On.
Remote engine start
The feature allows to make remote and automatic engine start and stop to warm up or cool down vehicle interior to a comfortable temperature and warm up engine before a trip.
Preparation of a vehicle with manual transmission for remote and automatic engine start.
If vehicle is equipped with manual transmission, then system must be set to “Program neutral” state to prepare for further safe remote or automatic engine start in following procedure:
• Tighten parking brake at engine running
• Remove key from ignition barrel, engine continues running, service button LED will light up permanently
• Leave vehicle, shut doors, hood, trunk and arm security system. Engine will be stopped.
• System turns to Armed
• “N” (program neutral) icon is indicated on remote key display and StarLine app main screen
• System and vehicle are now ready for remote and automatic engine start.
If any door is open or ignition is switched On after setting to Program neutral, then remote and automatic engine start will be denied until Program neutral procedure is executed again.
Vehicle equipped with automatic transmission must be switched to Parking position in order to prepare it for remote or automatic engine start.
Engine start
Remote engine start can be activated by one of following ways:
-
3 x Lock command from factory remote control (if supported for particular vehicle model and enabled in system configuration
-
tag button short push once (if enabled in system configuration)
-
long push level 1 of remote key button 1
- Command from StarLine mobile app
Automatic engine start can be activated by following terms:
-
Engine or interior temperature
-
Main vehicle battery voltage drop
-
Periodic engine start set in hours
-
Engine start by timer
Parameters for automatic engine start can be configured in:
- Remote key operation modes menu
- StarLine mobile app
Automatic engine start is allowed only in armed mode, in 5 min after last engine stop and 1 hour after previous remote and automatic engine start.
Engine stop
Engine will be stopped when:
-
Tag button short push once(if enabled in system configuration)
-
Long push level 1 of remote key button

- Command from StarLine mobile app
- Alarm mode triggered
- Vehicle motion detected
- Hood opened
- Parking brake released (for manual transmission)
-
Automatic transmission is shifted out of parking position
- Brake pedal pressed
-
Max engine temperature limit reached


Drive after remote start without engine stop (ignition takeover)
To start driving after remote / automatic engine start without engine stop make following depending on engine control system:
-
for vehicles with ignition barrel
-
disarm security system
-
insert key into ignition barrel and turn it to ignition On
- start driving
-
-
for vehicles with PTS (push-to-start) button
Option 1:
-
disarm security system
-
press and hold brake pedal for 3 sec
Option 2:-
disarm security system
-
push PTS button 1 or 2 times
-
Learn ignition takeover support and particular procedure from your StarLine installer.
Parking heater (preheater) control
This feature lets warm up engine and/ or interior before a trip with remote and automatic activating parking heater and auxiliary heater.
Parking heater can be started manually in following ways:
- Sequentially pushing remote key buttons
- Command from StarLine mobile app
Default parking heater run time at manual activation is 20 min and can be adjusted in system configuration.
Factory and optional parking heater may have embedded primary factory settings, differ from those configured in system settings.
Parking heater run time can be extended with sending repeated activation command.
Parking heater can be stopped manually in following ways:
- Sequentially pushing remote key buttons
- Command from StarLine mobile app
Parking heater can be automatically started before remote and automatic engine start on events and terms set in system configuration.
Parking heater can be started automatically in following terms:
- by engine temperature – parking heater is started when engine temperature is below the set value
- by timer – parking heater is started at a set time
Temperature and time for parking heater activation can be set in:
- Remote key operation modes menu
- StarLine mobile app
Parking heater is stopped when the set engine start temperature (for automatic engine start) or the set parking heater run time is reached and engine will be started then.
Default parking heater automatic run time is 20 min. It can be extended by sending heater start command again.
Intelligent turbotimer
Turbotimer option is used to temporary continue engine running after a trip to cool down turbo charger and extend its lifetime.
The option must be initially enabled and programmed while installation.
Turbotimer activation on vehicles with ignition barrel:
-
Tighten parking brake at engine running. The service button LED shall light up permanently
-
Take a key out of ignition barrel. Engine shall keep on running
-
Leave a vehicle, shut doors, trunk, hood and arm security system
-
Engine shall stop after interval sufficient for cooling down a turbine
Turbotimer activation on vehicles with Push-to-Start button:
- Tighten parking brake at engine running
- Leave a vehicle, shut doors, trunk, hood and arm security system
- Engine shall stop after interval sufficient for cooling down a turbine
Turbine cool down interval is calculated automatically and depends on engine speed before a trip finished. Max turbine cool down interval is 5 min.
Automatic climate scripts
Automatic climate scripts are comprehensive settings of vehicle climate control system that turn on automatically or at the user command
They allow adjust the cabin temperature, windows, seat heaters, ventilation and other comfort options supported in CAN
Depending on ambient temperature, there are 3 scenarios available:
1) "Cold" - If ambient temperature is below +3 °C, then the climate control temperature is set to Max, and the steering wheel, seats, mirrors, and window heaters turn on. If the difference between engine and outside temperatures is more than 20 °C, then the climate control temperature will be set to value selected in mobile app "Smart comfort" section
2) "Regular" - When ambient temperature is from +3 to 22 °C, then the climate control temperature, and the heated options will be set as in mobile app "Smart comfort" section
3) "Warm" - If ambient temperature is above +22 °C, then the climate control temperature is set to Min for 1 min after engine start, and the seats ventilation is activated
At "Ignition takeover" mode, if any of the “Cold” or “Warm” script was active, the climate control temperature is turned to the value set in mobile app "Smart comfort" section
If vehicle does not support Ignition takeover, then the temperature which is set during automatic scenario remains at engine stop
The ambient temperature is taken from vehicle CAN bus. If temperature is not supported in CAN, then the system main unit embedded temperature sensor is used.
Automatic climate scripts can be enabled in the app: "Device settings" - "Remote start" - "Smart comfort"
Find the list of climate control options supported for your vehicle in CAN bus at can.starline.bz
Beach mode
In Beach mode system is armed and disarmed without a tag and remote key, which can be left inside vehicle. System is disarmed by owner authorisation with emergency disarm code entered by means of StarLine EC-1 touch sensor installed in a door handle or another convenient place (under plastic parts). System does not execute any commands from remote key in this mode.
Beach mode activation procedure:
-
Disarm security system and switch ignition Off.
-
Push service button or external transceiver button 3 times and switch ignition On. 3 sounds confirming entry to Beach mode shall follow. Switch ignition Off.
-
Leave vehicle and touch door handle sensor 3 times. System shall turn armed.
Hands Free mode is switched Off in Beach Mode until disarming.
Disarming (exit from Beach mode) is done by entering emergency disarm code be means of touch sensor with less than 3 sec intervals. Every valid digit entry is confirmed with sounds and flashes in corresponding number. Full valid code entry is confirmed with double sounds and flashes.
If invalid emergency disarm code is entered 3 times, then next code entry will be blocked for 15 min.
If nothing is done after disarming with emergency disarm code, then system shall return to armed and Beach mode remains active.
Video recorder (dashcam) control
The option must be initially wired and programmed while installation
System can automatically switch dashcam On to begin recording:
- at ignition switched On – dashcam is activated for 5min
- at full alarm or warn alarm triggered – dashcam is activated for 2 min
If engine is still running in armed mode then dashcam continues operating until engine is stopped
Risky parking
This mode can be used in places with high probability of theft and robbery. In Risky parking mode system shall require owner authorisation with factory buttons at every switching ignition On in disarmed mode. This mode operates regardless immobiliser mode settings made in system configuration.
Risky parking activation:
-
Disarm security system
-
Switch ignition Off
-
Push service button or external transceiver button twice
-
Switch ignition On. Double sounds shall follow.
Risky parking activation is confirmed with 1 sound and flash, deactivation – with double sounds and flashes.
Emergency braking alert
In case of a forced emergency braking, the system can alert other traffic participants by means of hazard lights blinking
Hazard lights turn off in 5 sec after the end of sudden braking, or beginning of acceleration
The option must be enabled in the system configuration: "Device settings" - "Telematics" - "Insurance telematics"
The main unit embedded accelerometer must be calibrated for the function proper operation (make sure the corresponding option is enabled in system configuration)
Accessories registration
Registration mode is used to pair new remote keys, tags, smartphones and other wireless and wired accessories to the system main unit.
Total amount of accessories can be registered in the system main unit: 5 wireless tags / 4 smartphones / 4 remote keys / 4 service relay modules / 8 wireless sensors
Total up to 8 Bluetooth accessories can be operated simultaneously, where: 1 memory cell is always reserved for registered smartphone or M66 tracking device, 7 cells are reserved for other wireless devices (tags, wireless relays and sensors). Once 8 first detected Bluetooth accessories are in range, then remaining registered Bluetooth accessories will be ignored until any of first devices get out of range.
Entry to accessories registration
-
Disarm system if it is armed.
-
Switch ignition Off if it is On
-
Push service button or external transceiver button 7 times.

-
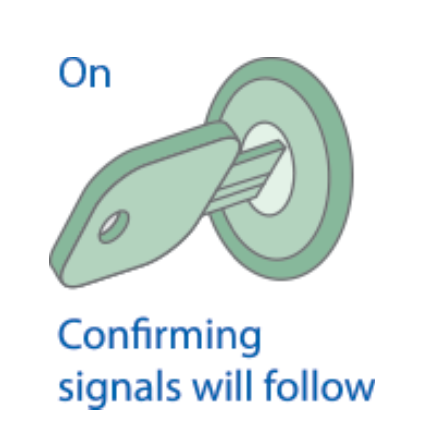
Switch ignition On. 7 LED flashes and 7 beep sounds shall follow.

-
Entry into registration mode will be confirmed with 2 LED flashes and 2 beep sounds.



Wireless tags (transponders) registration
-
Remove battery from a tag slot.

-
Push and hold tag button and insert battery back in slot observing the right polarity (“+” side top). The tag LED will light up red.

-
Release button and make sure a tag LED serial red flashes come up for 10 seconds.

-
Successful registration will be confirmed by a tag LED green flash, 2 service button LED flashes and 2 beep sounds. If a tag pairing failed then its LED will light up red.

-
Repeat items 1-3 for the remaining tags.


Smartphone registration
- Enable Bluetooth in smartphone and activate device searching
- Select “StarLine E9” in available devices list
- Enter pairing code 000000 (for iOS click “Pair”)
Remote key registration
-
Push 1 and 2 remote key buttons shortly

-
In 3 sec successful registration will be confirmed with remote key short beep, 2 service button LED flashes and 2 sounds.
If registration failed, then 4 beep sounds will follow.
-
Repeat items 1, 2 for remaining remote keys.

Exit from the device registration mode
System will automatically exit from accessories registration mode in 5 minutes or at ignition switch Off.
Exit from registration mode is confirmed with 2 service button LED flashes, 2 sounds and followed with a serial sounds in a number of total registered accessories.

Owner authorisation code (PIN-to-Drive)
Pin-to-Drive code entered with factory buttons is used for secondary owner authorisation at disarming and immobiliser mode.
Recording and changing authorisation PIN code in registration mode:
-
Disarm system if it is armed.

-
Switch ignition Off if it is On.
-
Push service button or external transceiver button 7 times.
-
Switch ignition On. 7 LED flashes and 7 beep sounds shall follow.

-
Entry into registration mode will be confirmed with 2 LED flashes and 2 beep sounds.
-
Enter a new PIN code with use of supported factory buttons with 3 sec and less intervals. Each pushing will be indicated with one LED flash.


7. Code entry will be confirmed in 3 sec with 2 LED flashes and 2 beep sounds.

8. Enter a new Pin code once again.
9. Properly repeated new code entry will be confirmed with 2 LED flashes and 2 beep sounds. Invalid code entry is followed with 4 LED flashes and 4 sounds, then repeat 5...8 steps.
10. Switch ignition Off within 10 sec to exit registration mode.

11. Exit from registration mode will be confirmed with 2 LED flashes and 2 beep sounds.
Deleting authorisation PIN code
-
Disarm system if it is armed
-
Switch ignition Off if it is On
-
Push service button or external transceiver button 7 times.
-
Switch ignition On. 7 LED flashes and 7 beep sounds shall follow.
-
Entry into registration mode will be confirmed with 2 LED flashes and 2 sounds.
-
Push service button 3 times.
-
Wait for the long LED light up confirming that existing authorisation PIN code has been erased from memory.
-
Switch ignition Off.
-
Exit from registration mode will be confirmed with 2 LED flashes and 2 beep sounds.
Emergency disarming
System can be fully disarmed with emergency disarm code, when:
- Tag is lost
-
Tag or remote key battery discharged
- Anti hijack mode is activated
Emergency disarming with service button
-
Make sure ignition is switched On.
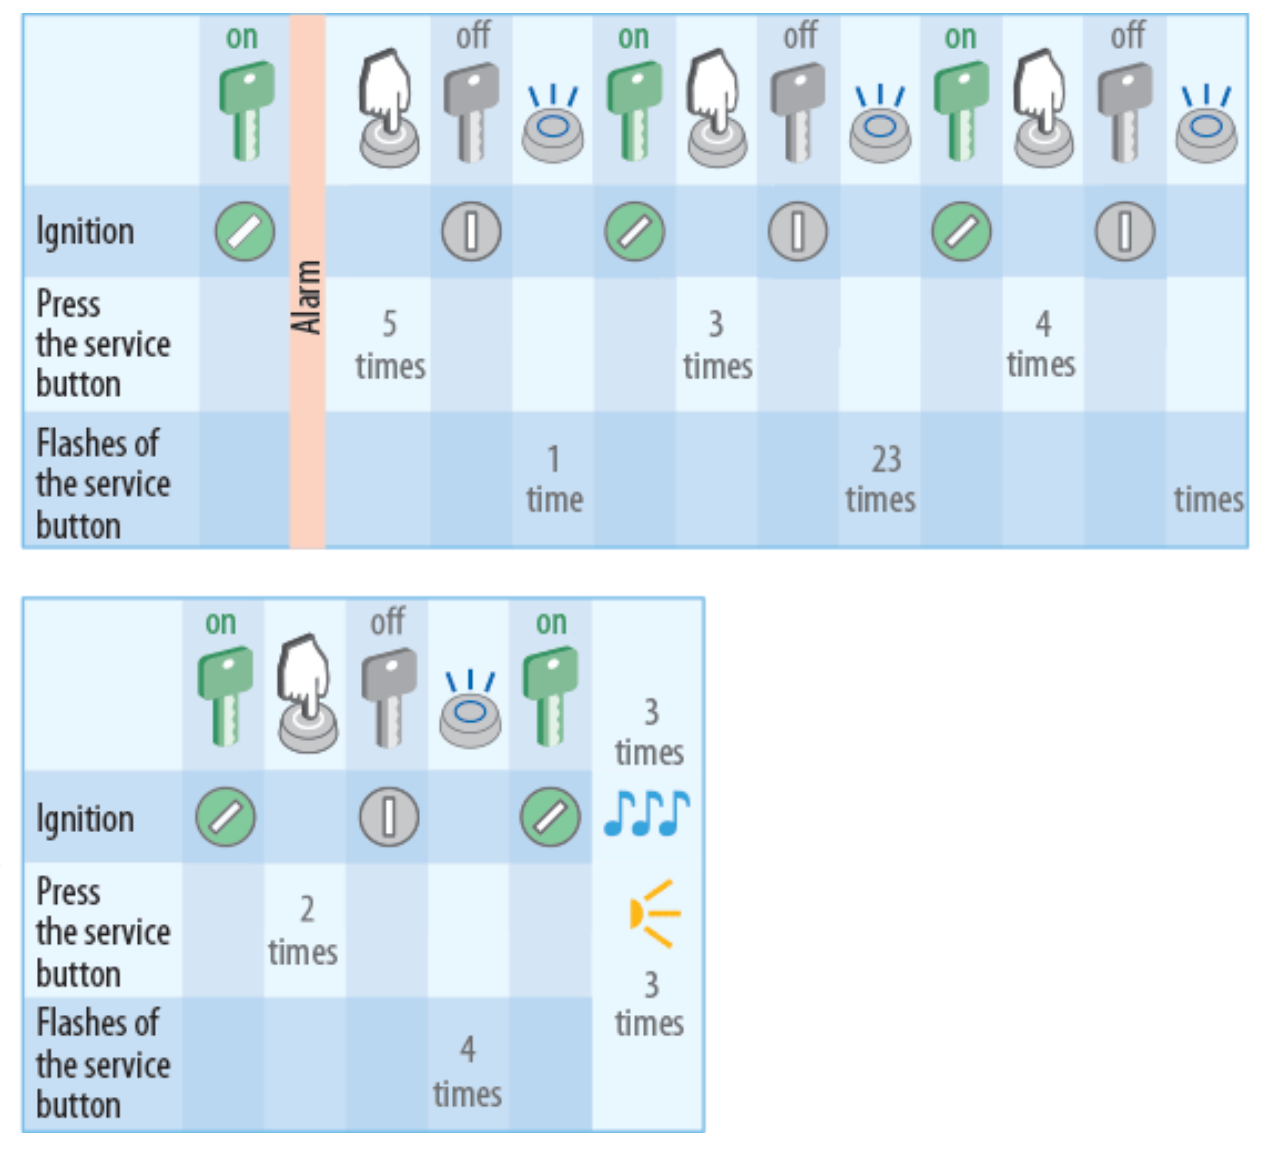
- Push service button or external transceiver button a number of times, equal to the first digit of emergency disarm code.

-
Each digit entry will be confirmed within 3 sec with service button LED flashes in a number equal to a sequence number of corresponding digit entered (1,2, 3 or 4 times).


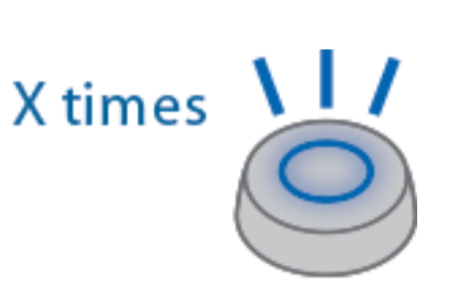
4. Repeat 1...2 steps for remaining digits.
5. Valid code entry is confirmed with 3 flashes and 3 sounds, system turns disarm.
If invalid emergency disarm code is entered 3 times, then next entry shall be blocked for 15 min. Each button push in this interval will be indicated with 5 flashes.
Example of entry the code 5342
Emergency disarming with SMS text message
Send SMS text command 30 XXXX , where ХХХХ — emergency disarm code.
Changing emergency disarm code with service button (or external transceiver button)
-
Switch system in disarmed mode if it is armed.
-
Push service button 4 times.
-
Switch ignition On. 4 LED flashes and 4 sounds shall follow.
-
Entry into code recording will be confirmed with 2 LED flashes and 2 sounds.
If nothing is done withing 5 sec system shall turn Off emergency code recording mode.
5. Switch ignition Off.
6. Switch ignition On and push service button a number of times equal to a first digit of existing emergency disarm code.
7. Switch ignition Off. Each digit entry will be confirmed with LED flashes equal to a sequence number of corresponding digit entered (1,2, 3 or 4 times).
8. Repeat 6...7 steps for remaining digits.
9. Valid existing code entry will be confirmed with 2 LED flashes and 2 beep sounds.
10. Switch ignition On. Push service button a number of times equal to a first digit of a new emergency disarm code.
11. Switch ignition Off. Each digit entry will be confirmed with LED flashes equal to a sequence number of corresponding digit entered (1, 2, 3 or 4 times).
12. Repeat 10...12 steps for remaining new code digits.
13. A new code entry will be confirmed with 2 LED flashes and 2 beep sounds.
14. Enter a new code once again repeating 10...12 steps.
15. New emergency disarm code recording will be confirmed with 2 LED flashes and 2 beep sounds.
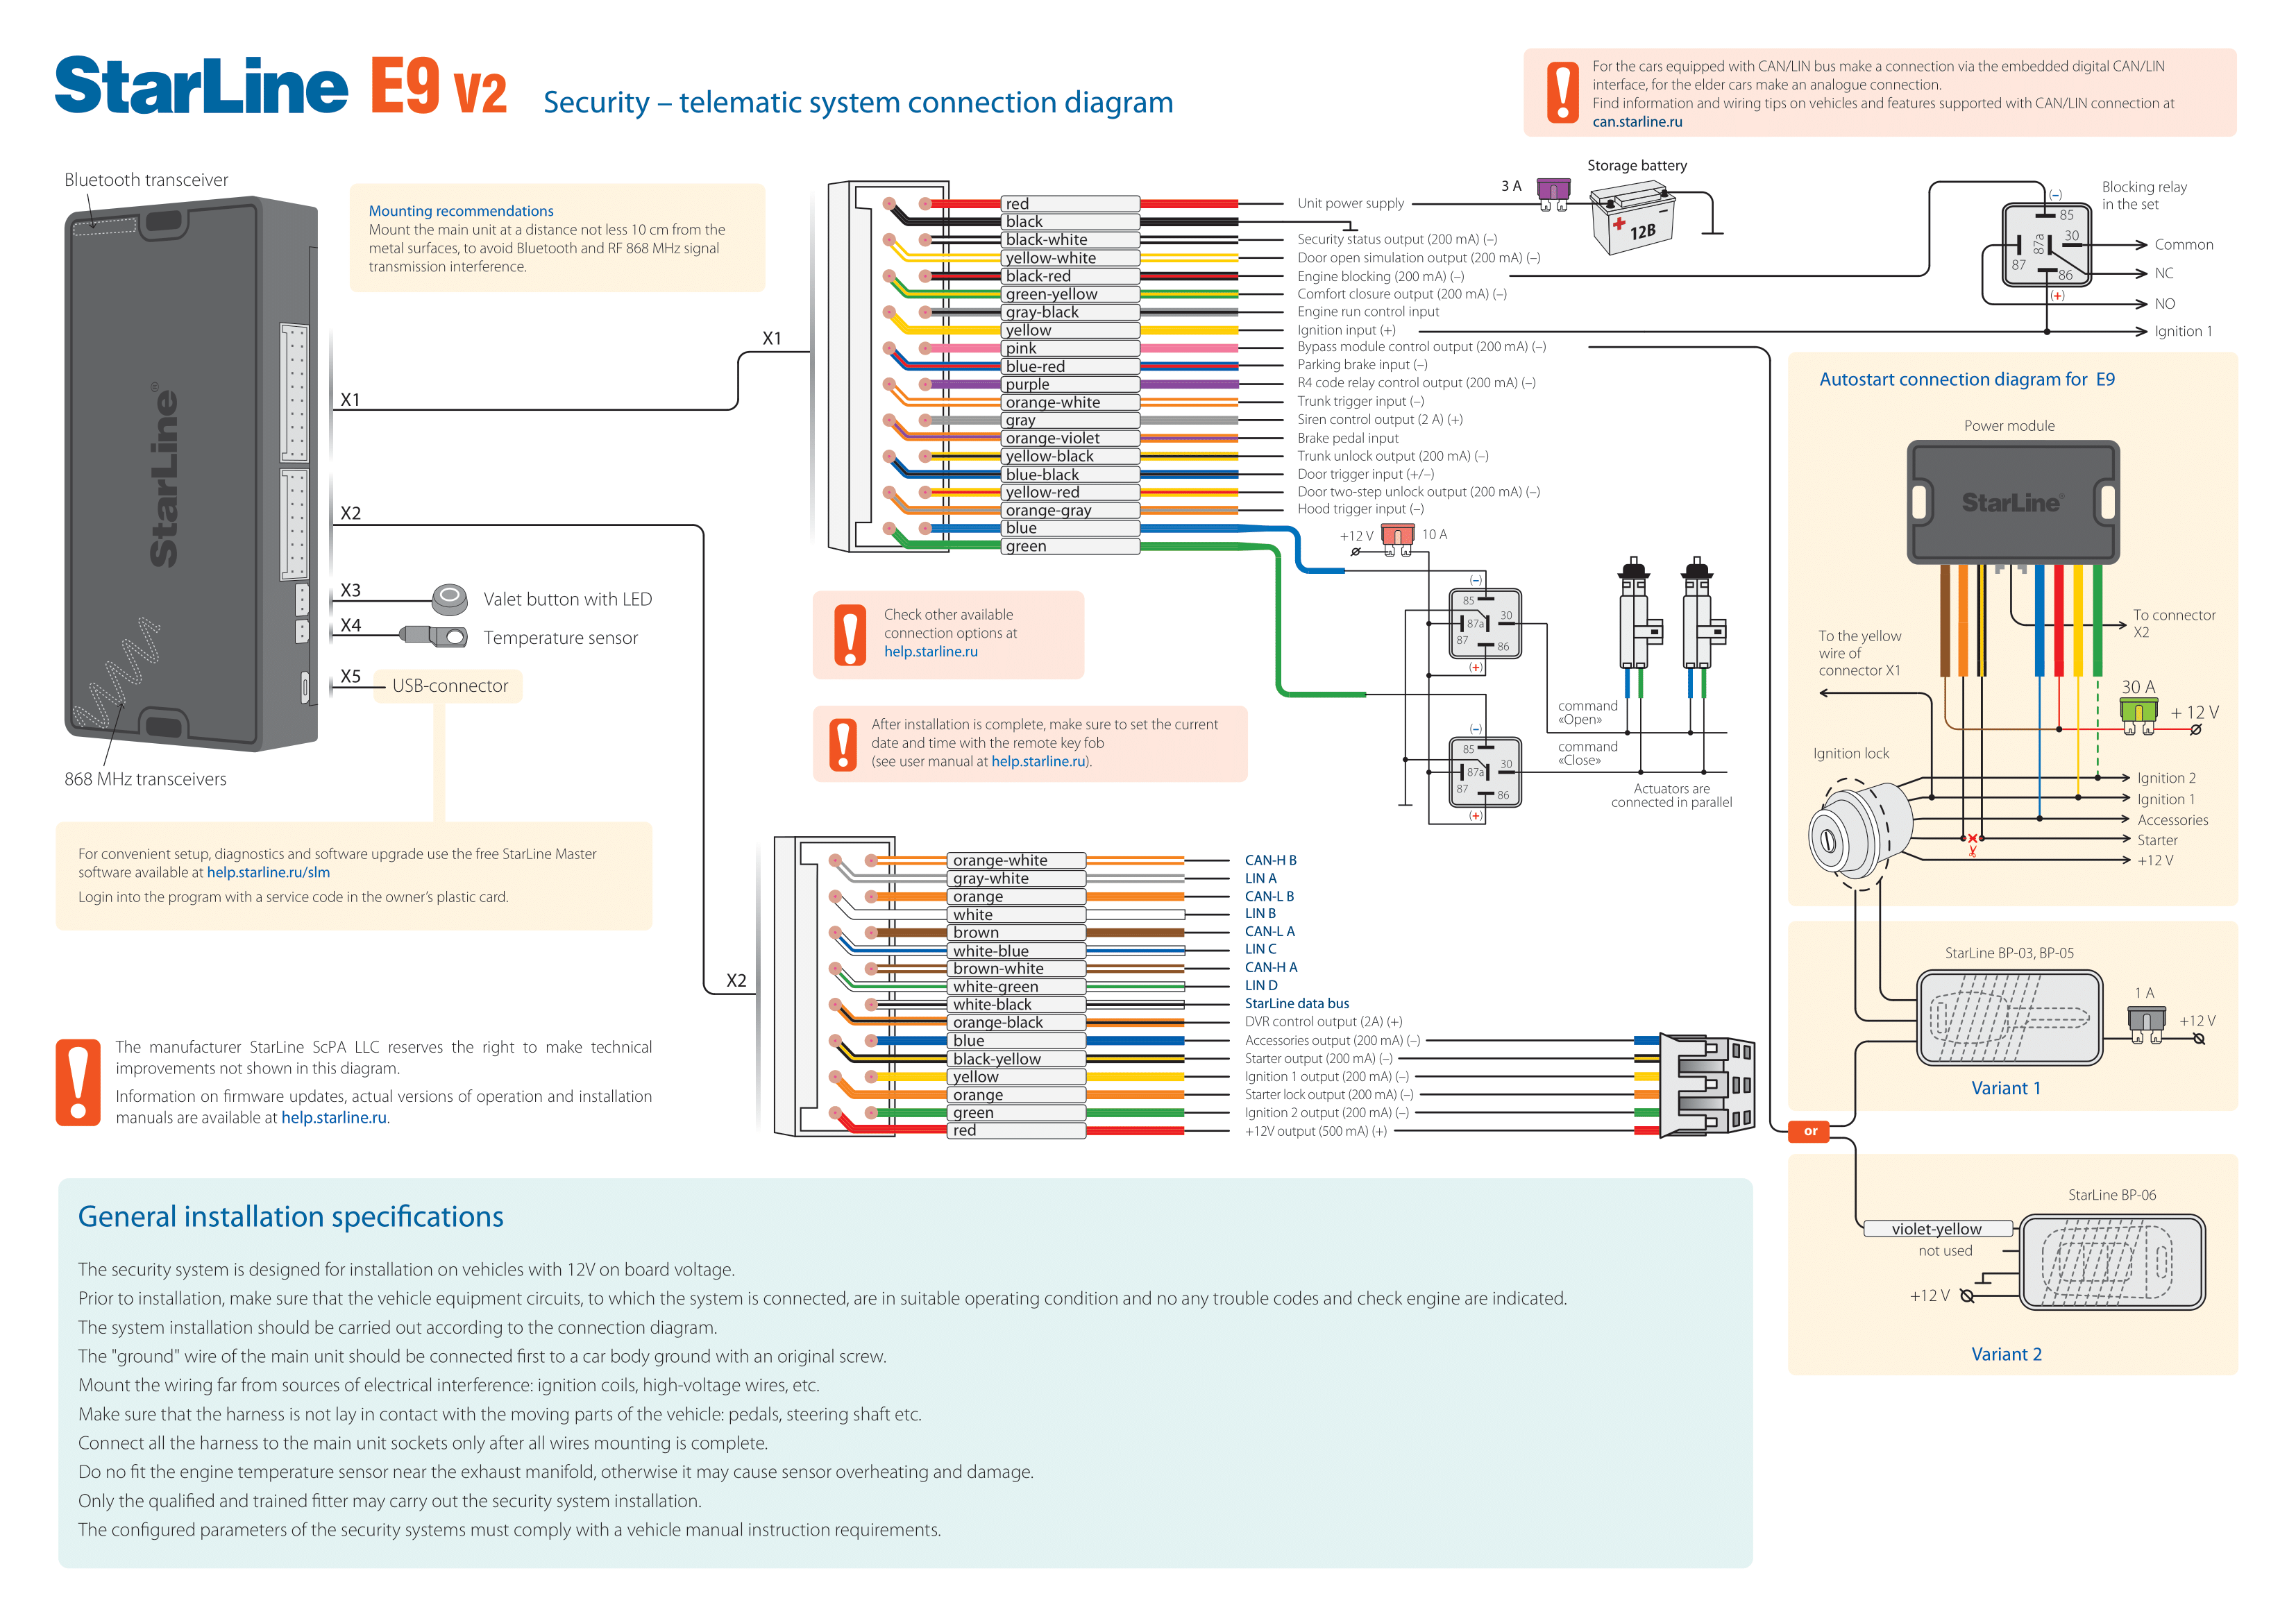
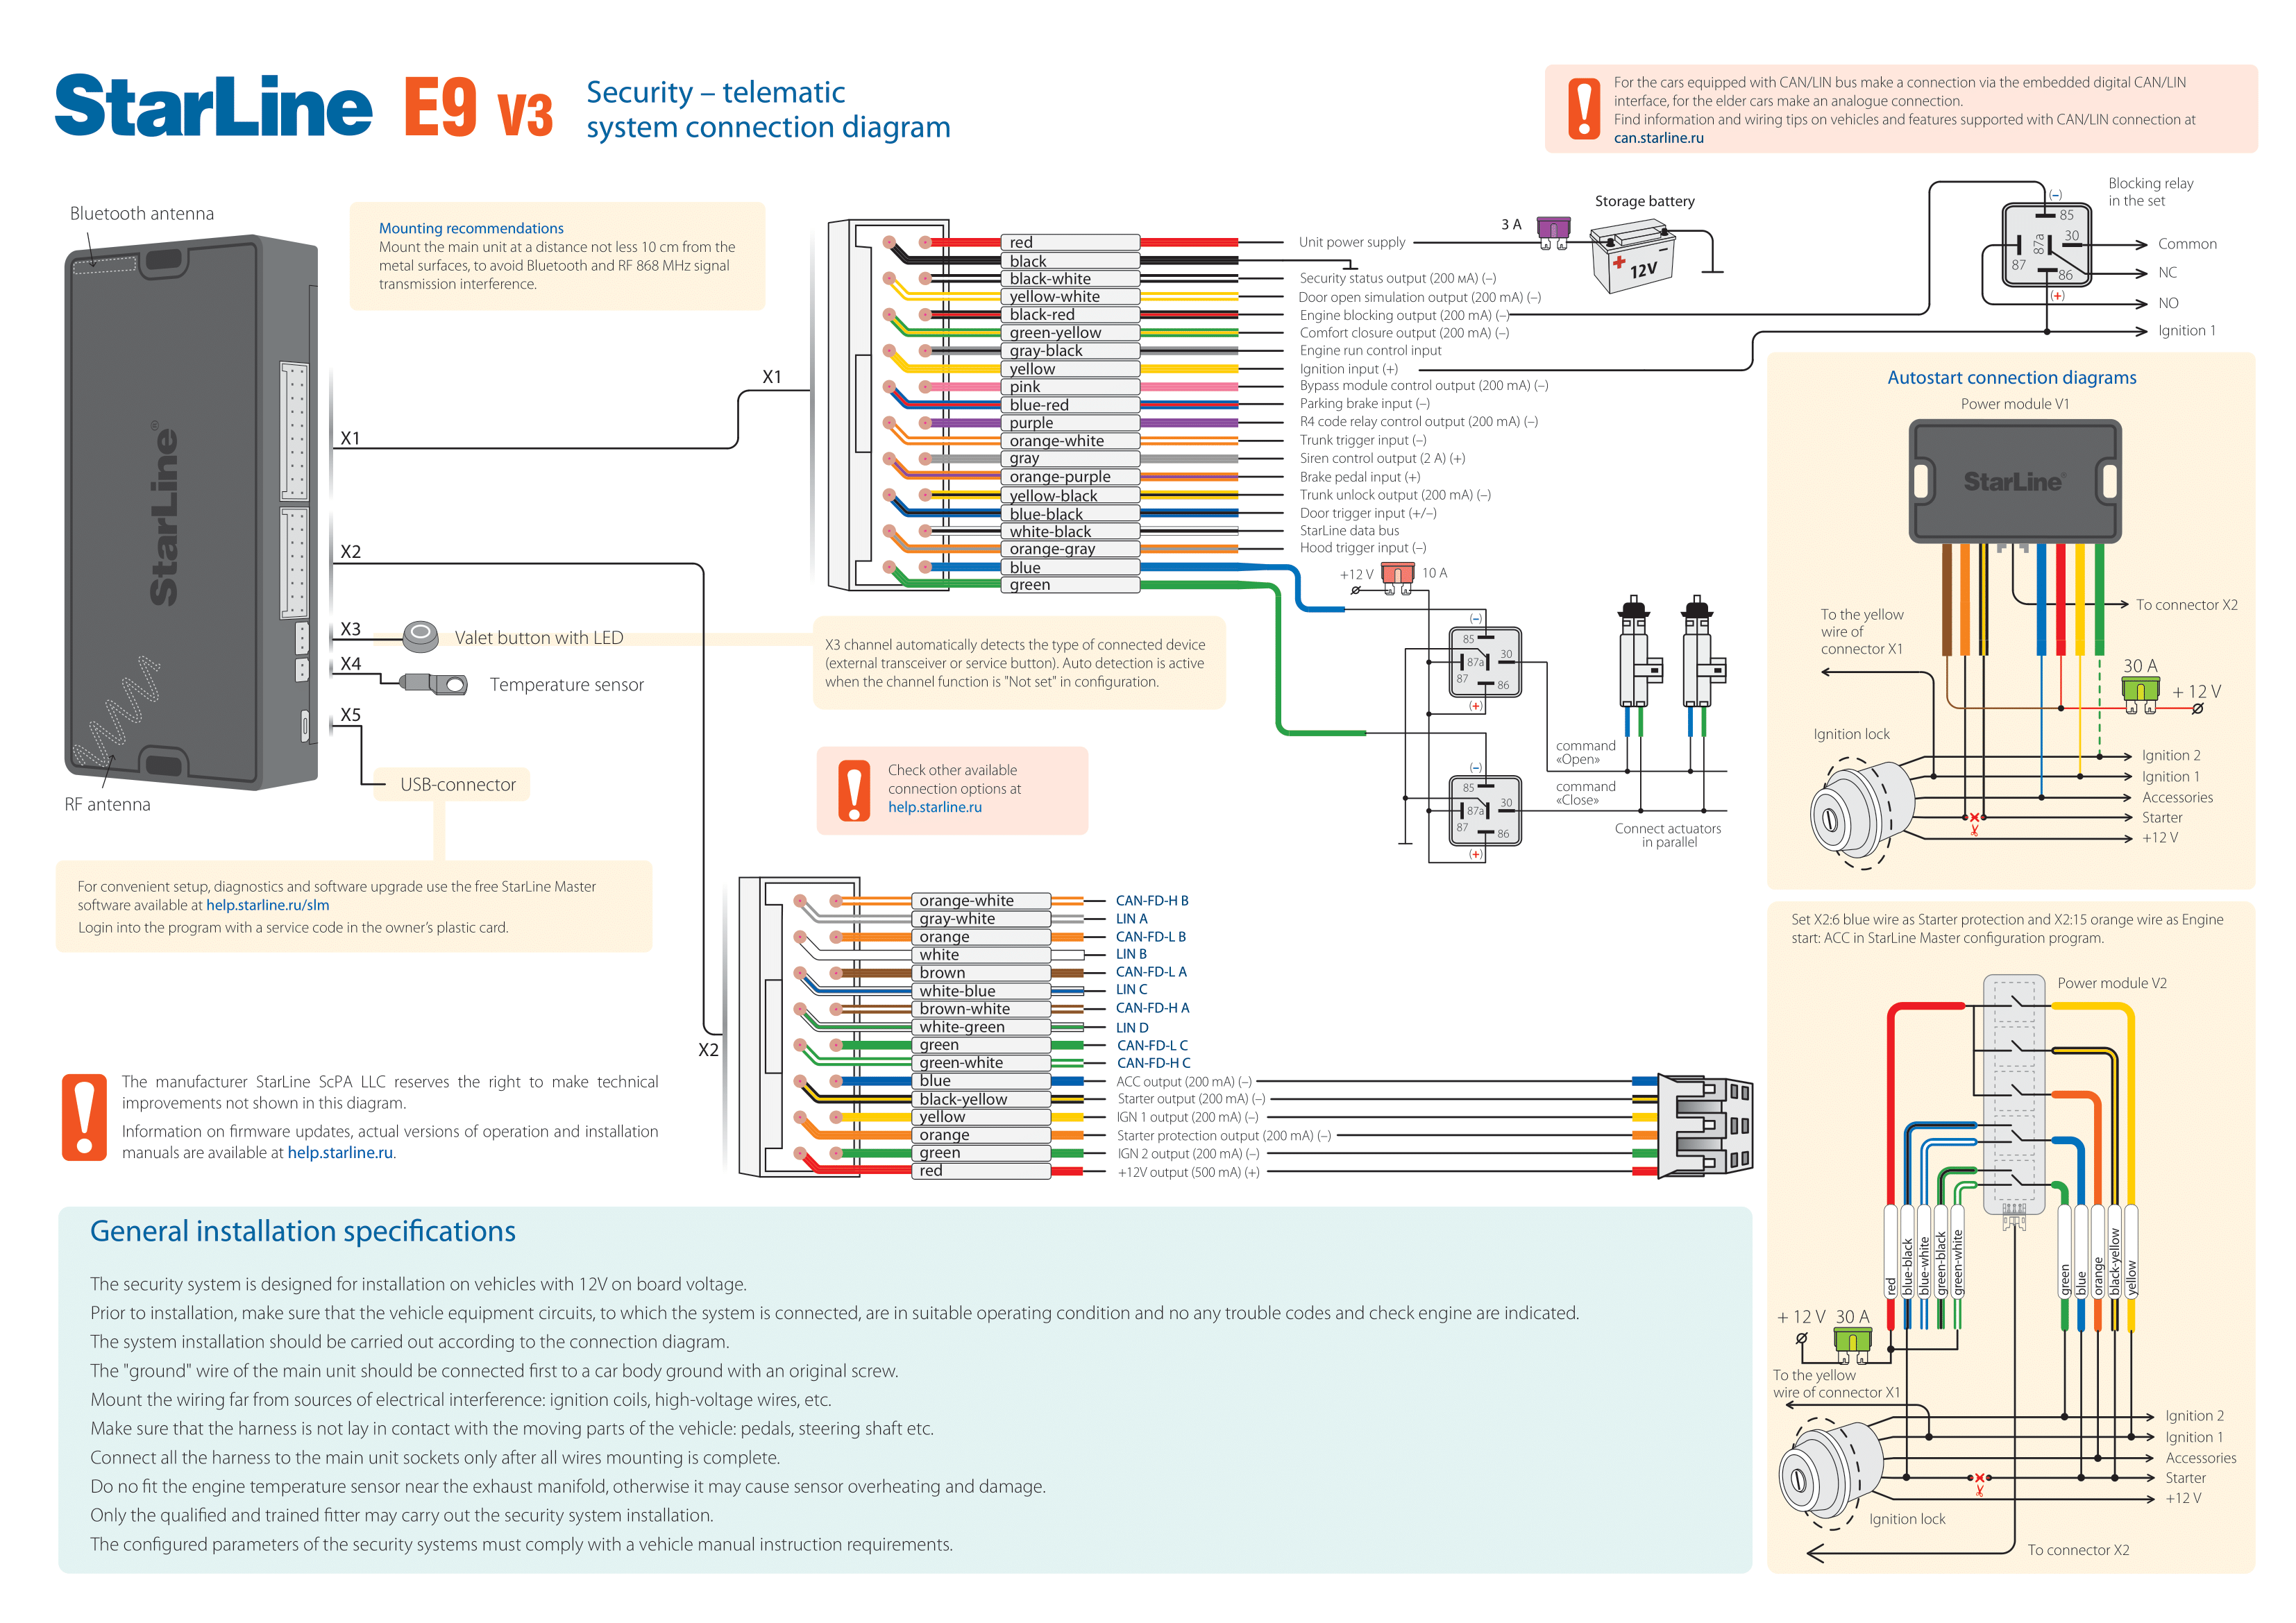
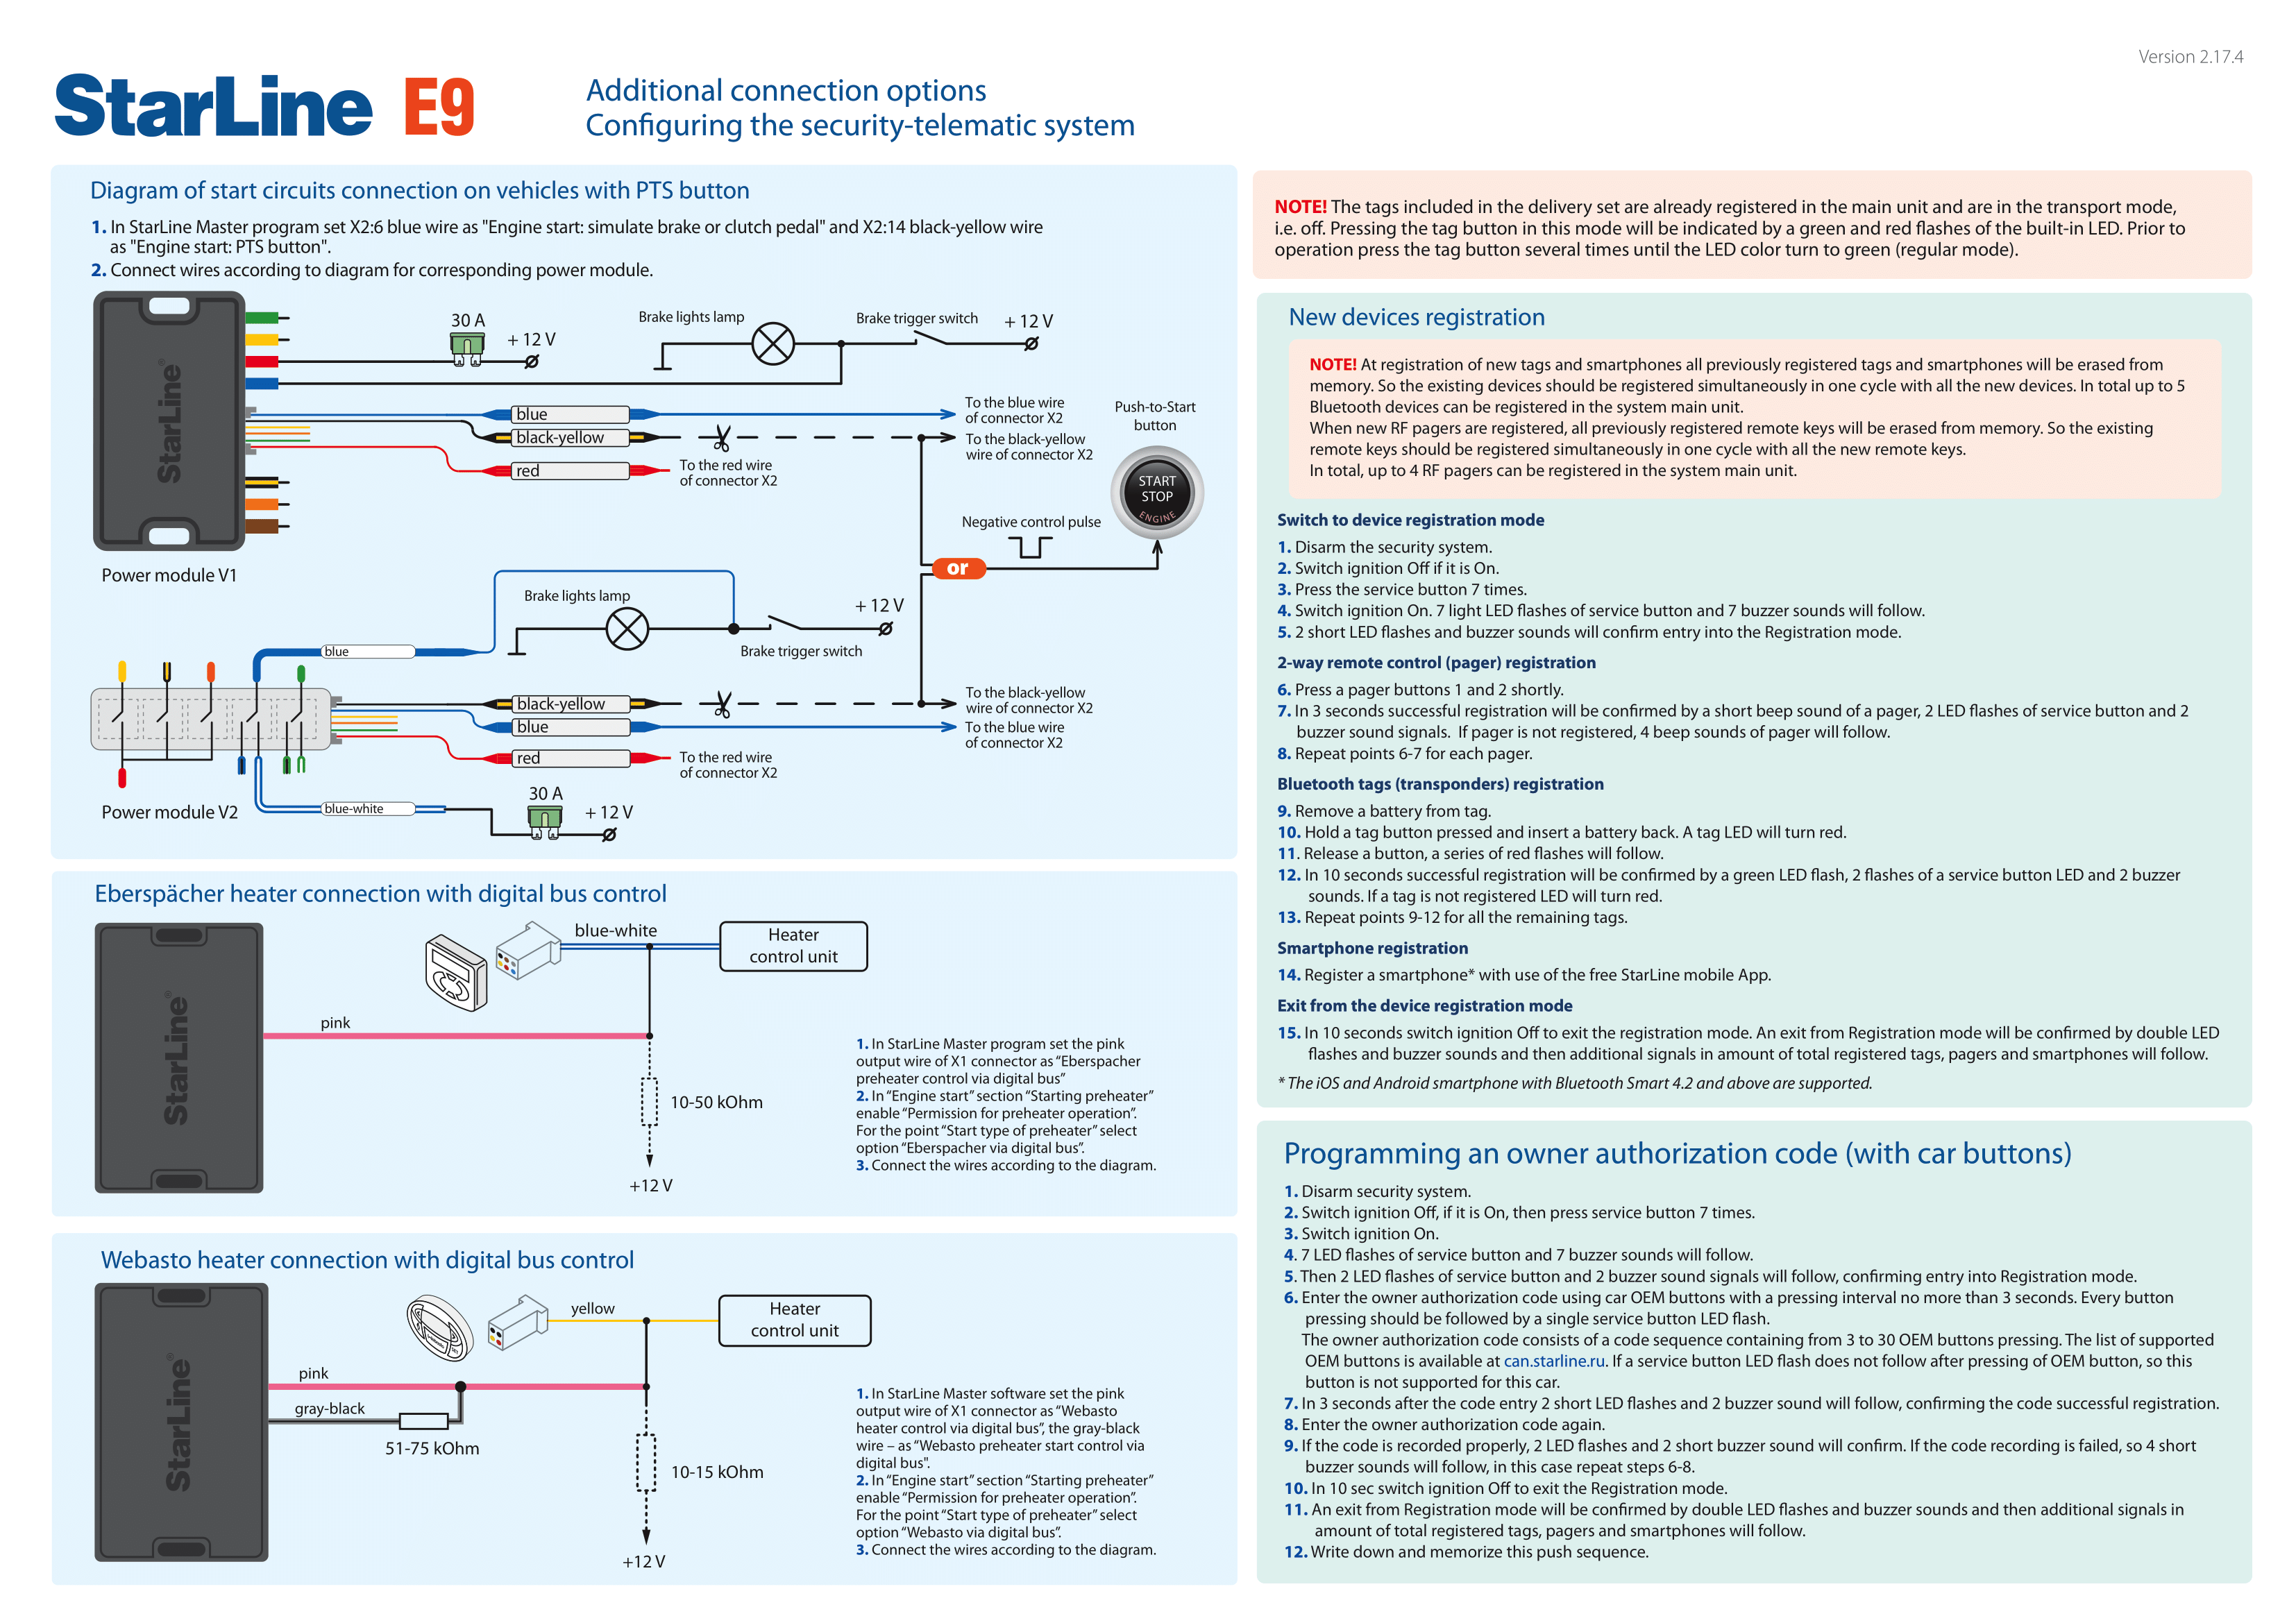
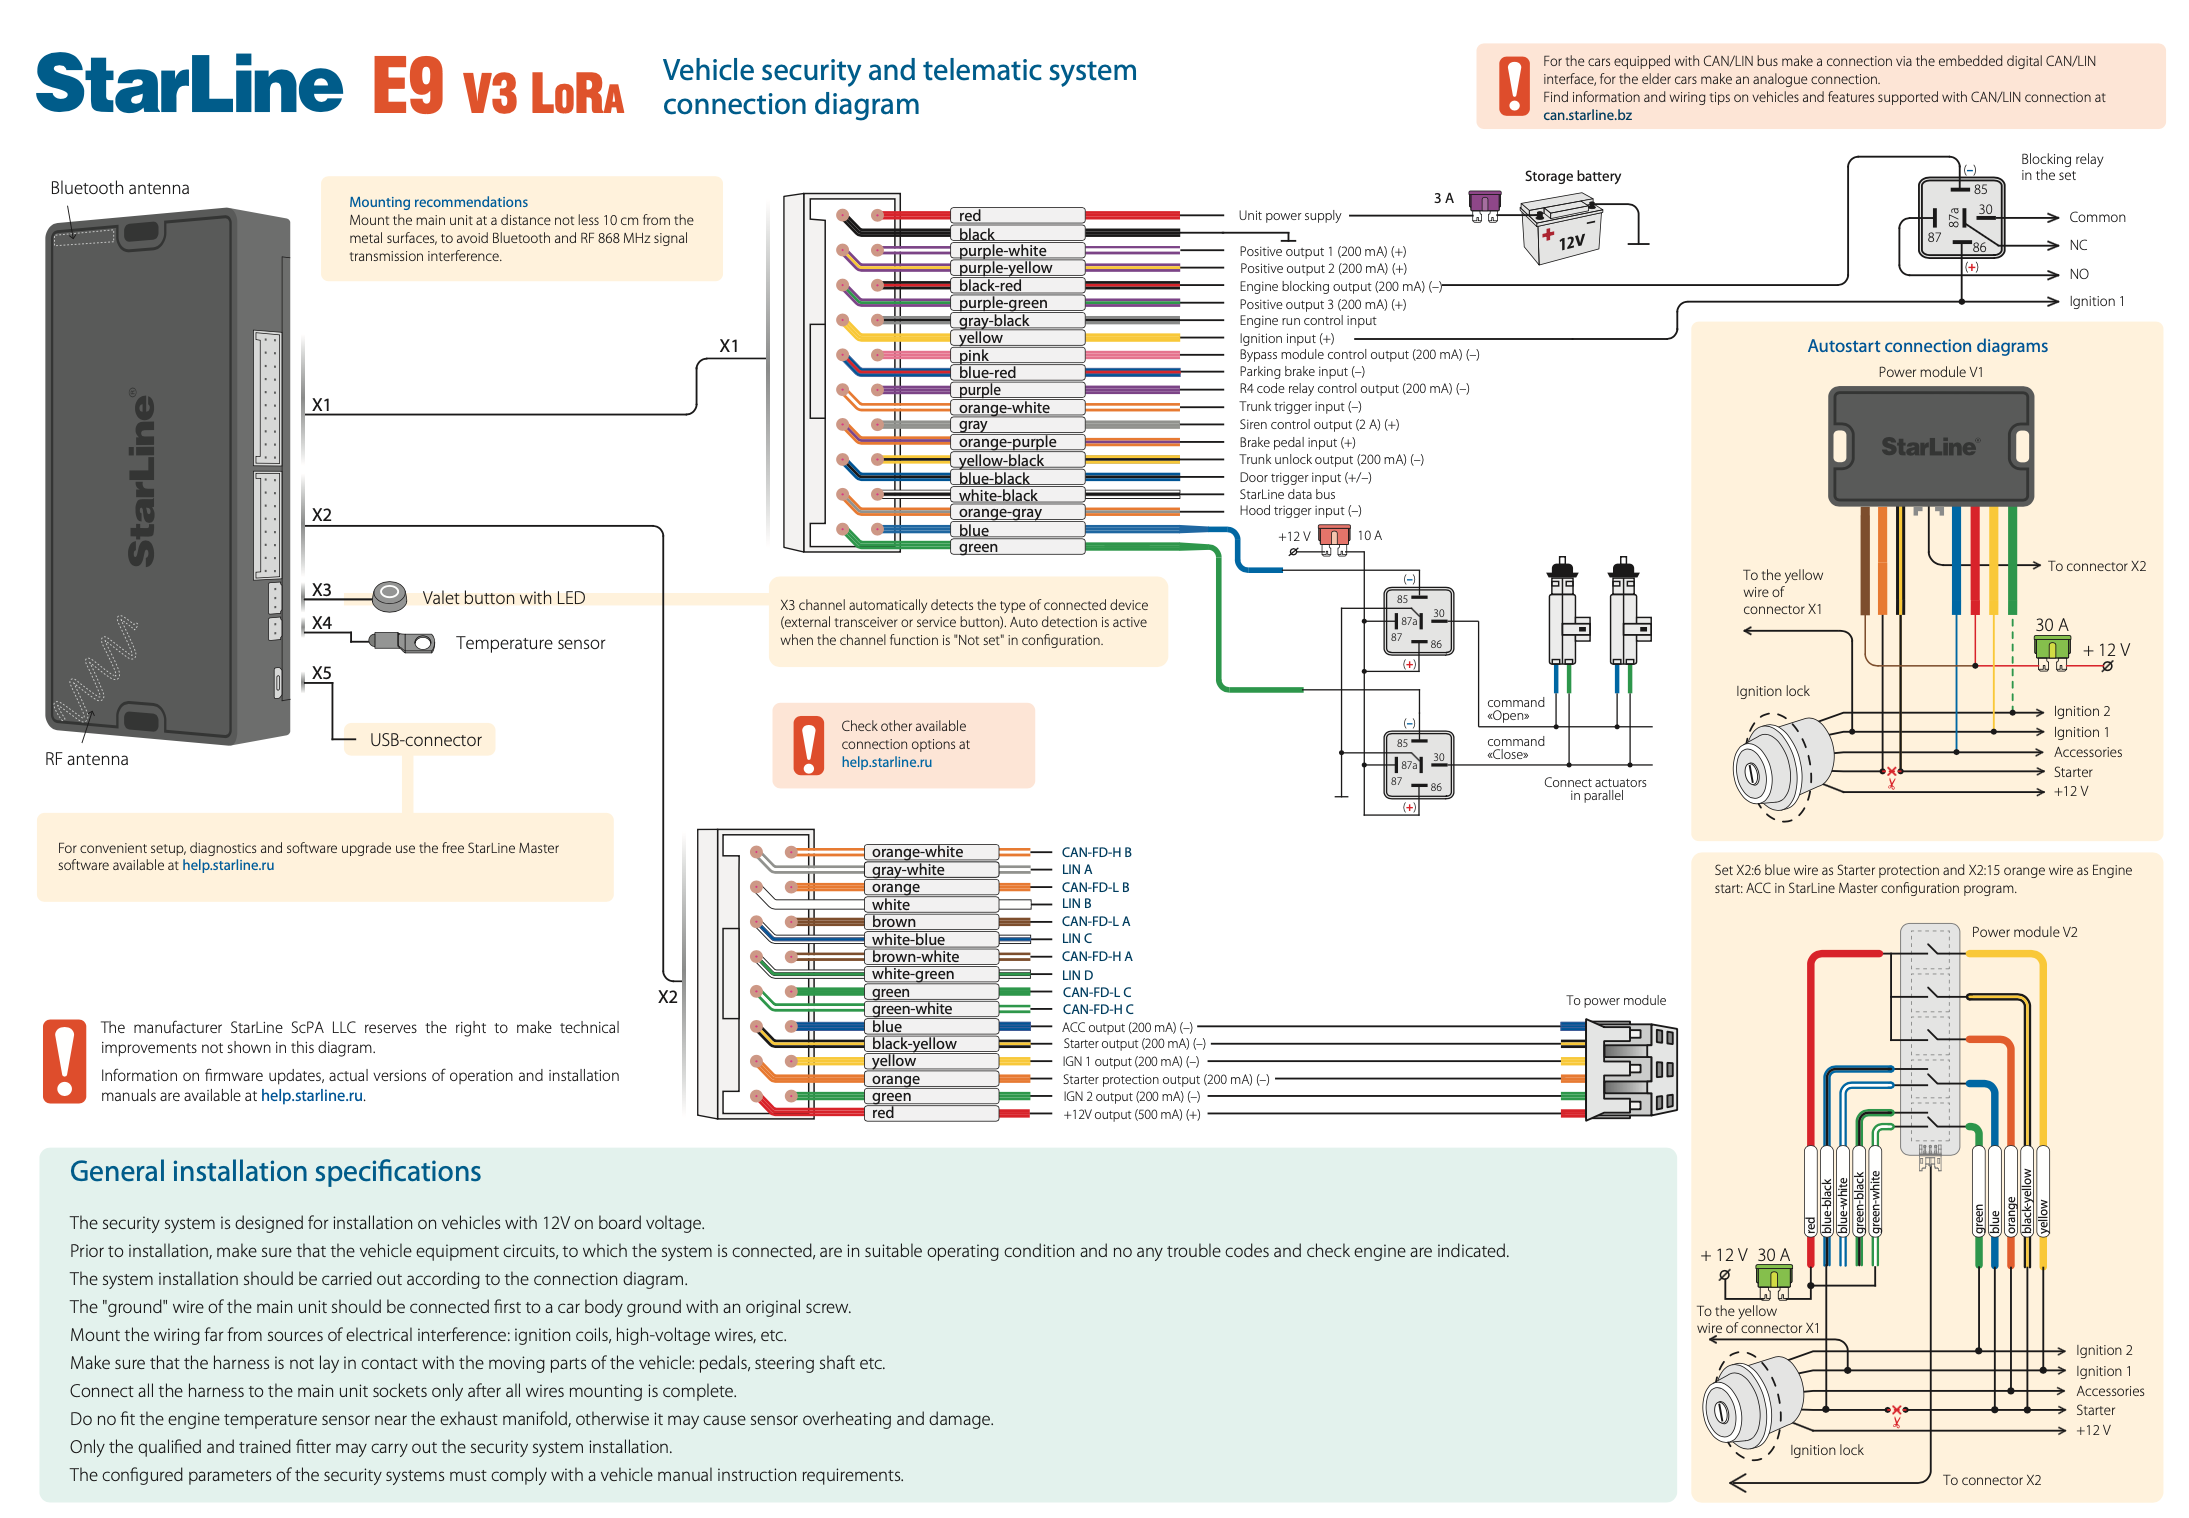
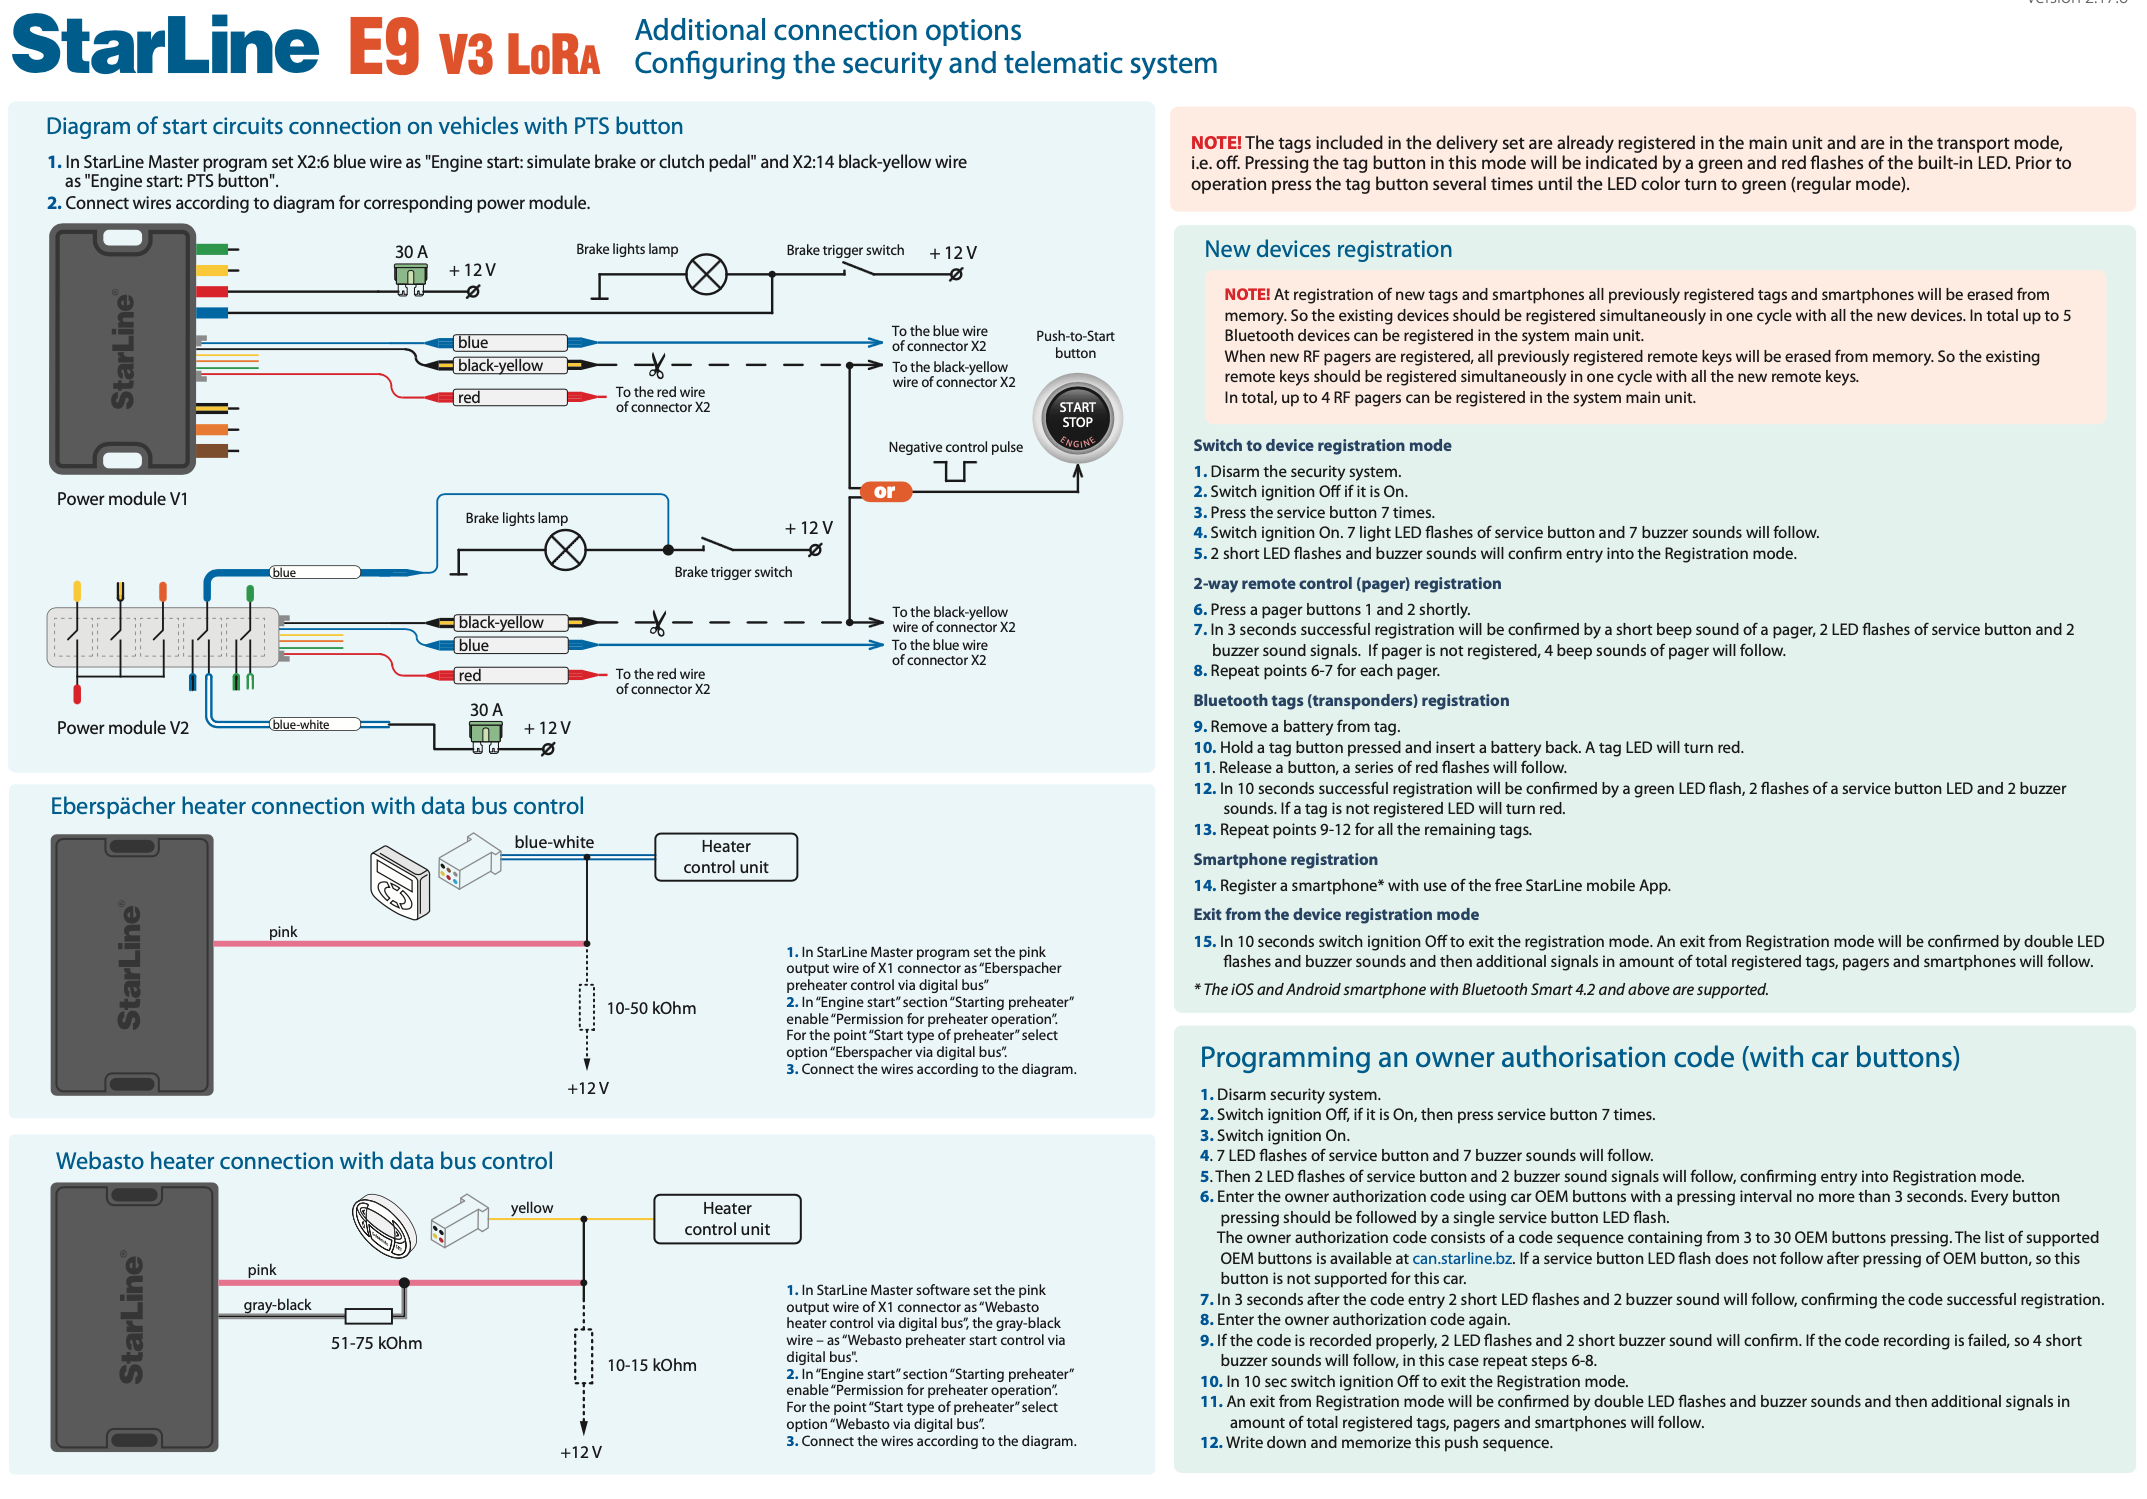
Connection diagram
Firmware
Find description for the main unit, remote key, and tag firmware versions by the link: Firmware