StarLine M66 v2
- Safety precautions
- General Description
- Technical Specification
- Personal information
- GSM control and GPS navigation
- Control with wireless tag (transponder)
- Operation modes
- Device registration
- Owner authorisation code (PIN-to-Drive)
- Recording and changing PIN-to-Drive code
- Emergency disarming
- Changing emergency disarm code
- Installation
Safety precautions
Attention!
Read the manual before using the security system. Pay special attention to sections marked with  . To check if this security system is suitable for your vehicle, follow vehicle manual and manufacturer requirements.
StarLine security system is a complex electronic appliance that connects to vehicle wiring and equipment, including engine controls.
It must be installed only by qualified, trained auto electronics technicians who have passed safety training.
Configured parameters must comply with vehicle manual requirements.
The user is fully responsible for any damage to people, animals, or property resulting from improper use of security system or violation of safety precautions in this manual.
Manufacturer is not responsible for losses or injuries caused by breaching these safety rules.
If your system includes a wireless tag (transponder), follow these recommendations:
-
do not carry a tag with vehicle's original keys
-
always switch system to service mode before handing over a vehicle for maintenance or car wash
-
do not give tags to other people to prevent unauthorized access to security functions
-
keep tags out of reach of children and animals
- store the spare tag and battery in the vehicle in its original factory packaging
Safety precautions when charging vehicle storage battery
Battery charging applies voltage above the normal 12V/24V to battery and vehicle circuits, which can damage factory electronics and optional equipment.
Do NOT use chargers or jump-starters directly on the vehicle without disconnecting the battery terminals in these modes:
-
rapid charging with high current ("boost" or similar modes)
-
START modes for engine starting
Never use starting/charging devices for engine starting if main battery is disconnected, main battery is faulty (short circuits, broken plates, etc.).
Never use faulty charging devices, and other power supply equipment (i.e. welding inverters), not dedicated to charge 12V and 24V vehicle batteries.
Avoid the "light up" method of starting with using cables from a donor vehicle battery. The owner is fully responsible for short circuits, voltage surges, or damage to security system and vehicle electronics.
Follow a safe storage battery charging procedure!
Before charging a battery terminals must be disconnected from vehicle circuits.
After charging, connect battery terminals back to vehicle circuits.
This is necessary because battery health (internal shorts, plate damage, etc.) can't be checked without special equipment. Connecting a charger to a faulty battery risks over voltage damage to vehicle electronics and security system.
General Description
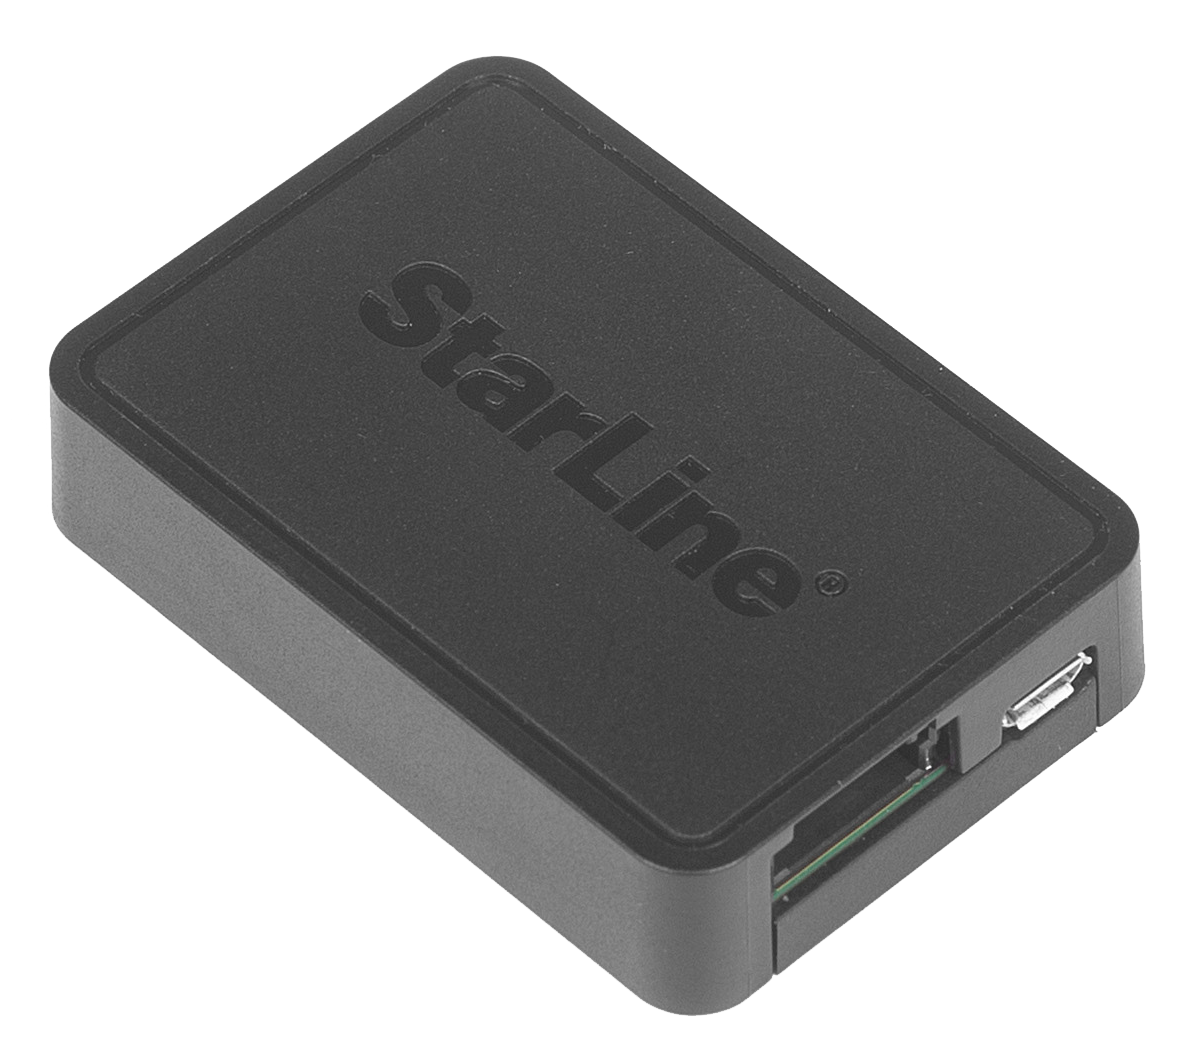
StarLine M66 v2 security and telematic system (hereinafter referred to as the system) is dedicated to securing various types of vehicles from theft and robbery. It matches 12V and 24V onboard power systems, interacts with vehicle systems through the CAN bus, brings multilevel digital and analog immobilising functionality, and provides subscription free GSM and GPS live tracking and remote control at starline.online web service and StarLine mobile app.
The systems can be controlled using the wireless tag, SMS commands, voice call menu, StarLine mobile app, or at starline.online monitoring service.
Major benefits
-
embedded 2G GSM or 4G LTE modem and 2* nanoSIM card slots
- 2*CAN bus data interfaces for easy and quick integration into the modern vehicles onboard network
-
«Super Slave» option for automatic arming and disarming with use of a factory key or Keyless-Go
- driver authentication by wireless tag, or smartphone paired via Bluetooth Smart (this functionality can be limited by a phone operating system configuration and not guaranteed)
- authorisation with PIN-to-Drive code (entered via standard vehicle buttons) is supported over CAN bus
- GPS location, live tracking, and remote control via the lifetime-free StarLine web service and mobile app
- live vehicle data monitoring: i.e. battery voltage, mileage, fuel level, distance to empty etc.
- live OBDII diagnostics and trouble codes displayed in the app
- drive behavior analyzing and scoring
- trip data storage in non-volatile memory (“black box”): up to 1,000 km urban and 5,000 km highway driving, up to 13,000 events
- optional StarLine R6 wireless relay module to control hood lock, siren, engine kill, engine temperature, and bonnet trigger switch
- universal programmable input and output channels
- FlexibleLogic - customised operation logic based on "Event - Term - Action" program scripts
- universal StarLine Master installer’s software for the system configuration and updating through USB and Bluetooth interface
- compact housing for convenient and hidden installation
Technical Specification
| Parameter | Values |
|---|---|
|
Cellular network bands |
2G version: GPRS 850, 900, 1800, 1900 |
|
Antenna type |
Embedded |
|
GPS / GLONASS receiver sensitivity |
– 148 dBm —«cold start» |
|
Short range control |
Bluetooth Low Energy 2.4 GHz |
|
Interfaces |
• 2xCAN • 1 x StarLine data bus |
|
Input voltage |
8 – 32 V |
|
Rated current |
within 25 mA |
|
Bluetooth tag current |
32.7 μA |
|
Operating temperature |
−40 °С ... +85 °С |
|
Tag protection rating |
IP67 |
|
Dimensions |
64 х 44 х 13.5 mm |
|
Weight |
33 g |
Personal information

GSM control and GPS navigation
StarLine.online and mobile app
StarLine system can be remotely controlled and monitored on the starline.online web tracking platform and StarLine mobile app with life time free subscription.
Make sure that a proper local SIM card with active balance, internet traffic and permission to operate with M2M smart devices is installed and configured at installation.
SIM card boot PIN code must be disabled prior to inserting into the main unit.
Make sure the local network support cellular standards and bands described in device technical specification.
1. Download StarLine 2 mobile app from your phone store (App Store, Google Play, Huawei AppGallery) or browse starline.online web tracking service
2. Register a new or sign in to existing StarLine account
3. Go to "Device adding" ("+" button) menu on the main screen, select "Add new device" — Next — "GSM module, alarm
system, smart tracker" — "Use activation code"
4. Enter the one-time activation code printed on attached sticker
5. System will be registered on server and appear in device list on the main screen
Activation code can not be used again to add device into another account. Use SMS command 00581 and the one-time PIN code in this case.


Cellular commands
System can be controlled with voice and SMS text commands from the owner master phone number (M1) and additional registered numbers (M2, M3, M4).
The first incoming call telephone number shall be automatically recorded as M1 master number. All commands received from M1 number are executed without a GSM PIN code in default configuration. PIN code is recorded by owner at initial call from M1 number. Also, this number sets up control permissions for M2, M3, and M4 phones.
Commands from guest phones are executed with PIN code in the beginning, i.e. system arming command: 1234 11; where 1234 – PIN code, 11 – arming command number.
If invalid password is entered twice from the guest number, commands from that number will be blocked for 1 hour, and alert message will be sent to the owner's M1 number
Voice call commands
|
Command
|
Function
|
М1
|
М2, М3, М4
|
Guest phones
|
|---|---|---|---|---|
|
0
|
Listen commands menu |
|
|
|
|
10
|
Disarming |
|
|
|
|
101 |
Silent disarming |
|
|
|
|
11
|
Arming |
|
|
|
|
111 |
Silent arming |
|
|
|
|
12 |
Arming with shock sensor disabled |
|
|
|
|
13
|
Arming with auxuliary sensor disabled |
|
|
|
|
14
|
Arming with shock sensor warning level disabled |
|
|
|
|
15
|
Arming with tilt sensor disabled |
|
|
|
|
31
|
Activate Anti-hijack mode |
|
|
|
|
40
|
Request location |
|
|
|
|
41
|
Request vehicle state |
|
|
|
|
50
|
Disable Service mode |
|
|
|
|
51
|
Enable service mode |
|
|
|
|
70
|
Disable Hands Free |
|
|
|
|
71 |
Enable Hands Free |
|
|
|


SMS text commands
| Text commands | Function | М1 | М2, М3, М4 | Guest phones |
|---|---|---|---|---|
|
10 |
Disarming |
|
|
|
|
ARM- |
||||
|
О-
|
||||
|
101 |
Silent disarming |
|
|
|
|
11 |
Arming |
|
|
|
|
ARM+
|
||||
|
О+
|
||||
|
111 |
Silent arming |
|
|
|
|
12 |
Arming with shock sensors disabled |
|
|
|
|
13
|
Arming with auxuliary sensor disabled |
|
|
|
|
14
|
Arming with shock sensor warning level disabled |
|
|
|
|
15
|
Arming with tilt sensor disabled |
|
|
|
|
19
|
Panic activation |
|
|
|
|
PANIC
|
||||
|
40
|
Request location |
|
|
|
|
GPS
|
||||
|
41
|
Request vehicle state |
|
|
|
|
AUTO
|
||||
|
45
|
Request cell connection status and SIM card balance |
|
|
|
|
BALANCE
|
||||
|
MONEY
|
||||
|
30 ХХХХ
|
Emergency disarming, where XXXX - emergency disarm code from sticker with codes in your manual. |
|
|
|
|
A- ХХХХ
|
||||
|
31
|
Activate Anti-hijack mode |
|
|
|
|
А+
|
||||
|
50
|
Disable Service mode |
|
|
|
|
S-
|
||||
|
51
|
Enable Service mode |
|
|
|
|
S+
|
||||
|
69
|
Activate video recorder (dashcam) |
|
|
|
|
VIDEOREG
|
||||
|
70
|
Disable Hands Free |
|
|
|
|
R-
|
||||
|
71
|
Enable Hands Free |
|
|
|
|
R+
|
||||
|
VALIDATOR-
|
Reset PIN-to-Drive code by factory buttons |
|
|
|
|
8N |
Activate FlexibleLogic program, where N – program number
|
|
|
|
|
SETTING+ |
Enter configuration via BLE |
|
|
|
|
SETTING- |
Exit configuration via BLE |
|
|
|
|
FWUPDATE VER LANG |
Firmware update via internet, where VER – firmware version number (can be written without dots, optional parameter) |
|
|
|
|
FWUPDATE STOP
|
Stop firmware update via internet |
|
|
|
|
FWUPDATE? |
Request status of firmware updating via internet |
|
|
|


Info commands
| Text commands | Function | М1 | М2, М3, М4 | Guest phone |
|---|---|---|---|---|
|
REG ХХХХ |
Entering "Device Registration" mode, where XXXX - emergency disarm code |
|
|
|
|
05 |
Request registered accessories list |
|
|
|
|
REG?
|
||||
|
06 |
Request current GSM PIN code |
|
|
|
|
GSMPSW?
|
||||
|
07 |
Request registered master phone numbers |
|
|
|
|
TEL
|
||||
|
PHONES
|
||||
|
09 |
Request GSM signal strength, battery voltage, firmware version status |
|
|
|
|
INFO
|


GSM settings commands
| Text commands | Function | М1 | М2, М3, М4 | Guest phone |
|---|---|---|---|---|
|
0000ХХХХ |
Record new GSM PIN code, where ХХХХ — new PIN code. |
|
|
|
|
0000 ХХХХ |
||||
|
GSMPSWХХХХ |
||||
|
GSMPSW ХХХ
|
||||
|
0050XXXXYYYY |
Record new emergency disarm code,
|
|
|
|
|
0050 XXXX YYYY
|
||||
|
PINXXXXYYYY
|
||||
|
PIN XXXX YYYY
|
||||
|
0001XYXXX |
Record new М1 phone number, where:
М1 phone number can not be deleted. |
|
|
|
|
0001 XY XXX
|
||||
|
M1XYXXX
|
||||
|
M1 XY XXX
|
||||
|
0002XYXXX |
Record new М2 phone number, where:
If XY parameters and phone number not entered, then current M2 number will be deleted. |
|
|
|
|
0002 XY XXX
|
||||
|
M2 XY XXX
|
||||
|
M2XYXXX
|
||||
|
0003XYXXX |
Record new М3 phone number, where:
If XY parameters and phone number not entered, then current M3 number will be deleted. |
|
|
|
|
0003 XY XXX
|
||||
|
M3XYXXX
|
||||
|
M3 XY XXX
|
||||
|
0004XYXXX |
Record new М4 phone number, where:
If XY parameters and phone number not entered, then current M4 number will be deleted. |
|
|
|
|
0004 XY XXX
|
||||
|
M4XYXXX
|
||||
|
M4 XY XXX
|
||||
|
ZZZZ9900PINXYXXX |
Emergency changing M1 phone number:
This command can be sent from any phone number. |
|
|
|
|
ZZZZ 9900 PIN XY ХХХ
|
||||
|
ZZZZEM1PINXYXXX
|
||||
|
009401 |
Enable all control commands for М2 as forМ1 |
|
|
|
|
М2+
|
||||
|
009400 |
Disable all control commands for М2 as for M1 |
|
|
|
|
М2-
|
||||
|
009500 |
Enable control commands from guest phones |
|
|
|
|
GUEST+
|
||||
|
009501 |
Disable control commands from guest phones |
|
|
|
|
GUEST-
|
||||
|
00961 |
Enable GSM PIN request for М1 |
|
|
|
|
M1PSW+
|
||||
|
00960 |
Disable GSM PIN request for М1 |
|
|
|
|
M1PSW-
|
||||
|
APN?
|
Request active SIM card APN |
|
|
|
|
APN NAME LOGIN PSW
|
Record APN for active SIM card, where:
If no any parameters entered, then current APN settings will be deleted. |
|
|
|
|
00520
|
Disable notification on switching to roaming |
|
|
|
|
00521
|
Enable notification on switching to roaming |
|
|
|
|
00522
|
Enable notification on switching to roaming with automatic data internet off |
|
|
|
|
00523
|
Enable data internet in roaming |
|
|
|
|
00524
|
Disable data internet in roaming |
|
|
|
|
0069Х |
Setting interval of forwarding all incoming SMS from unregistered numbers and USSD from cell carrier to M1 phone, where: X — interval in min (1 - 60 min). |
|
|
|
|
FORWARD X |


SIM cards switching
|
Text command
|
Function
|
М1
|
М2, М3, М4
|
Guest phones
|
|---|---|---|---|---|
|
SIMMAIN X
|
Record priority SIM card, where: X — priority operation SIM card (0 — no priority SIM card, both are equal; 1 — 1st SIM is main, 2nd SIM card is supplementary; 2 — 2nd SIM is main, 1st SIM card is supplementary). Value 1 is set as default. |
|
|
|
|
SIMMAIN? |
Request current SIM cards priority |
|
|
|
|
SIMNUM? |
Request operating SIM cards number |
|
|
|


Periodic connection mode control (Beacon mode)
| Text command | Function | M1 | М2, М3, М4 | Guest phone |
|
MAYAK+
|
Enable periodic connection mode (Beacon mode) |
|
|
|
|
MAYAK-
|
Disable periodic connection mode (Beacon mode) |
|
|
|
Auxiliary commands
| Text command | Function | M1 | М2, М3, М4 | Guest phone |
|
K1+ |
Universal output №1 On |
|
|
|
|
K1- |
Universal output №1 Off |
|
|
|
|
K2+ |
Universal output №2 On |
|
|
|
|
K2- |
Universal output №2 Off |
|
|
|
|
K3+ |
Universal output №3 On |
|
|
|
|
K3- |
Universal output №3 Off |
|
|
|


Control with wireless tag (transponder)
The included and optional tags are supplied from factory in transport (power saving) mode, i.e. inactive! Pushing a tag button in this mode is indicated by green and red alternating flashes of the built-in LED. To switch it to normal mode push a tag button several times until flashing color turns to green

Connection check
- green - regular mode, Anti-hijack is disabled
- red - Anti-hijack mode is enabled
- yellow - Service mode is enabled
Control over security system
Duration of a tag button pushing:
- short – push and release button, followed with a flash of corresponding current operation mode
- long–push and hold button until LED begins flashing
Duration of long push are of 2 levels:
-
1 level – push and hold a tag button followed with double short
flashes of current operating mode and then long flash at
which button must be released -
2 level – push and hold a tag button followed with double
short flashes of current operating mode, then one long flash
and then followed with serial flashes at which button must be released
|
Command
|
Button push
|
|---|---|
| Arm and Disarm | 1 short |
|
Enable and disable Anti-hijack by tag away |
long 1 level |
| Enable and Disable Service mode |
long 2 level |
Replacing a tag battery
Wireless tag (transponder) is equipped with CR2032 3V battery.
Tag battery discharging is indicated with 3 sounds of external buzzer (or siren) at ignition On and owner is notified with text message to his phone number. Then battery must be replaced as soon as possible
To replace battery open a tag casing carefully with a flat metal or plastic item, remove discharged battery from slot. Install a new battery in the slot observing correct polarity (positive side up, as shown on picture).
Do not forget remove safety sticker from a new battery.

A smartphone with support of Bluetooth 4.2 and above can also be used as a tag. See Devices registration article to pair a smartphone as a tag.
The smartphone operation as a tag may be limited by operating system restrictions and power saving settings in a particular phone
Operation modes
| Security modes |
Armed |
| Disarmed | |
| Anti-hijack | |
| Alarm | |
| Panic | |
|
Supplementary modes |
«Slave» |
| Hands Free | |
| Service mode | |
| Registration | |
| Configuration |
Armed Mode
The following zones are controlled in armed mode:
- ignition
- shock sensor
- tilt sensor
- motion sensor
If any protected zone is triggered, the system switches to Alarm mode.
System can be armed when ignition off only. If arming command received at ignition on, then only doors are locked
System is armed in one of following ways:
-
pushing tag button once in disarmed or alarm mode
- SMS text command 11
- voice call menu command 11
- command from StarLine mobile app
- command from starline.online web account
- arming with factory security system in Slave mode
-
tag loss or touching capacitive sensor in Hands Free mode
System shall confirm arming with 1 lights flash and 1 siren sound.
Disarmed mode
System is disarmed by one of following ways:
-
pushing tag button once in armed mode
- SMS text command 10
- voice call menu command 10
- command from StarLine mobile app
- command from starline.online web account
-
disarming with factory security system in Slave mode
-
tag detection or touching capacitive sensor in Hands Free mode
Disarming is confirmed with 2 siren sounds and 2 lights flashed. If alarm was triggered while armed mode then 3 siren sounds and 3 lights flashes come up at disarming.
Automatic doors lock on a trip
System can automatically lock doors on a trip on a trip by one of selected terms:
- ignition is switched On
- vehicle starts moving and brake pedal pressed
- parking brake released
- automatic transmission is shifted from parking position
- preset vehicle speed is reached
Automatic doors unlock on a trip
System can automatically unlock doors on a trip by one of selected terms:
- ignition is switched Off
- automatic transmission is shifted to parking position
- engine is stopped
- ignition is switched Off and automatic transmission is shifted to parking positioning
- parking brake is tighten
Automatic doors lock / unlock option can be configured in StarLine mobile app or starline.online account
Trunk unlock in armed mode
Owner can unlock and open trunk by means of a factory remote in armed mode once StarLine tag is visible in detection range.
Unlock trunk in Armed mode" option is configured by installer during setup
Keyless-Go system blocking
The option of factory Keyless-Go blocking via CAN bus protects against factory key stealing and relay attack with specific radio hacking devices. The system shall lock factory Keyless-Go system once StarLine tag is out of detection range. And then unlocks it once tag is detected again in range.
This option is disabled by default and must be enabled in system configuration if needed. Owner authorisation with a tag must be enabled as well. Find out if the option is supported for your vehicle via CAN bus at can.starline.bz
Alarm mode
Alarm shall go off when any of secured zones is breached in armed mode.
System activates siren alert sound, hazards lights flashing for 30 seconds and notifies owner with phone call, text message, and notification in StarLine2 app. If breached zone is not restored system repeats alert cycle once again.
Any warning zone breaching is followed with 3 lights flashes and 3 siren sounds.
Alarm mode can be aborted in Armed mode with push of a tag button.
Alert methods can be set in mobile app or at starline.online:
- siren and hazard lights
- hazard lights only
- no visual or sound alerts
Siren volume level in Alarm mode can be set in mobile app or starline.online web service, when siren is connected to R6 relay module
The output channel must be set on siren (or horn) control in system configuration with StarLine Master program to enable sound alerts. Siren must be connected through automotive relay 12V or 24V
The maximum number of zone triggering is limited to 8 times within 1 security cycle
Panic mode
Panic mode ensures owner and vehicle security and informs on intrusion attempt. This mode can also be used to easily locate vehicle in a parking lot.
Mode can be activated with text message 19 or a command from StarLine mobile app.
System shall activate siren alert and hazard lights flashing for 10 sec in order to scare an intruder and attract other people attention.
Anti-hijack mode
Anti-hijack mode secures driver against assault attempts on a trip.
The mode is activated either by owner command or by a tag loss on a trip.
Anti-hijack by owner command is activated by one of following ways:
- SMS text message 31
- voice call menu command 31
- command from StarLine mobile app
- command from starline.online personal account
The mode operation algorithm depends on a vehicle speed reading from CAN bus (check on can.starline.ru website)
System enables warning sounds and lights on upcoming engine blocking for 10 seconds. Then by reaching a speed below 30 km/h engine will be safely stopped.
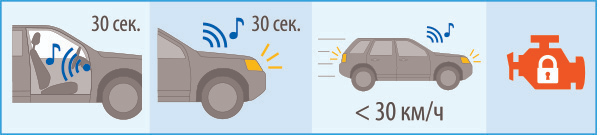
If CAN bus speed reading support is missing, the system will activate warning sounds and lights on upcoming engine blocking for 10 seconds after receiving the command. The engine will be blocked either after 3 minutes or after pressing the brake pedal.
Exit from Anti-hijack mode is done by one of following ways:
- SMS text command 30 XXXX , where XXXX - emergency disarm code
-
entering emergency disarm code using the standard vehicle buttons
- entering emergency disarm code by opening a driver door
-
at starline.online personal account with entering emergency disarm code
In case of invalid emergency disarm code is entered 3 times, then a code entry will be blocked for 15 min and owner will be informed with text message.
Anti-hijack by a tag loss on a trip
The mode operation algorithm depends on a vehicle speed reading from CAN bus.
- Anti-hijack operation sequence when speed supported from CAN bus:
- any of secured zones has been breached (doors, hood or trunk)
- motion sensor has triggered
- in 30 sec system begins seeking for a tag
- in another 30 sec, if a tag has not been detected, system enables warning sound and lights for 10 sec
- by reaching a speed below 30km/h engine will be safely stopped
2. Anti-hijack operation sequence when speed from CAN bus is not supported:
-
any of secured zones has been breached (doors, hood or trunk)
-
motion sensor has triggered
-
in 30 sec system begins seeking for a tag
- in another 30 sec, if a tag has not been detected, system enables warning sound and lights for 10 sec
-
engine will be stopped in 3 min or after pressing the brake pedal
Exit from Anti-hijack mode by a tag loss is made by one of following ways:
- when tag is detected in range
- SMS text command 30 XXXX , where XXXX - emergency disarm code
- disarm command from mobile app or starline.online with entering emergency disarm code
- entering emergency disarm code with vehicle standard buttons*
- entering emergency disarm code by opening a driver door*
Check whether the standard buttons and drive door status are supported for your vehicle in CAN bus at can.starline.bz
In case of invalid emergency disarm code is entered 3 times, then a code entry will be blocked for 15 min and owner will be informed with text message
Anti-hijack by tag loss is disabled by default.
Enable it in device settings through mobile app, or press and hold a tag button until red flash come up, then release the button
Slave mode
Slave mode allows to control security system by means of a factory remote control.
System detects unlocking doors and disarming factory security and waits for owner authorisation with any of below methods before disarming itself:
-
tag detection in range at disarming within adjusted interval from 15 to 60 sec
-
entering personal PIN code with standard buttons at ignition On within adjusted interval from 15 to 60 sec
It is highly recommended to enable above mentioned secondary owner authorization methods in "Slave" mode in system configuration settings
To change the owner authorisation method and wait time, contact your installer
Service mode
Service mode is used for temporary security deactivation and restricting access to system configuration while vehicle maintenance, car wash etc, or when the tag battery is discharged.
Service mode can be activated from disarmed state only
Following features are disabled in service mode:
- arming and disarming
-
doors lock and unlock on a trip
- trunk unlock
- Hands Free mode
- Panic mode
- Anti-hijack by a tag loss
- main unit calibration
- trouble codes in CAN information section
- entry to system configuration
- entry to device registration
Service mode is enabled by any of following ways:
-
tag button push for over 5 sec until the tag's LED turns yellow
- SMS text command 51
- command from StarLine mobile app or starline.online account
Service mode activation is indicated with a tag LED turned yellow.
Service mode is disabled by one of following ways:
-
tag button push for over 5 seconds
- SMS text command 50
- command from StarLine mobile app or starline.online account
After exiting service mode, system switches to disarmed mode and remains in it until tag appears and then disappears from the range
Automatic exit from Service mode
System automatically turns from service mode to owner authorisation when leaving a service area by selected event when ignition on (set in system configuration while installation).
This option requires owner authorisation, embedded sensors and vehicle speed from CAN bus to be enabled in system configuration
Immobiliser mode
Immobiliser mode prohibits drive without an extra owner authorisation.
Depending on settings system waits for owner authorisation with a tag in detection range or PIN code entered with standard vehicle buttons after every disarming or every ignition switching Off and next switching On.
In most of vehicles PIN code can be entered with standard buttons only when ignition is switched On.
If the Immobiliser mode is enabled along with Slave mode, both authorisation conditions must be met to disarm the system
Video recorder (dashcam) control
The option must be initially wired and programmed while installation
System can automatically switch dashcam On to begin recording:
- at ignition switched On – dashcam is activated for 5 min
- at full alarm or warn alarm triggered – dashcam is activated for 2 min
- with SMS command 69 dashcam is activated for 5min
If engine is still running in armed mode then dashcam continues operating until engine is stopped
Emergency braking alert
In case of a forced emergency braking, the system can alert other traffic participants by means of hazard lights blinking
Hazard lights turn off in 5 sec after the end of sudden braking, or beginning of acceleration
The option must be enabled in the system configuration: "Device settings" - "Telematics" - "Insurance telematics"
The main unit embedded accelerometer must be calibrated for the function proper operation (make sure the corresponding option is enabled in system configuration)
Device registration
Registration mode is used to pair tags, smartphones and wireless relay StarLine R6.
Total amount of accessories can be registered in the system main unit: 5 wireless tags or 4 smartphones
Complete all device registration steps without long pauses between them
Entry to device registration
-
disarm system if it is armed
-
send SMS command REG ХХХХ, where ХХХХ is emergency disarm code
-
wait for SMS message confirming entry to registration mode
If invalid emergency disarm code is sent 3 times, then entry to device registration will be blocked for 15 min, and alert SMS will be sent to owner's M1 phone number
Wireless tags (transponders) registration
-
Remove battery from a tag slot

-
Push and hold tag button and insert battery back in slot observing the right polarity (“+” side top). The tag LED will light up red

-
Release button and make sure a tag LED serial red flashes come up for 10 seconds

-
Successful registration will be confirmed by a tag LED green flash and SMS message.
If a tag pairing failed then its LED will light up red
-
Repeat items 1-3 for the remaining tags


Smartphone registration
- enable Bluetooth in smartphone and activate device searching
- select "StarLine M66 v2" in available devices list
- enter pairing code 000000 (for iOS click "Pair")
If multiple registered smartphones are in range at the same time, the system will only work with the first one to connect
Exit from the device registration mode
System will automatically exit from device registration mode in 5 minutes.
Successful device registration will be confirmed by an SMS with a list of registered devices.
Owner authorisation code (PIN-to-Drive)
Pin-to-Drive code entered with standard vehicle's buttons is used for secondary owner authorisation at disarming.
The secondary authorisation method and interval are selected in the system configuration by installer
Recommend connect external buzzer or siren for the code entry sound confirmation
Entering PIN-to-Drive authorisation code:
-
Disarm system if it is armed

-
Switch ignition On

- The series of triple sounds of external buzzer will follow. System is waiting for the code entry
-
Enter PIN code by a sequence of vehicle's standard buttons pressing with no more than 3 sec push intervals
presses.


5. If valid code entered, 2 buzzer beeps come up and system shall disarm.
If invalid code entered, then series of triple beeps continues - retry code entry from step 3
If no sound signal follows after pressing the factory button, then this button is not supported in this vehicle
Recording and changing PIN-to-Drive code
Recording (changing) PIN-to-Drive code:
-
Disarm system if it is armed
- Switch ignition Off

- Send SMS text command REG XXXX to enter Registration mode, where XXXX is emergency disarm code
-
Wait for the reply SMS: "Attention! Registration mode activated"
- Switch ignition On
-
Enter new owner authorisation code by a sequence of vehicle's standard buttons pressing with no more than 3 sec push intervals
Every detected button push shall be followed by a single beep

7. In 3 sec after the full sequence finished system confirms code entry by 2 beeps
8. Enter the same buttons sequence once again
9. Correct button sequence repeated will be confirmed with 2 beeps
Invalid sequence entry will be followed by 4 beeps,
then retry code recording again from step 6
10. Switch ignition Off to exit Registration mode

Emergency disarming
System can be fully disarmed with emergency disarm code (find it on the sticker inside printed manual), when:
- tag is lost or discharged
-
no access to mobile app or starline.online account
-
vehicle is immobilised in Anti-hijack mode
Emergency disarming with standard buttons or driver door
- while armed, switch ignition On - system turns to alarm
- press and hold brake pedal
-
wait for 2 sec, then press any standard vehicle button (or open and close driver's door) the number of times matching the first digit of emergency disarm code
- wait for 2 sec and release brake - buzzer or siren (if connected) confirms entry with sounds matching the digit number
-
repeat steps 2 - 4 for remaining digits
- valid code will be confirmed with 2 sounds and system shall disarm. If invalid code entered, system shall remain in alarm and vehicle immobilised
Note! Emergency disarm code and service code are generated randomly at factory and never stored anywhere for security reasons. It cannot be recovered once lost ! Strongly recommend to copy it in a safe place and record in StarLine mobile app: Settings - General information - Device codes
If invalid code is entered 3 times, then next attempts will be blocked for 15 min
System should be able to read statuses of ignition, brake pedal, at least one standard button or a driver door trigger from CAN bus.
Check your vehicle's CAN bus supported statuses at can.starline.bz
Emergency disarming by SMS
To emergency disarm, send SMS text command 30 XXXX, where XXXX is emergency disarm code.
If invalid code is sent 3 times, then next attempts will be blocked for 15 min, and owner will be notified on it with SMS alert
Changing emergency disarm code
The current emergency disarm code must be known to change the code
Find the factory issued emergency disarm code on the sticked inside printed manual.
The emergency disarm code can use any digits except zero
Changing the emergency disarm code by SMS text command
To change emergency disarm code, send SMS text command 0050XXXXYYYY,
where XXXX - 4 digits of an old code
YYYY - 4 digits of a new code.
Installation
SIM card installation
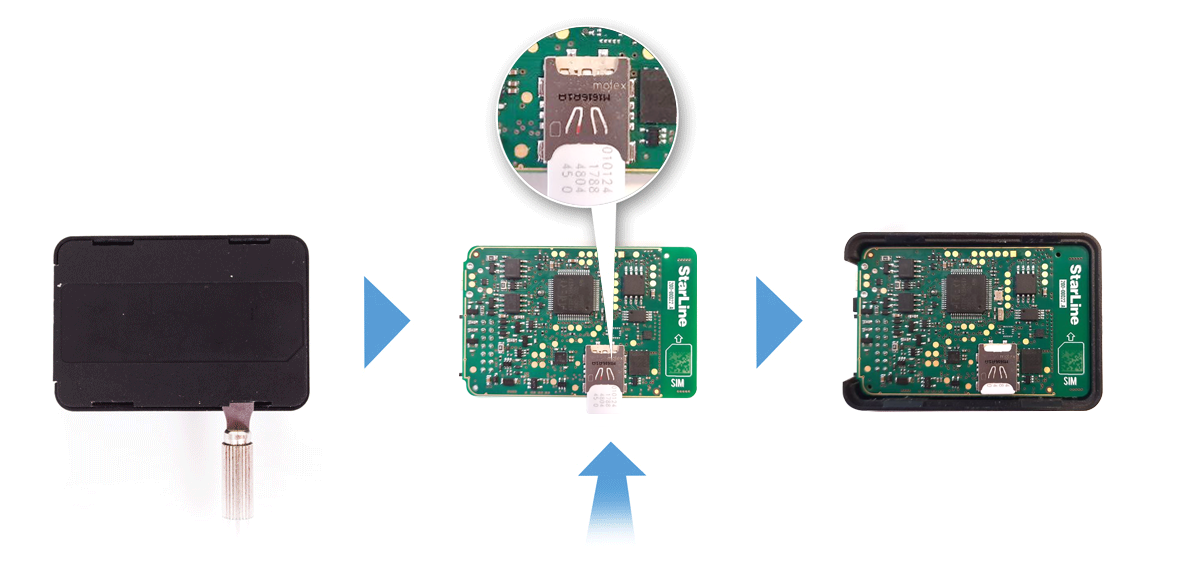
Open main unit housing with a flat metal item. Insert SIM card into the slot on the circuit board.
Put the board back in the case. Close the case lid.
Tracker placement recommendations
The system main unit must be placed so that its cover is pointing towards the sky (StarLine logo side up).
Also the unit must not be obscured by metal objects and coatings.
The satellites signal well passes through glass, plastics, decorative door paneling, but does not pass through a metal body, metallized tinting and other metal objects.
Connection diagram

Black wire - connection to vehicle's ground (-).
This connection must be done first.
Recommend to crimp the wire into the ring terminal and fix it with one of the vehicle's factory ground bolt (screw).
Red wire — connection to vehicle's power feed 12 or 24 V.
The wire must be connected to one of the permanently powered contact or wire of 0.5 mm2 thickness at least, or directly to the vehicle's main battery terminal through the supplied 3A protective fuse. Typical connection points: fuse, relay box or body control module (BCM) power supply, ignition switch.
Green wire — universal output / input No 1.
Activated by SMS command K1+.
Can be used as an engine kill control, universal output for the other circuits (dashcam, buzzer, siren, PTS button), or input for an auxiliary sensor.
For example, set the output function to Engine blocking in Channel settings and select NO (normally open) or NC (normally closed) connection type in Engine blocking settings of StarLine Master program. Break one of an engine control circuits with automotive relay and connect this output to the control contact.
Blue wire — universal output No 2.
Activated by SMS command K2+.
Can be used as an engine kill control, universal output for the other circuits (dashcam, buzzer, PTS button).
Yellow wire — can be used for ignition or auxiliary sensor control.
White-black wire — can be used as StarLine data bus to connect the other optional StarLine extention devices or as universal output for the other circuits control (dashcam, buzzer, siren, PTS button)
The NC (normally closed) engine kill connection type is set by default.


Brown, brown-white, orange and orange-white wires — digital CAN bus interfaces. Find recommended connection points and diagrams for your vehicle at can.starline.bz.
The system operation is configured with the help of StarLine Master program.