The presence of a remote key depends on the delivery set of the security system.
### Remote Key **2-way remote key with LCD (liquid crystal display). [ ](/uploads/images/gallery/2024-02/dmgimage.png) **[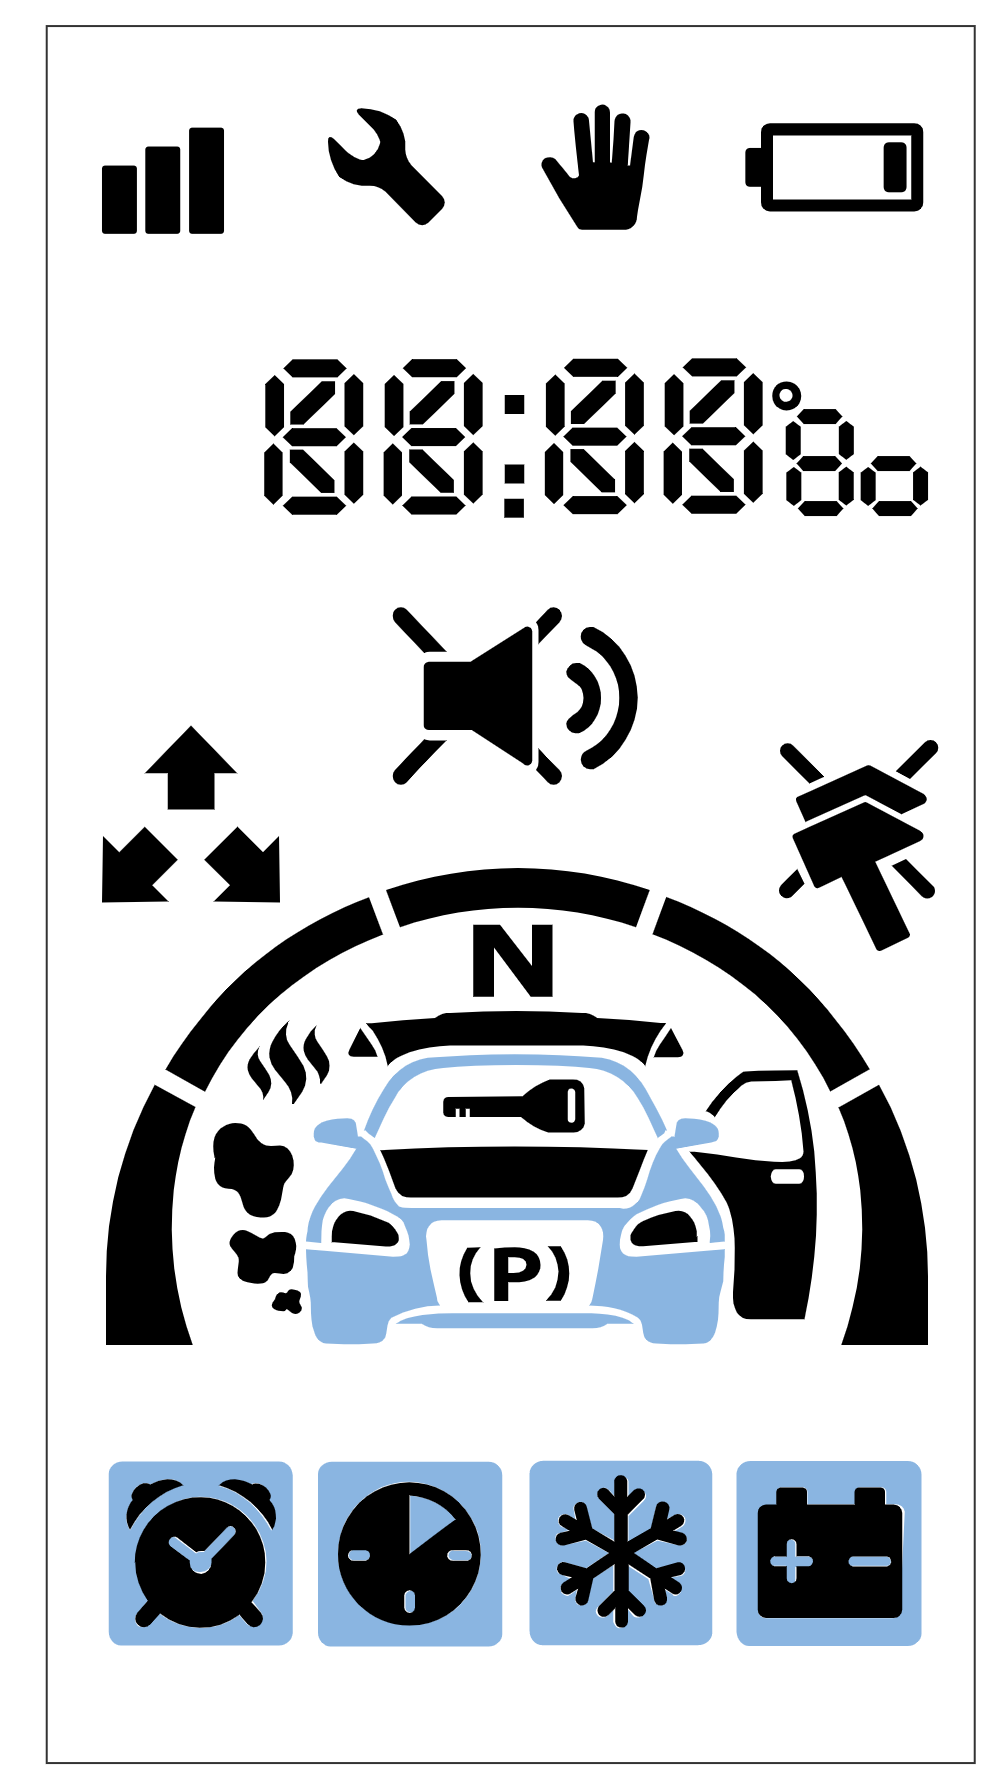](/uploads/images/gallery/2024-02/xGqimage.png)** The remote key with LCD uses a AAA 1.5 V battery. The battery life of the remote key with LCD is up to 6 months depending on operating conditions. LCD remote control and matching external RF868 transceiver are optional accessories and can be ordered from local dealer. ### Meaning of icons on the remote key #### Engine Start| Icon | Meaning |
|---|---|
|  | Engine is running |
|  | Automatic engine start by timer enabled |
|  | Periodic automatic engine start enabled |
|  | Automatic start by temperature enabled |
|  | Automatic start by battery voltage drop enabled |
|  | Program neutral executed |
| .png") | Parking heater activated (blinking) |
| Icon | Meaning |
|---|---|
|  | Armed |
|  | "Hands-Free" mode |
|  | Service mode |
|  | Programming mode |
|  | Remote key's button lock |
|  | "Anti-hijack" mode |
| Icon | Meaning |
|---|---|
|  | Ignition is on |
|  | Parking brake tighten |
|  | Hood open |
|  | Door open |
|  | Trunk open |
| Icon | Meaning |
|---|---|
|  | Tilt or motion sensor triggered |
|  | Additional sensor 1 triggered |
|  | Additional sensor 2 triggered |
|  | Tilt sensor triggered |
|  | Motion sensor triggered |
|  | Warning level of shock sensor triggered |
|  | Alarm level of shock sensor triggered |
|  | Shock sensor disabled |
| Icon | Meaning |
|---|---|
|  | Data Transmission |
|  | Replace battery in remote key |
|  | Siren sounds enabled |
|  | Siren sounds disabled |
| Short Press | Pressing a single button (or two buttons simultaneously) for less than 1.5 seconds. Example:  — short press of the first button;  — short press of buttons 2 and 3 simultaneously. |
|---|---|
| Long Press | Pressing and holding a button or two buttons until a melodic sound signal and vibration signal appear.
Two levels of long press are provided:
- First-level long press — pressing a button until the first sound signal.
Examples:  — first-level long press of the first button;  — first-level long press of the first and second buttons;
- Second-level long press — pressing a button until the second sound signal;
Examples:  — second-level long press of the fourth button.
|
| Double Press | Two presses of the same button within 1 second. Example:  — double press of the first button. |
| Triple Press | Three presses of the same button within 1 second. Example:  — triple press of the first button. |
| Sequential Press | Two presses of one or different buttons. The first press should be long (first or second level), the second press should be short. Release the first button before the second press. Example:  — sequential press of buttons 2 and 1. |
| Command | Button Combination |
|---|---|
| Arm |  |
| Arm without confirmation sound signals |  |
| Disarm |  |
| Disarm without confirmation sound signals |  |
| Request vehicle statuses (engine and cabin temperature, battery voltage, fuel level). During remote engine start - remaining engine runtime. |  |
| Start engine |  |
| Stop engine |  |
| Activate parking heater |  |
| Deactivate parking heater |  |
| Search for vehicle in parking lot |  |
| Activate/deactivate shock sensor |  |
| Activate/deactivate tilt and motion sensor |  |
| Activate "Panic" mode |  |
| Unlock trunk |  |
| Enable automatic engine start | configuration menu |
| Enable/disable service mode |  or configuration menu |
| Enable/disable "Hands-Free" mode | configuration menu |
| Enable/disable button lock |  |
| Enable/disable "Button Autolock" function |  |
| Activate only remote key vibration signal |  |
| Activate sound profile 2 |  |
| Activate sound profile 1 |  |
| Activate sound profile 0 |  |
| Activate sound profile -- |  |
| Activate Flexible logic program |  |
| Icon | Parameter | Description | Setting Step |
|---|---|---|---|
 | "Hands-Free" mode | Enable/disable "Hands-Free" mode | — |
 | Automatic engine start and preheater start by timer | Set the hours and minutes for engine start. Switching between engine and preheater start settings is done by short pressing buttons  and  on the remote key. When setting the engine start, the screen will display the digit "1", for preheater start — the digit "2". | 1 minute |
 | Periodic engine start | Set the frequency of engine start in hours | 1 hour |
 | Automatic engine start by temperature | Set the temperature value in degrees Celsius | 1 ºС |
 | Automatic engine start by battery voltage | Set the battery voltage value in Volts | 0.1 V |
 | Service mode | Enable/disable service mode | — |
Current time is automatically retrieved from cellular network and satellites data (if GPS module is available).
**Setting Light and Sound Indicators for Arming and Disarming** To configure the operation of light and sound indicators when arming and disarming, select the 2 item in the settings menu. Then, using buttons  and  set the desired value. Description of configuration options: - for silent arming and disarming (without light and sound indicators), set the value to 0; - for quiet (only light indication) — value 1; - for full (light and sound indication) — value 2; - for using only sound indication — value 3. **Setting Siren Volume for Arming and Disarming** To set the siren volume level, select the 3 item in the settings menu. Then, using buttons  and , select the desired siren volume level. 0 — no sound, 10 — maximum volume level. **Setting Light and Sound Indicators in "Alarm" Mode** To configure light and sound indicators in "Alarm" mode, select the 4 item in the settings menu. Then, using buttons  and , set the desired value. Description of configuration options: - for hidden indication (without light and sound indicators) set the value to 0; - for quiet (only light indication) — value 1; - for full (light and sound indication) — value 2. **Setting Siren Volume in "Alarm" Mode** To set the siren volume in "Alarm" mode, select the 5 item in the settings menu. Then, using buttons  and , set the desired siren volume level. 0 — no sound, 10 — maximum volume level. **Setting Motion Sensor Sensitivity** To adjust the motion sensor sensitivity level, select the 6 item in the settings menu. Then, using buttons  and , set the desired value from 0 to 30. 0 — sensor disabled, 30 — maximum sensitivity level. **Setting Tilt Sensor Sensitivity** To adjust the tilt sensor sensitivity level, select the 7 item in the settings menu. Then, using buttons  and , set the desired value from 0 to 30. 0 — sensor disabled, 30 — maximum sensitivity level. **Setting Warning Shock Sensor Sensitivity** To adjust the pre-warning shock sensor sensitivity level, select the 8 item in the settings menu. Then, using buttons  and , set the desired value from 1 to 30. 0 — sensor disabled, 30 — maximum sensitivity level. The selected pre-warning shock sensor sensitivity value must be greater than the alarm shock sensor sensitivity value. **Setting Alarm Shock Sensor Sensitivity** To adjust the alarm shock sensor sensitivity level, select the 9 item in the settings menu. Then, using buttons  and , set the desired value from 0 to 29. 0 — sensor disabled, 29 — maximum sensitivity level. The selected alarm shock sensor sensitivity value must be lower than the pre-warning shock sensor sensitivity value. **Setting Tag Loss Range** To set the range of the tag loss zone, select the 10 item in the settings menu. Then, using buttons  and , set the desired value from 3 to 10. 3 — minimum range, 10 — maximum range. The tag loss zone range should be greater than the tag detection zone range.Ensure that the set tag loss zone range is sufficient from all sides of the vehicle.
**Setting Tag Detection Range** To set the range of the tag detection zone, select the 11 item in the settings menu. Then, using buttons  and , set the desired value from 1 to 8. 1 — minimum range, 8 — maximum range.The detection zone should be smaller than the loss zone range.
**Setting the Communication Check Period with the Remote Key** To set the communication check period with the remote key, select the 12 item in the settings menu. Then, using buttons  and , select the value 0 or 1. Description of configuration options: - 0 — communication check disabled; - 1 — communication check occurs every 3 minutes. **Setting turbotimer run time** To set the turbotimer run time, select the 13 item in the settings menu. Then, using buttons  and , set the desired value from 1 to 5 minutes. **Setting remote/automatic engine start duration** To set the engine run time, select the 14 item in the settings menu. Then, using buttons  and , set the desired value from 10 to 60 minutes. **Setting max duration of extended** **remote/automatic** **engine start** To set the max extended engine run time, select the 15 item in the settings menu. Then, using buttons  and , set the desired value from 15 to 60 minutes. **Setting parking heater starting max duration** To set the max parking heater starting interval, select the 16 item in the settings menu. Then, using buttons  and , set the desired value from 1 to 10 minutes. **Setting parking heater run time duration** To set the parking run time, select the 17 item in the settings menu. Then, using buttons  and , set the desired value from 5 to 60 minutes. **Setting parking heater activation before remote engine start** To set the parking heater activation before remote engine start, select the 18 item in the settings menu. Then, using buttons  and , set the desired value 0 or 1. Description of configuration options: - 0 — do not start parking heater; - 1 — start parking heater before remote engine start. **Setting parking heater activation before automatic engine start** To set the parking heater activation before automatic engine start, select the 19 item in the settings menu. Then, using buttons  and , set the desired value 0 or 1. Description of configuration options: - 0 — do not start parking heater; - 1 — start parking heater before automatic engine start. **Setting temperature for parking heater activation before remote and automatic engine start** To set the parking heater activation temperature before remote and automatic engine start, select the 20 item in the settings menu. Then, using buttons  and , set the desired value from –5 to –30 ºС. **Setting temperature for automatic engine start** To set the temperature for automatic engine start, select the 21 item in the settings menu. Then, using buttons  and , set the desired value from +10 to –40 ºС. **Setting 2-way remote key detection range** To set the remote key detection range, select the 22 item in the settings menu. Then, using buttons  and , set the desired value from 1 to 10. 1 – min distance, 10 – max distance. ### Remote Sound Profile Menu The menu offers 4 sound profiles with settings for various types of remote signals: command confirmation, alarm, and button press. Profile selection is done by pressing buttons on the remote.The sound profile settings shown in the table are set by default.
| № | Profile Name | Button Combination | Description |
|---|---|---|---|
| 1 | SOUND 2 | [](/uploads/images/gallery/2023-11/icon-short-1.png) | Maximum volume with all signals, vibration signal enabled. |
| 2 | SOUND1 |  | Minimum volume with all signals, vibration signal enabled. |
| 3 | SOUND 0 |  | Vibration signal only, sound volume disabled. |
| 4 | SOUND -- |  | Silent mode, sound volume and vibration signal disabled. |
By default, the BR-1 theme is set
You will automatically exit the menu after 10 seconds if no buttons on the remote key are pressed ### Automatic Button Lock Function When this function is activated, the remote key buttons are automatically locked after the backlight turns off. The function is enabled and disabled by performing a second-level long press on buttons 1 and 4: . ### Remote Key Locator Function To locate the remote key, hold the service button for 5 seconds — the remote key will emit a sound signal. ### Setting Time and Date To set the current time and date, follow these steps: 1. Enter the time and date settings menu by sequentially pressing button 4: . 2. Use a short press of button  to set the hours and a short press of button  to set the minutes. [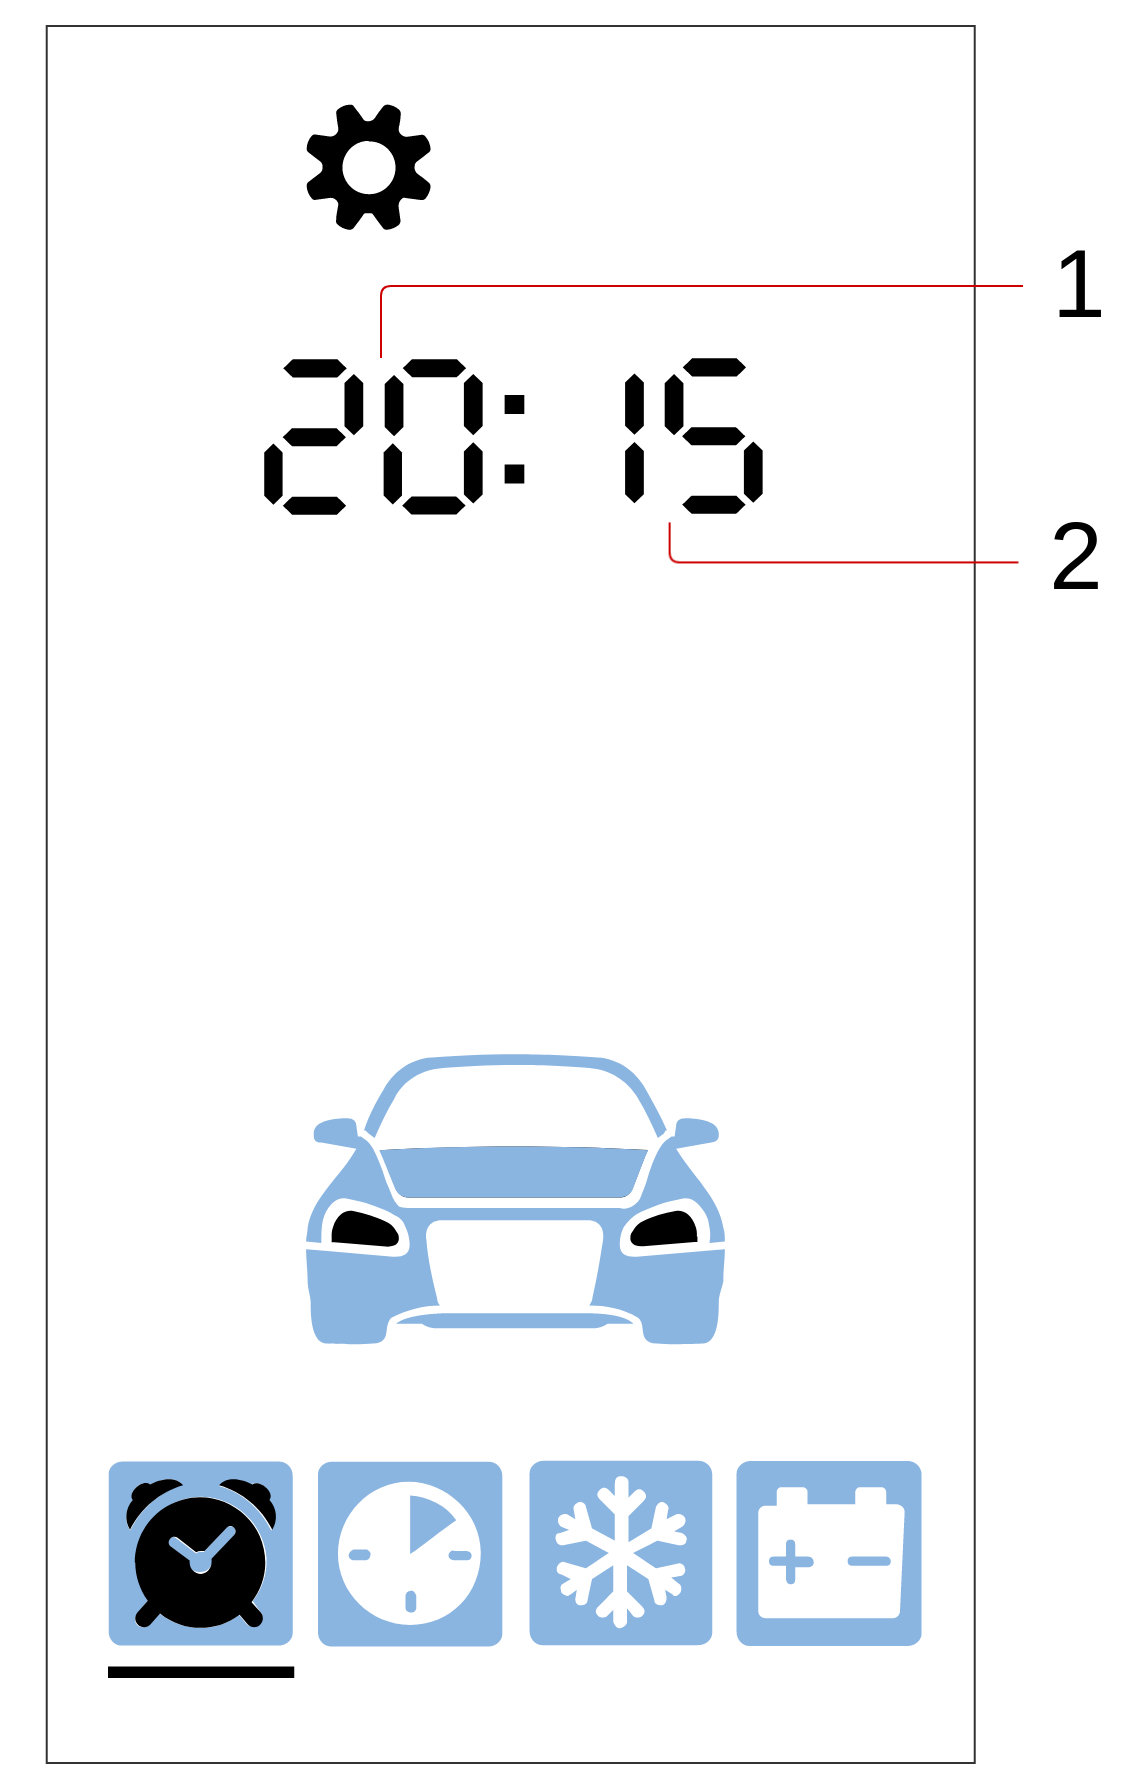](/uploads/images/gallery/2024-02/6B4image.png)[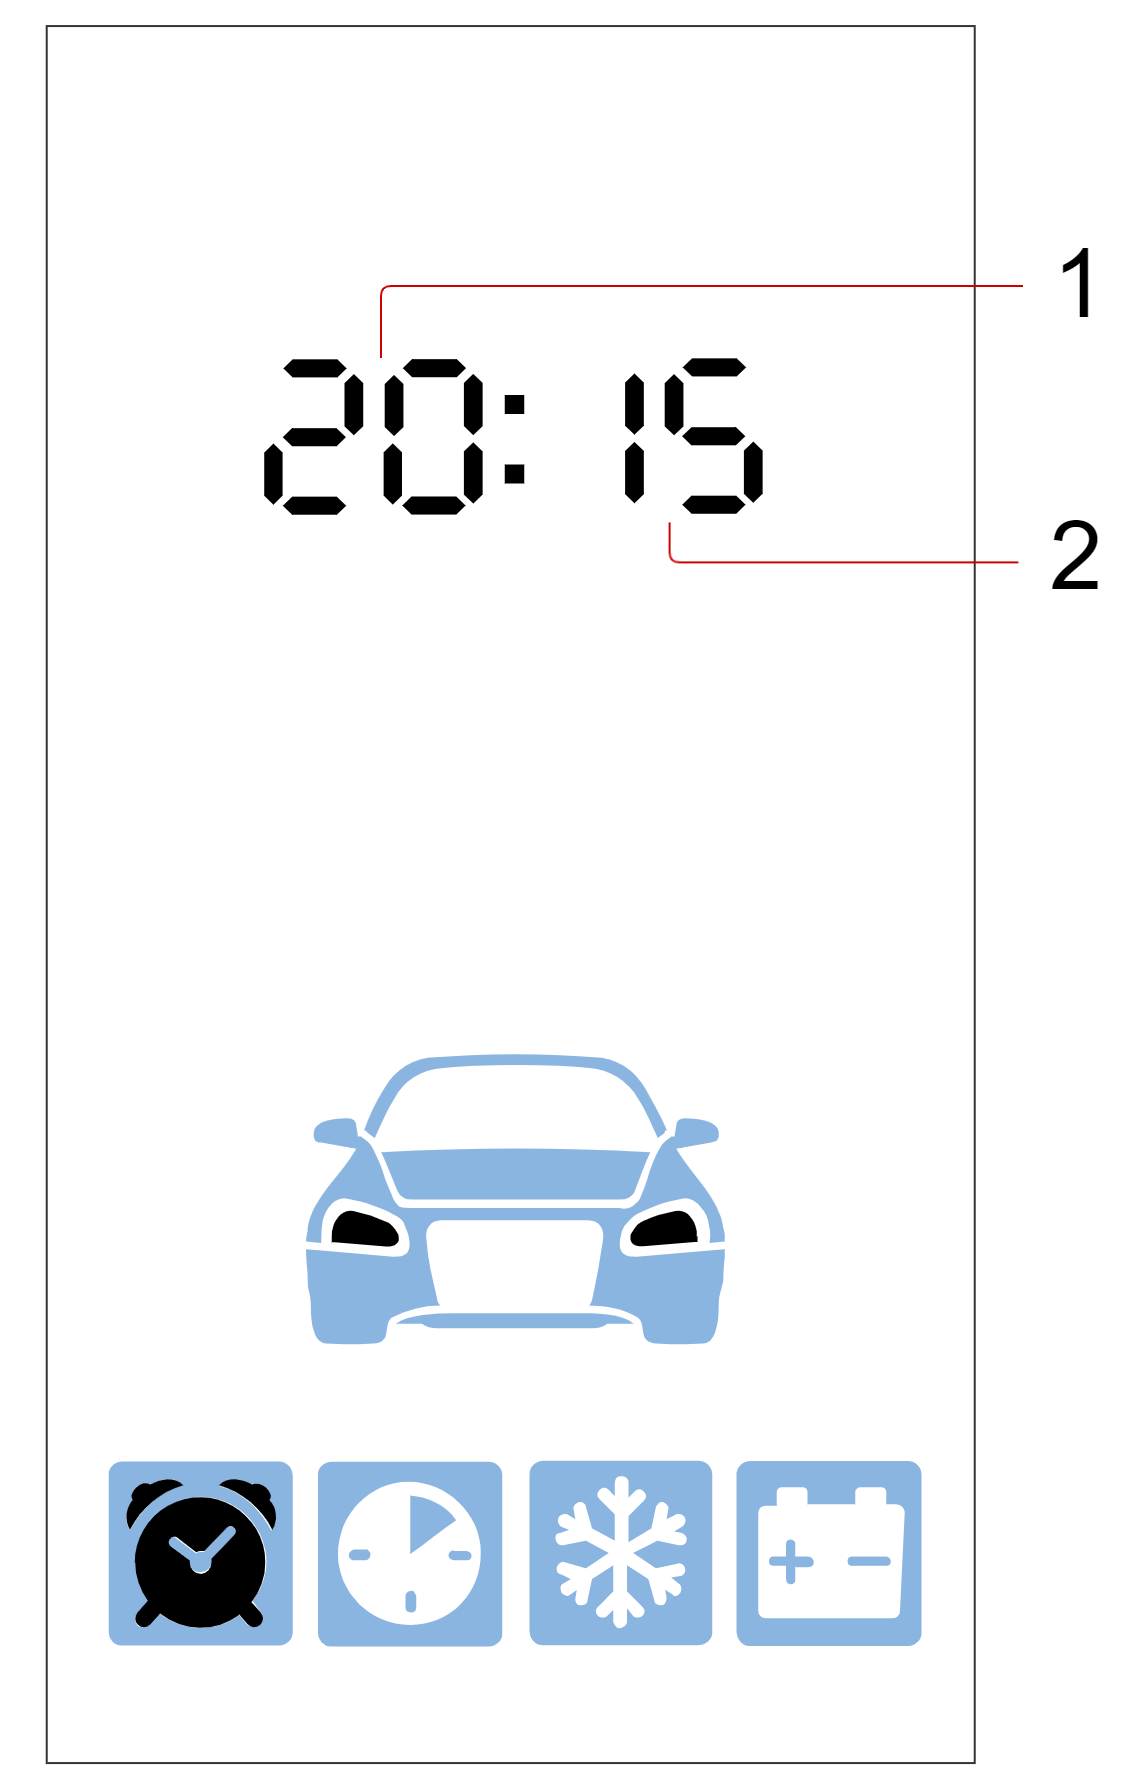](/uploads/images/gallery/2024-02/6Zgimage.png) - 1 — Hours; - 2 — Minutes. 3. Briefly press button  to proceed to set the current date. [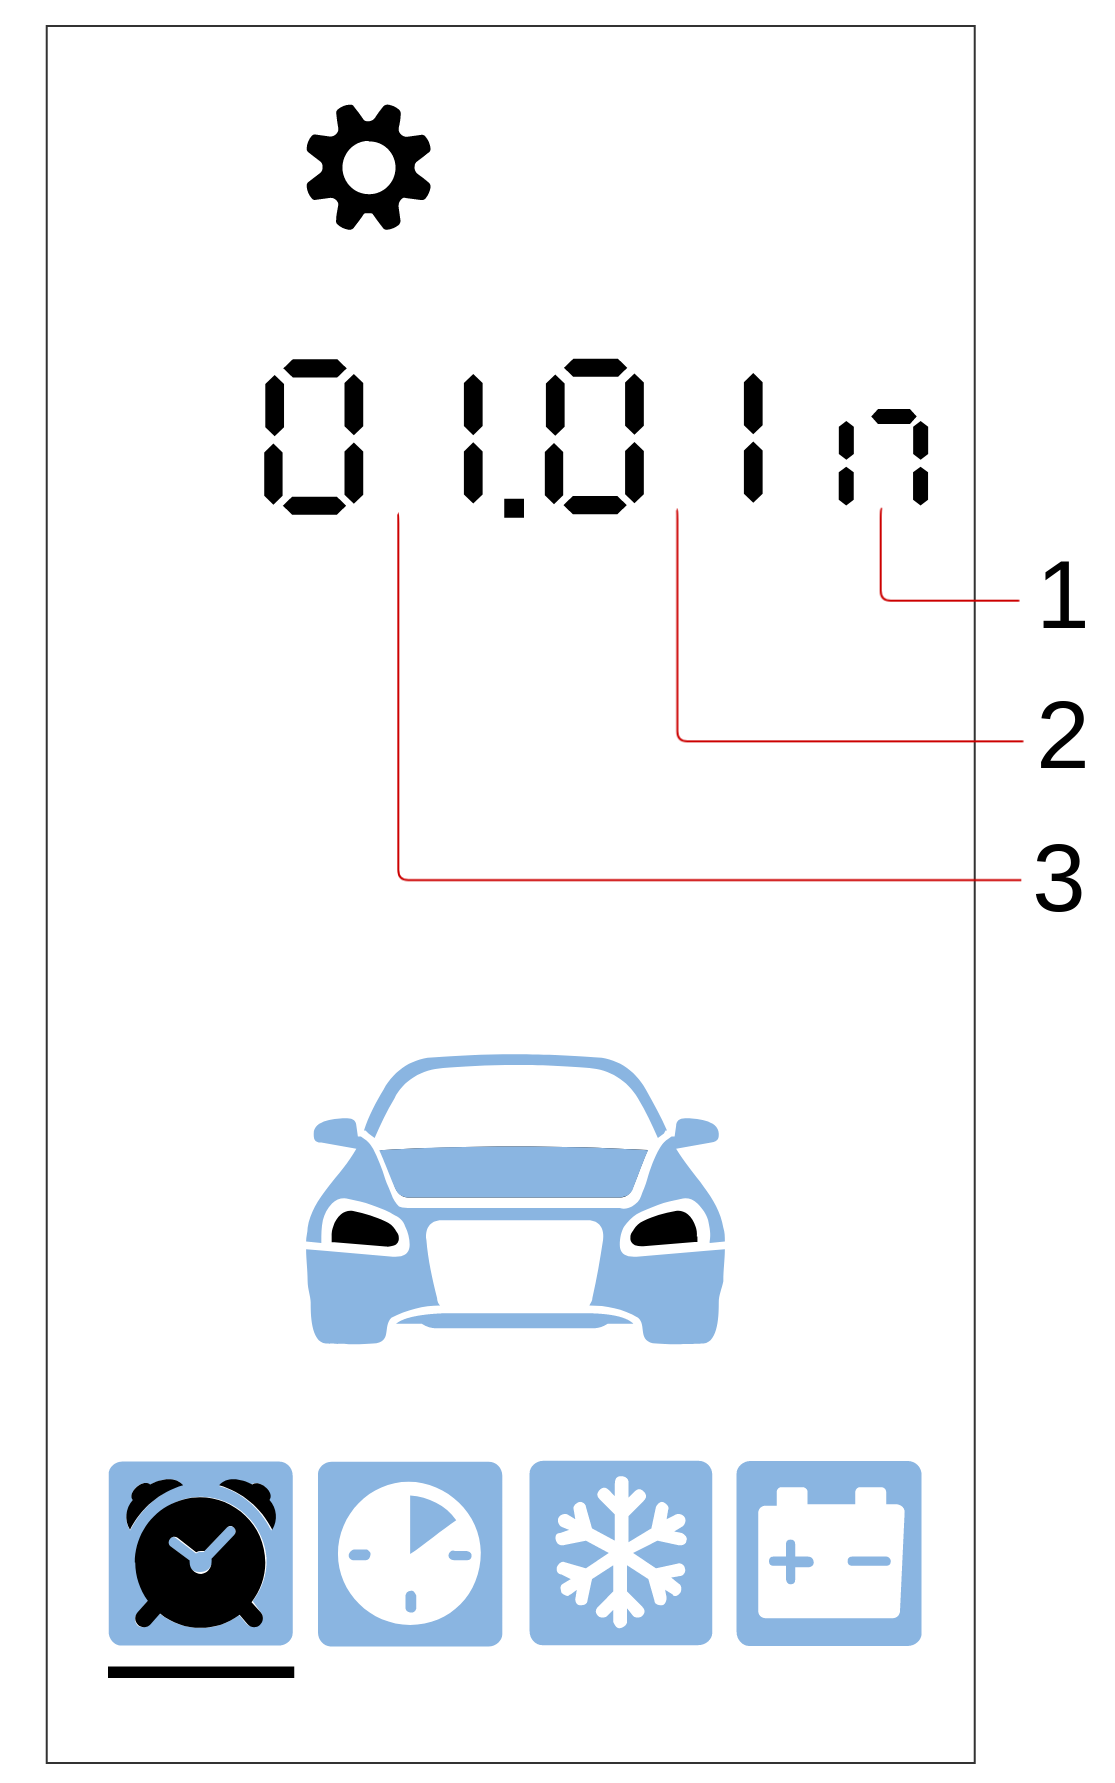](/uploads/images/gallery/2024-02/oawimage.png)[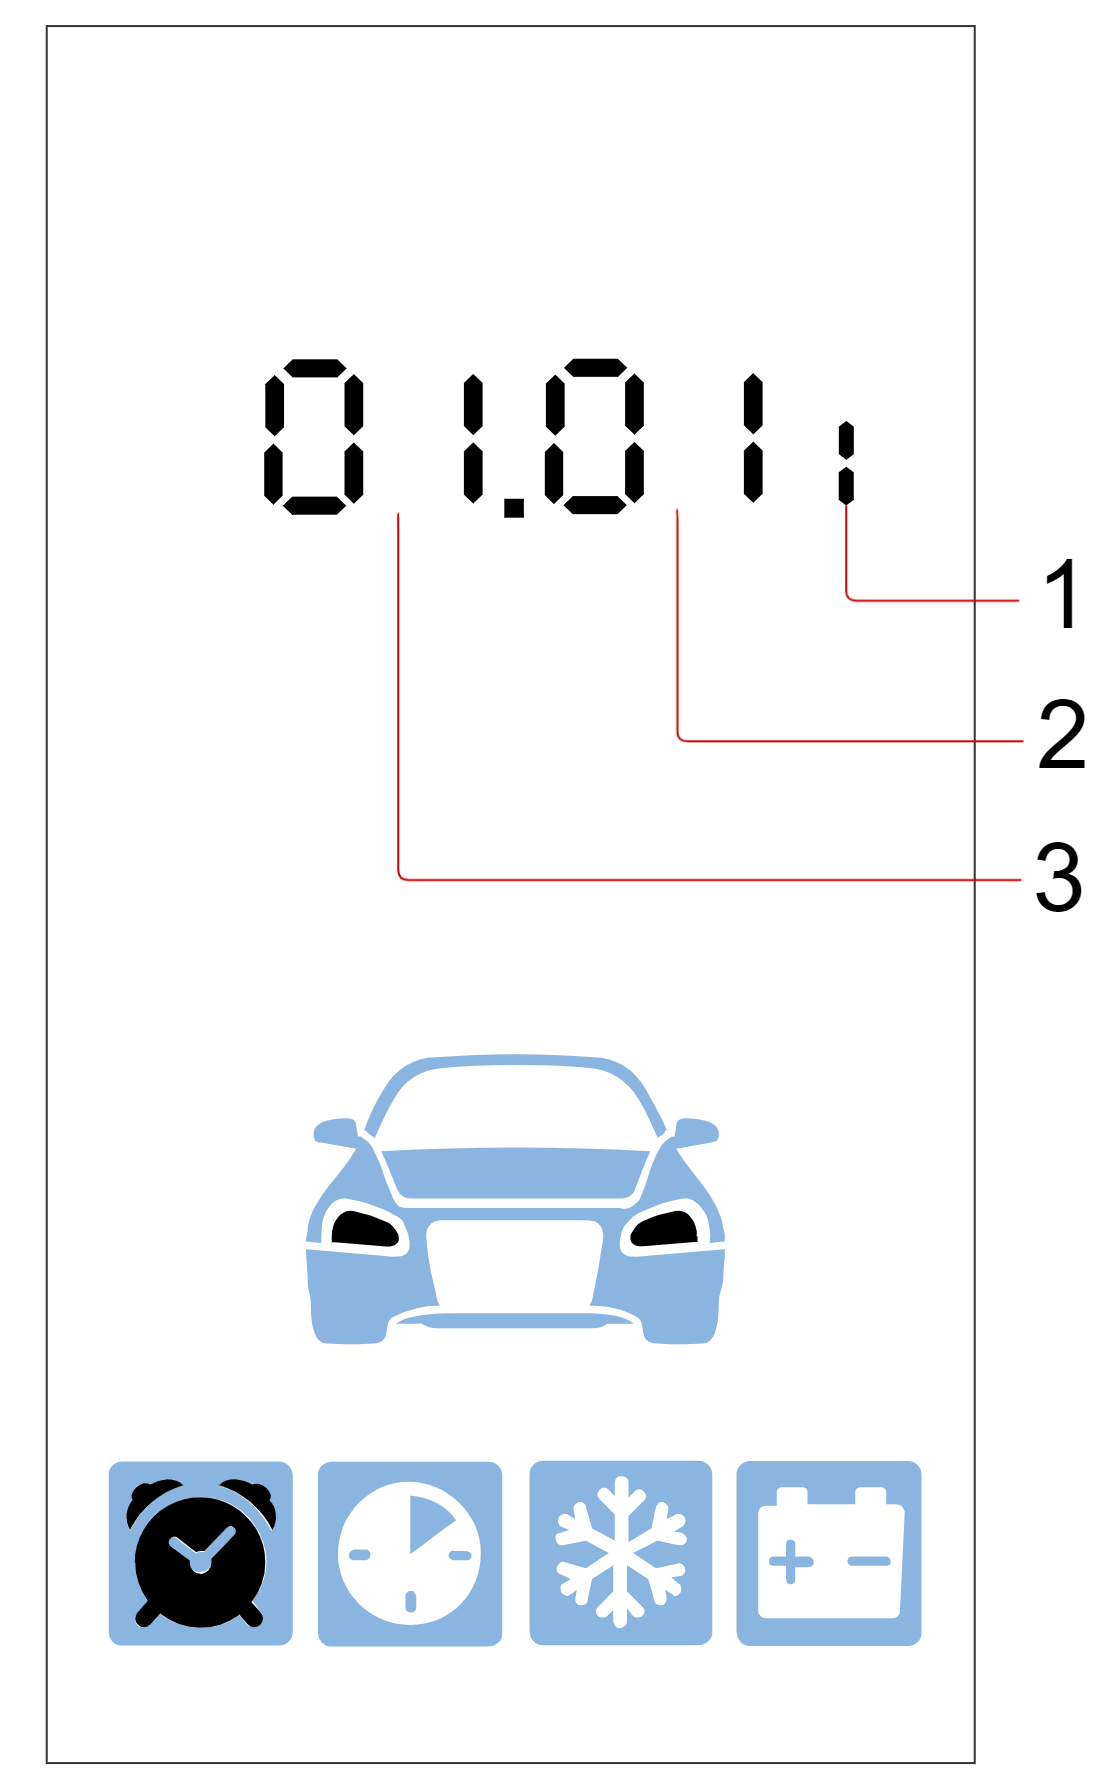](/uploads/images/gallery/2024-02/84timage.png) - 1 — Day; - 2 — Month; - 3 — Year. 4. Use a short press of button  to set the current day, a short press of button  to set the current month, and a short press of button  to set the current year. 5. To exit the menu, press buttons  simultaneously.